
1. Introduction
The TP-Link RE335 WLAN Repeater is designed to extend the coverage of your existing Wi-Fi network, eliminating Wi-Fi dead zones. It operates on both 2.4 GHz and 5 GHz bands, providing stable and high-speed wireless connectivity throughout your home or office. This manual provides detailed instructions for installing, configuring, and maintaining your RE335 repeater.
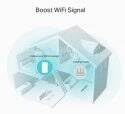
Figure 1: The RE335 extends your Wi-Fi signal, boosting coverage to areas previously unreachable by your router's signal.
2. Product Overview
The TP-Link RE335 is a compact, wall-plug Wi-Fi range extender. It features dual-band AC1200 speeds and supports TP-Link OneMesh technology for a unified home network.
2.1 Physical Features

Figure 2: Front view of the RE335, highlighting the power, 2.4 GHz, and 5 GHz LED indicators.

Figure 3: Side view of the RE335, showing the WPS/Reset button and Ethernet port.
LED Indicators:
- Power LED: Indicates the power status of the device.
- 2.4 GHz LED: Indicates the connection status to the 2.4 GHz Wi-Fi band.
- 5 GHz LED: Indicates the connection status to the 5 GHz Wi-Fi band.
Buttons:
- WPS/Reset Button: Press briefly to use WPS for quick setup. Press and hold for 5 seconds to reset the device to factory defaults.
Ports:
- Ethernet Port: Used to connect a wired device to your extended network.
2.2 Key Features
- Dual-Band Wi-Fi: Supports both 2.4 GHz (up to 300 Mbps) and 5 GHz (up to 867 Mbps) bands for a total of 1200 Mbps.
- OneMesh Compatible: Works with TP-Link OneMesh routers to create a unified mesh network for seamless roaming.
- Smart Signal Indicator: Helps you find the best location for optimal Wi-Fi coverage.
- Ethernet Port: Allows for wired connections to devices like smart TVs, PCs, or game consoles.

Figure 4: The RE335 provides faster dual-band speeds for various devices.

Figure 5: OneMesh technology creates a seamless Wi-Fi experience.
3. Setup
There are two primary methods to set up your TP-Link RE335 repeater: using the WPS button or via a web browser.
3.1 Placement for Optimal Performance
Plug the repeater into an electrical outlet midway between your router and the Wi-Fi dead zone. The Smart Signal Indicator LEDs will help you find the best location. A solid blue light indicates a good connection, while a red light suggests the repeater is too far from the router.
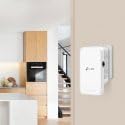
Figure 6: Proper placement of the RE335 for effective signal extension.
3.2 Method 1: Using the WPS Button (Recommended)
- Plug the RE335 into an electrical outlet near your router.
- Wait for the Power LED to turn solid.
- Press the WPS button on your router.
- Within two minutes, press the WPS/Reset button on your RE335.
- The 2.4 GHz and 5 GHz LEDs on the repeater should turn solid, indicating a successful connection.
- Relocate the RE335 to an optimal position (refer to 3.1).
3.3 Method 2: Using a Web Browser
- Plug the RE335 into an electrical outlet near your router.
- Wait for the Power LED to turn solid.
- Connect your computer or mobile device to the RE335's Wi-Fi network (e.g., 'TP-Link_Extender'). There will be no internet access at this stage.
- Open a web browser and type http://tplinkrepeater.net or http://192.168.0.254 in the address bar.
- Create a login password when prompted.
- Follow the on-screen instructions to select your host Wi-Fi network(s) and configure the extended network.
- Relocate the RE335 to an optimal position (refer to 3.1).
4. Operating the Repeater
Once set up, the RE335 will automatically extend your Wi-Fi network. You can connect your wireless devices to the extended network using the same Wi-Fi name (if OneMesh is enabled) or a new name you configured during setup.
4.1 LED Status
- Solid Blue: Good connection to the router.
- Solid Red: Poor connection to the router (too far or interference).
- Flashing: Connecting or WPS in progress.
- Off: No power or device is off.
4.2 OneMesh Functionality
If your main router supports TP-Link OneMesh, the RE335 can join the OneMesh network. This creates a single, unified Wi-Fi network name (SSID) throughout your home, allowing your devices to seamlessly switch to the strongest signal as you move around, without manual reconnection.
5. Maintenance
Regular maintenance ensures optimal performance and longevity of your RE335 repeater.
- Firmware Updates: Periodically check the TP-Link website for firmware updates. Updating the firmware can improve performance, add new features, and fix bugs. You can usually update via the web management interface.
- Cleaning: Gently wipe the device with a soft, dry cloth. Do not use liquid cleaners or aerosols. Ensure the ventilation holes are not obstructed.
- Ventilation: Ensure the repeater is plugged into an outlet with adequate airflow around it to prevent overheating.
- Reset: If the device becomes unresponsive or you wish to reconfigure it from scratch, perform a factory reset by pressing and holding the WPS/Reset button for 5 seconds.
6. Troubleshooting
If you encounter issues with your RE335, try the following solutions:
6.1 No Internet Access After Setup
- Check Router: Ensure your main router has an active internet connection.
- Repeater Placement: The repeater might be too far from the router. Relocate it closer until the signal indicator LEDs turn solid blue.
- Reconfigure: Try re-running the setup process, either via WPS or the web browser.
- IP Address Conflict: In rare cases, an IP address conflict might occur. Try restarting both the router and the repeater.
6.2 Slow Speeds or Frequent Disconnections
- Placement: Ensure the repeater is in an optimal location (solid blue signal indicator). Obstacles like thick walls or metal objects can degrade signal quality.
- Interference: Other electronic devices (microwaves, cordless phones) can cause interference. Try moving the repeater away from such devices.
- Channel Overlap: If many Wi-Fi networks are in your area, they might be using overlapping channels. Try changing the Wi-Fi channel on your main router.
- Firmware: Ensure your repeater has the latest firmware installed.
6.3 Cannot Access Web Management Page
- Connection: Ensure your device is connected to the repeater's Wi-Fi network (or via Ethernet).
- IP Address: Try http://tplinkrepeater.net or the repeater's IP address (check your router's DHCP client list).
- Browser Cache: Clear your browser's cache and cookies, or try a different browser.
- Reset: If all else fails, perform a factory reset and reconfigure.
7. Specifications
| Feature | Detail |
|---|---|
| Brand | TP-Link |
| Model Number | RE335(DE) |
| Color | White |
| Wireless Communication Standard | 802.11ac |
| Data Transfer Rate | 1167 Megabits per second (AC1200) |
| Frequency Band Class | Dual Band (2.4 GHz & 5 GHz) |
| Special Features | Dual Band |
| Compatible Devices | Most devices with 802.11ac wireless communication standard |
| Included Components | Standard Components (RE335 Repeater, Quick Installation Guide) |
| Item Weight | 1 Grams |
| Product Dimensions | 11P x 16l x 10H centimeters |
| Spare Parts Availability | 1 Year |
| Manufacturer | TP-Link |
8. Warranty and Support
8.1 Product Warranty
The TP-Link RE335 comes with a 1-year warranty for spare parts. Please retain your proof of purchase for warranty claims.
8.2 Technical Support
For further assistance, technical support, or to download the latest drivers and manuals, please visit the official TP-Link support website:
https://www.tp-link.com/support/
You may also find FAQs and troubleshooting guides specific to your model on the support page.


