
1. Introduction
This manual provides essential information for the safe and efficient operation of your Denon DCD-900NE CD Player. Please read these instructions thoroughly before using the unit and retain them for future reference. The Denon DCD-900NE is designed to deliver high-fidelity audio playback from various disc formats and USB sources, incorporating advanced processing technologies for an enhanced listening experience.
2. Important Safety Instructions
- Power Source: Connect the unit only to an AC outlet of the voltage specified on the rear panel.
- Ventilation: Ensure adequate ventilation. Do not block ventilation openings or place the unit on soft surfaces that may impede airflow.
- Water and Moisture: Do not expose the unit to rain or moisture. Do not place objects filled with liquids, such as vases, on the unit.
- Heat: Keep the unit away from heat sources such as radiators, heat registers, stoves, or other apparatus that produce heat.
- Cleaning: Unplug the unit from the wall outlet before cleaning. Use a dry cloth for cleaning.
- Servicing: Do not attempt to service the unit yourself. Refer all servicing to qualified service personnel.
3. Package Contents
Verify that all items listed below are included in the package:
- Denon DCD-900NE CD Player
- Quick Start Guide
- Remote Controller
- 2 external antennas (if applicable, though not typically for CD players, included in source data)
- Power cord
- 2 AAA batteries (for remote control)
4. Front Panel Features
The front panel provides access to essential controls and the disc tray.

Image: Front view of the Denon DCD-900NE CD Player, showcasing the disc tray, display, power button, USB port, and playback controls.
- Power Button: Turns the unit on or off.
- USB Port (5V/1A): For connecting USB storage devices to play audio files.
- Disc Tray: Insert CDs for playback.
- Display: Shows track information, time, and operational status.
- Playback Controls: Play/Pause, Stop, Skip Track (Forward/Backward).
- Source Button: Selects the input source (CD or USB).
5. Rear Panel Connections
The rear panel houses all necessary input and output terminals for connecting the DCD-900NE to your audio system.

Image: Rear panel of the Denon DCD-900NE, showing analog audio outputs, digital coaxial and optical outputs, IR control ports, and the AC power inlet.
- AUDIO OUT (Analog): RCA stereo outputs for connecting to an amplifier or receiver.
- DIGITAL AUDIO OUT (Coaxial/Optical): Digital outputs for connecting to a DAC or amplifier with digital inputs.
- IR CONTROL IN/OUT: Ports for connecting to other Denon components for integrated control.
- AC IN: Power cord connection.
6. Remote Control
The included remote control allows convenient operation of all functions from a distance.

Image: The Denon DCD-900NE CD Player positioned next to its remote control, highlighting the comprehensive control options available.
The remote control features buttons for power, source selection, disc tray open/close, playback controls (play, pause, stop, skip), track selection, and other advanced settings. Insert the two AAA batteries as indicated in the battery compartment.
7. Setup Guide
7.1 Initial Placement
Place the DCD-900NE on a stable, level surface. Ensure there is adequate space around the unit for proper ventilation. Avoid placing it directly on top of other heat-generating components.
7.2 Connecting to an Amplifier/Receiver
Choose one of the following connection methods:
- Analog Connection (Recommended for optimal audio quality): Connect the AUDIO OUT (L/R) RCA jacks on the DCD-900NE to the corresponding analog input jacks (e.g., 'CD' or 'AUX') on your amplifier/receiver using RCA audio cables.
- Digital Connection: Connect either the DIGITAL AUDIO OUT (COAXIAL) or DIGITAL AUDIO OUT (OPTICAL) terminal on the DCD-900NE to a digital input on your amplifier/receiver using a coaxial digital cable or an optical digital cable, respectively.
7.3 Power Connection
Connect the supplied power cord to the AC IN terminal on the rear panel of the DCD-900NE, then plug the other end into a wall outlet.
8. Basic Operation
8.1 CD Playback
- Press the Power button to turn on the unit.
- Press the Open/Close button (usually an upward-pointing triangle) to open the disc tray.
- Place a CD gently into the disc tray with the label side facing up.
- Press the Open/Close button again to close the tray. The unit will read the disc.
- Press the Play/Pause button to start playback.
- Use the Skip Track buttons to navigate between tracks.
- Press the Stop button to halt playback.
8.2 USB Playback
- Insert a USB storage device (e.g., USB flash drive) into the USB port on the front panel.
- Press the Source button to select 'USB' as the input.
- Use the navigation buttons on the remote or front panel to browse and select audio files.
- Press the Play/Pause button to start playback of the selected file.
8.3 Pure Direct Mode
Pure Direct Mode bypasses certain processing circuits and the display to deliver the purest possible audio signal. To activate/deactivate:
- Press the 'PURE DIRECT' button on the remote control or front panel. The display will turn off or dim, indicating the mode is active.
- Press the button again to exit Pure Direct Mode.
9. Advanced Features
9.1 Advanced AL32 Processing Plus
The DCD-900NE incorporates Denon's proprietary Advanced AL32 Processing Plus technology. This feature utilizes data interpolation algorithms, up-sampling, and bit-extension to accurately reproduce sound closest to the original recording, ensuring highly detailed and richly expressive audio playback.
9.2 Vibration-Resistant Design
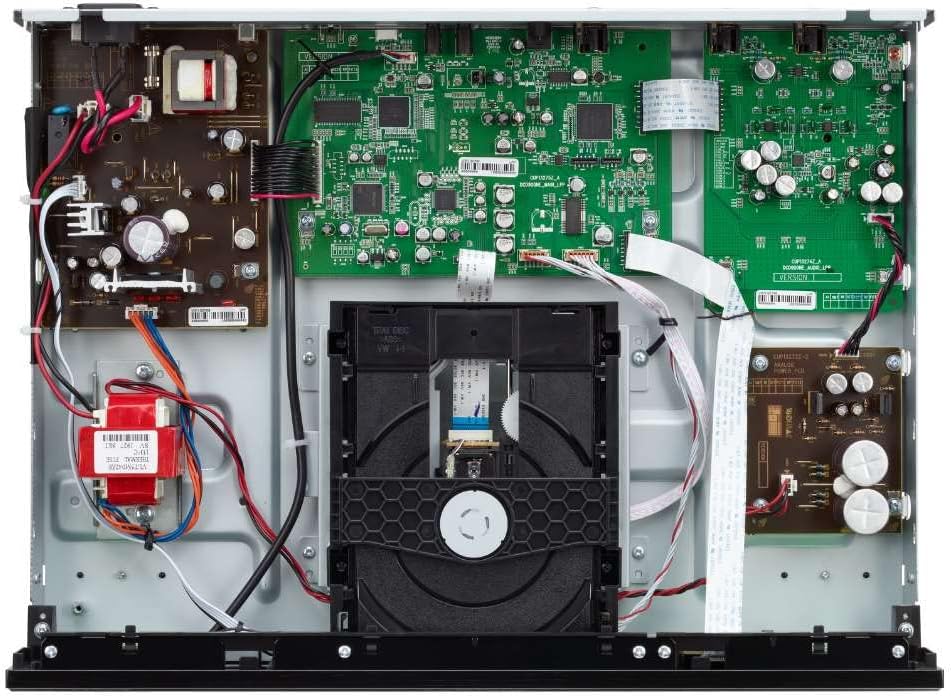
Image: Internal view of the Denon DCD-900NE, showing the organized layout of components, including the disc drive and circuit boards, designed for vibration resistance.
The unit features a vibration-resistant design, including Direct Mechanical Ground Construction. Power transformers are strategically placed next to insulators, and physical separation is maintained between audio and digital boards. This design minimizes adverse effects from internal and external vibrations, contributing to pristine, interference-free sound.
10. Maintenance
10.1 Cleaning the Unit
Wipe the unit's exterior with a soft, dry cloth. Do not use abrasive cleaners, waxes, or solvents. For stubborn stains, lightly dampen a cloth with a mild detergent solution and wipe, then immediately dry with a clean, dry cloth.
10.2 Cleaning Discs
Wipe discs from the center outwards using a soft, lint-free cloth. Do not use solvents or abrasive cleaners, as these can damage the disc surface.
11. Troubleshooting
If you experience issues with your DCD-900NE, refer to the following common problems and solutions:
| Problem | Possible Cause | Solution |
|---|---|---|
| No power | Power cord not connected; power outage. | Ensure power cord is securely connected. Check wall outlet. |
| No sound | Incorrect input selected on amplifier; audio cables not connected. | Select correct input on amplifier. Check audio cable connections. |
| Disc not playing / 'Can't Read Disc' error | Disc is dirty or scratched; disc inserted incorrectly; unsupported disc format. | Clean the disc. Reinsert the disc correctly. Ensure disc format is supported (CD, CD-R/RW, MP3, WAV/FLAC, WMA & DSD files). |
| Remote control not working | Batteries are dead or inserted incorrectly; obstruction between remote and unit. | Replace batteries. Check battery polarity. Remove any obstructions. |
12. Specifications
| Feature | Detail |
|---|---|
| Product Dimensions | 17.1 x 12.9 x 4.2 inches |
| Item Weight | 10.78 pounds |
| Manufacturer | Denon |
| Item Model Number | DCD900NE |
| Batteries | 2 AAA batteries required (included) |
| Connectivity Technology | USB |
| Number Of Discs | 1 |
| Supported Disc Formats | CD, CD-R/RW, MP3, WAV/FLAC, WMA & DSD files |
| Audio Processing | Advanced AL32 Processing Plus |
13. Warranty and Support
Denon products are designed and manufactured to the highest quality standards. For detailed warranty information, please refer to the warranty card included in your package or visit the official Denon website. For technical support, product registration, or service inquiries, please contact Denon customer support through their official channels.
Keep your proof of purchase for warranty claims.


