1. Introduction
The KERUI Wireless Doorbell offers a convenient and reliable solution for your home or office. This kit features a long wireless range, multiple chime options, adjustable volume levels, and a durable, weather-resistant design. It is designed for easy installation and provides a clear indication of visitors with both audible alerts and LED flashing indicators.

Image: The KERUI Wireless Doorbell system, showing the receiver unit with volume and melody buttons, and the compact push button transmitter.
2. Setup and Installation
Setting up your KERUI Wireless Doorbell is a straightforward process that requires no special tools.
2.1 Package Contents
- 1 x Wireless Doorbell Receiver
- 1 x Wireless Doorbell Push Button Transmitter
- Mounting Screws and Anchors
- Double-sided Adhesive Tape
- User Manual (this document)
2.2 Receiver Installation
The receiver is designed for indoor use and simply plugs into any standard wall socket.
- Choose a convenient indoor electrical outlet within range of your desired push button location.
- Plug the KERUI Wireless Doorbell Receiver directly into the wall socket.
- Ensure the receiver is securely plugged in and the LED indicator lights up, signifying it is powered on.

Image: The doorbell receiver plugged into a wall outlet, illustrating its "Plug and Play" setup and highlighting features like 5 volume levels, LED flash, 60 melodies, 1000ft range, and memory function.
2.3 Push Button Transmitter Installation
The push button transmitter can be mounted using either screws or double-sided adhesive tape.

Image: Visual guide demonstrating the simple "Easy to Install" process for the doorbell, showing the receiver plugged in and the push button being attached with double-sided tape.
Using Double-sided Adhesive Tape (Recommended for smooth surfaces):
- Clean the desired mounting surface thoroughly to ensure it is free of dust and grease.
- Peel off one side of the protective film from the double-sided adhesive tape.
- Firmly press the tape onto the back of the push button transmitter.
- Peel off the remaining protective film from the tape.
- Press the push button firmly onto the cleaned surface for at least 30 seconds.
Using Screws (Recommended for uneven surfaces or added security):
- Open the back cover of the push button transmitter.
- Mark the desired drilling points on the wall using the screw holes on the back cover as a guide.
- Drill pilot holes (if necessary) and insert wall anchors.
- Secure the back cover to the wall using the provided screws.
- Snap the front part of the push button transmitter onto the secured back cover.

Image: A detailed illustration of the two installation methods for the push button: mounting with screws and mounting with double-sided adhesive, highlighting the ease of setup.
Note: Ensure the push button is installed in a location where it is easily accessible to visitors and within the wireless range of the receiver.
3. Operation
Your KERUI Wireless Doorbell is designed for intuitive operation.
3.1 Adjusting Volume Levels
The receiver offers 5 adjustable volume levels, including a mute mode, to suit various environments and preferences.
- Locate the Volume Button (speaker icon) on the front of the receiver.
- Press the Volume Button repeatedly to cycle through the 5 volume levels (0dB, 50dB, 70dB, 90dB, 110dB).
- Select the desired volume level. The LED indicator will flash with each press.

Image: The doorbell receiver and push button, illustrating the 5 adjustable volume levels suitable for different environments like sleeping, working, or parties.
3.2 Changing Melodies
Choose from 60 unique chimes to personalize your doorbell sound.
- Locate the Melody Selection Buttons (music note icons, + and -) on the front of the receiver.
- Press the "+" button to go to the next melody or the "-" button to go to the previous melody.
- The receiver will play a preview of each melody as you cycle through them.
- Stop pressing when you hear your preferred melody.

Image: The doorbell receiver displaying its 60 different melodies feature, with musical notes flowing from the device, and an outdoor scene showing the push button installed near a garage door.
3.3 Memory Function
The doorbell features a smart memory function. It will remember your last selected melody and volume level even after a power outage, so you don't need to reconfigure settings.
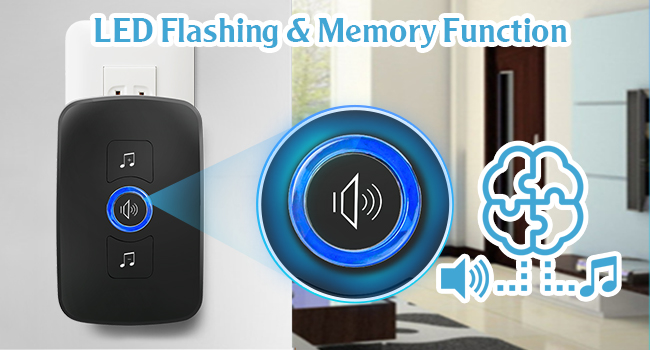
Image: The doorbell receiver highlighting its LED flashing indicator and smart memory function, which retains the last chosen melody and volume settings.
3.4 Wireless Range
The KERUI Wireless Doorbell boasts a transmission distance of up to 1000 feet (300 meters) in open space, ensuring you won't miss any visitors regardless of where you are in your home, apartment, office, or classroom.

Image: An illustration demonstrating the 1000ft long transmission range of the doorbell, showing the signal reaching various rooms within a multi-story house from the front door.
4. Maintenance
Proper maintenance will ensure the longevity and optimal performance of your KERUI Wireless Doorbell.
4.1 Cleaning
The doorbell push button is IP55 waterproof and dustproof, making it easy to clean.
- Wipe the surfaces of both the receiver and the push button with a soft, damp cloth.
- Avoid using abrasive cleaners or solvents, as these can damage the finish.
- Ensure the push button is dry after cleaning, especially around the button mechanism.

Image: The doorbell push button shown with water droplets, emphasizing its IP55 outstanding dustproof and waterproof function against a backdrop of a modern house and garden.
4.2 Battery Replacement (Push Button Transmitter)
The push button transmitter is powered by a CR2032 lithium battery. When the doorbell's range decreases or the button becomes unresponsive, it may be time to replace the battery.
- Carefully open the back cover of the push button transmitter. This may require a small screwdriver or prying tool.
- Remove the old CR2032 battery.
- Insert a new CR2032 3V lithium battery, ensuring the positive (+) side faces upwards.
- Securely close the back cover.
- Test the doorbell to ensure it is functioning correctly.

Image: An illustration showing the internal compartment of the push button transmitter and the CR2032 lithium battery, indicating its long battery life.
5. Troubleshooting
If you encounter any issues with your KERUI Wireless Doorbell, please refer to the following common problems and solutions:
| Problem | Possible Cause | Solution |
|---|---|---|
| Doorbell does not ring. |
|
|
| Short wireless range. |
|
|
| Doorbell rings randomly. |
|
|
If you experience issues not covered here or if the suggested solutions do not resolve the problem, please contact KERUI customer support for assistance.
6. Specifications
| Feature | Detail |
|---|---|
| Brand | KERUI |
| Model Number | Wireless Doorbell |
| Wireless Range | Up to 1000ft (300m) in open space |
| Chimes | 60 unique melodies |
| Volume Levels | 5 adjustable levels (0dB - 110dB) |
| Waterproof Rating | IP55 (for push button transmitter) |
| Power Source (Receiver) | AC Plug-in |
| Battery (Push Button) | 1 x CR2032 Lithium Battery (included) |
| Product Dimensions | Receiver: Approx. 3.94 x 3.15 x 3.15 inches |
| Item Weight | Approx. 5.3 ounces |
7. Warranty and Support
7.1 Warranty Information
KERUI products are manufactured to high quality standards. This product is covered by a standard manufacturer's warranty against defects in materials and workmanship. Please refer to the product packaging or the official KERUI website for specific warranty terms and duration.
7.2 Customer Support
For technical assistance, troubleshooting, or warranty claims, please contact KERUI customer support. You can typically find contact information on the product packaging, the official KERUI website, or through your point of purchase.
When contacting support, please have your product model number (Wireless Doorbell) and purchase details ready to expedite the process.


