
1. Introduction
This manual provides essential information for the safe and correct installation, operation, and maintenance of your Dieffematic PROTECO MEKO 5 Standard Sliding Gate Automation Kit. Please read this manual thoroughly before beginning any installation or operation procedures. Proper installation and adherence to safety guidelines are crucial for the longevity and safe functioning of the system.
The PROTECO MEKO 5 kit is designed to automate sliding gates, offering convenience and enhanced security for residential and light commercial applications. It is imperative that installation is performed by qualified personnel in compliance with local regulations and safety standards.
2. Safety Information
WARNING: Failure to follow these safety instructions could result in serious injury or death, and damage to property.
- Installation must be carried out by qualified and experienced technicians.
- Ensure the power supply is disconnected before performing any installation, maintenance, or repair work.
- The gate must be in good mechanical condition and slide freely without excessive friction.
- Do not allow children to play with or near the gate automation system. Keep remote controls out of reach of children.
- Regularly inspect the system for signs of wear, damage, or misalignment.
- Do not attempt to repair the motor or control unit yourself. Contact qualified service personnel.
- Ensure all safety devices (photocells, safety edges) are correctly installed and functioning.
3. Package Contents
The PROTECO MEKO 5 Standard Sliding Gate Automation Kit typically includes the following components. Please verify all items are present and undamaged upon receipt.
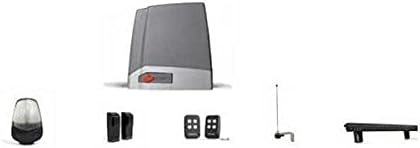
Image 1: Overview of the PROTECO MEKO 5 kit components. From left to right: a flashing safety beacon, a pair of photocells, the main sliding gate motor unit, two remote controls, an antenna, and a section of gear rack.
- Sliding Gate Motor Unit: The primary operator for moving the gate.
- Flashing Safety Beacon: Provides visual warning during gate operation.
- Photocells (Safety Sensors): Detect obstacles in the gate's path to prevent closure.
- Remote Controls: Two units for wireless operation of the gate.
- Antenna: Improves the range and reliability of remote control signals.
- Gear Rack: Sections of rack to be mounted on the gate, engaging with the motor's pinion gear.
- Mounting Hardware: Bolts, screws, and brackets for installation.
- Control Board: Integrated within the motor unit, manages all functions.
4. Setup and Installation
Installation of the PROTECO MEKO 5 kit requires electrical and mechanical expertise. It is strongly recommended that installation be performed by a certified professional.
4.1 Pre-Installation Checks
- Ensure the gate is structurally sound, moves freely, and is properly balanced.
- Verify the availability of a suitable power supply (e.g., 230V AC) at the installation site.
- Plan the exact mounting location for the motor unit, ensuring adequate clearance.
4.2 Mounting the Motor Unit
- Prepare a stable concrete base for the motor unit, ensuring it is level and secure.
- Securely fasten the motor unit to the concrete base using the provided mounting hardware.
4.3 Installing the Gear Rack
- Attach the gear rack sections to the bottom edge of the sliding gate, ensuring they are perfectly aligned and level.
- Maintain a small clearance (approx. 1-2 mm) between the rack and the motor's pinion gear to allow for gate movement and thermal expansion.
4.4 Electrical Connections
- WARNING: All electrical connections must be made with the main power supply disconnected.
- Connect the main power supply to the control board terminals as indicated in the detailed wiring diagram (refer to the full technical manual).
- Wire the photocells, flashing beacon, and antenna to the designated terminals on the control board.
- Ensure all wiring is properly insulated and protected from environmental elements.
4.5 Programming and Testing
- Refer to the detailed programming instructions in the full technical manual for setting up limits, operating modes, and remote controls.
- Perform thorough testing of the gate's opening and closing cycles, ensuring all safety devices function correctly.
- Adjust force settings and obstacle detection sensitivity as required.
5. Operating Instructions
5.1 Using the Remote Control
- Press the assigned button on your remote control once to open the gate.
- Press the same button again while the gate is moving to stop it.
- Press the button a third time to reverse the gate's direction (if stopped mid-cycle) or close it (if fully open).
5.2 Manual Release
In case of power failure or system malfunction, the gate can be operated manually.
- Locate the manual release mechanism on the motor unit (usually covered by a cap or panel).
- Insert the provided key into the lock and turn it to disengage the motor.
- The gate can now be pushed open or closed by hand.
- To re-engage the motor, reverse the manual release procedure. Ensure the gate is fully closed before re-engaging to prevent damage.
6. Maintenance
Regular maintenance ensures the safe and reliable operation of your gate automation system.
6.1 Monthly Checks
- Gate Movement: Manually operate the gate to ensure it moves smoothly without obstruction or excessive noise.
- Safety Devices: Test photocells by placing an object in their path during gate closure. The gate should stop or reverse.
- Visual Inspection: Check for loose bolts, worn cables, or signs of damage to the motor unit, rack, and accessories.
6.2 Annual Professional Service
It is recommended to have the system inspected and serviced by a qualified technician at least once a year. This includes checking electrical connections, motor performance, lubrication, and overall system calibration.
7. Troubleshooting
Before contacting technical support, review the following common issues and their potential solutions.
| Problem | Possible Cause | Solution |
|---|---|---|
| Gate does not respond to remote control. | Dead remote battery, remote out of range, power failure, remote not programmed. | Replace remote battery. Move closer to the gate. Check main power supply. Reprogram remote control (refer to manual). |
| Gate opens but does not close. | Photocells obstructed or misaligned, safety edge activated. | Clear any obstructions from photocell path. Clean photocell lenses. Realign photocells. Check safety edge connections. |
| Gate stops mid-cycle. | Obstruction detected, motor overheating, limit switch issue. | Remove obstruction. Allow motor to cool down. Check limit switch settings (refer to manual). |
| Flashing beacon does not light up. | Bulb faulty, wiring issue. | Check bulb. Verify wiring connections to the control board. |
If the problem persists after attempting these solutions, please contact a qualified technician or Dieffematic customer support.
8. Specifications
The following are general specifications for the PROTECO MEKO 5 Sliding Gate Automation Kit. For detailed technical specifications, please refer to the complete technical manual provided with the product.
- Model: KMK054P0Y01410
- Brand: Dieffematic
- Power Supply: 230V AC, 50/60Hz (typical for gate operators)
- Motor Type: Electromechanical
- Max Gate Weight: (Refer to full technical manual for specific capacity, typically up to 500-800 kg)
- Operating Temperature: (Refer to full technical manual)
- Protection Rating: IP44 (typical for outdoor use)
- Safety Features: Obstacle detection, auto-reverse, photocell input.
9. Warranty and Support
Dieffematic products are covered by a manufacturer's warranty against defects in materials and workmanship. The specific terms and duration of the warranty are detailed in the warranty card included with your product or available on the official Dieffematic website.
For technical support, spare parts, or warranty claims, please contact your authorized Dieffematic dealer or visit the official Dieffematic website for contact information. When contacting support, please have your product model (KMK054P0Y01410) and purchase date readily available.