1. Safety Instructions
- Always disconnect power before performing any maintenance or installation.
- Ensure hands are dry when handling the power adapter and plug.
- Do not immerse the controller in water. It is not waterproof.
- Ensure the light is securely mounted to prevent accidental falls into the aquarium.
- Keep out of reach of children.
- For indoor use only.
2. Package Contents
- hygger 26W LED Light Fixture
- Adjustable Clip-On Brackets (2 pieces)
- In-line Controller with Power Adapter
- Instruction Manual
3. Setup and Installation
The hygger Clip-On Full Spectrum Aquarium LED Light is designed for easy installation on various tank types. Follow these steps for proper setup:
- Attach Brackets to Light Fixture: The light fixture features a groove on its underside. Slide the two clip-on brackets into this groove. The brackets are adjustable, allowing you to position them as needed along the length of the light.
- Adjust Bracket Position: The brackets can be adjusted to extend the light further or closer to the tank. Loosen the screws on the brackets, slide them to your desired position, and then tighten the screws to secure.
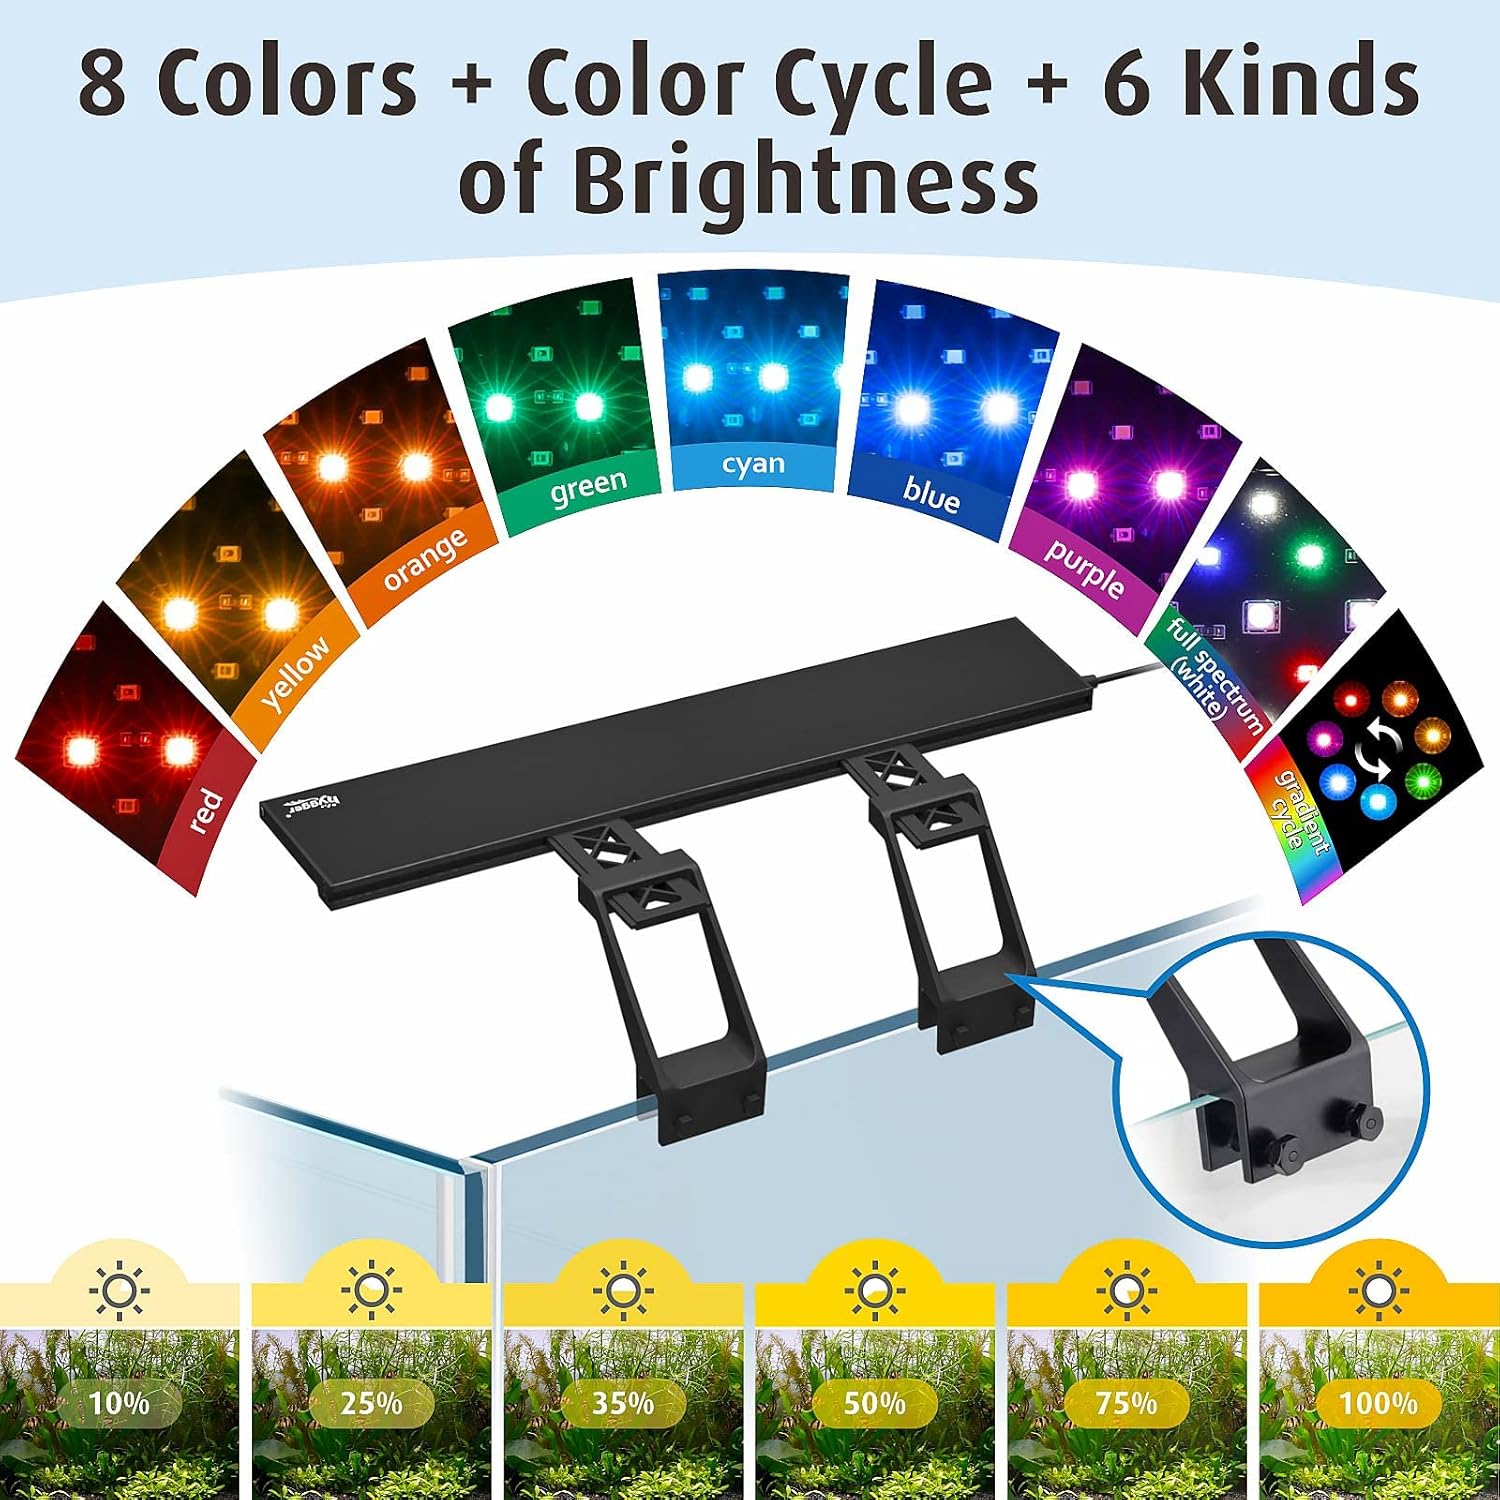
- Mount Light to Aquarium: Place the assembled light fixture onto the rim of your aquarium. The clip-on brackets are designed to fit tank glass less than 0.74 inches (approximately 1.9 cm) thick. Tighten the plastic screws on the brackets to firmly secure the light to the tank rim.
- Connect Power: Connect the in-line controller to the light fixture, and then plug the power adapter into a standard electrical outlet.


Installation Video
Video 3.1: This video demonstrates the unboxing, assembly, and various lighting modes and timer functions of the hygger Clip On Full Spectrum Aquarium LED Light. It shows how to connect the light fixture, clip-on bracket, and light neck, and how to adjust the light's position on the aquarium. The video also highlights the different color options and brightness levels available through the controller, as well as the 24/7 timer feature for simulating sunrise and sunset.
4. Operating Instructions
The hygger LED light offers multiple operating modes and customizable settings via its in-line controller.

4.1. Operating Modes
The light features four distinct operating modes:
- Daylight Only Mode: Set the duration for daylight lighting (6H/10H/12H). This mode simulates sunrise and sunset with a gradient orange to full spectrum white light transition.
- Moonlight Only Mode: Set the duration (3H/5H/12H) and choose from 6 brightness levels (10%-100%) and 7 colors (red, orange, yellow, green, cyan, blue, purple).
- Daylight + Moonlight Mode: Combines both daylight and moonlight cycles for a complete 24-hour simulation.
- Manual Mode: Allows direct selection of 9 colors and 6 brightness levels without a set timer.
4.2. Timer Settings
Use the dedicated timer buttons on the controller to set the desired lighting duration.
- Press the DAY-L timer button to select daylight lighting times: 6 hours, 10 hours, or 12 hours.
- Press the MOON-L timer button to select moonlight lighting times: 3 hours, 5 hours, or 12 hours.


4.3. Brightness and Color Adjustment
In Manual Mode or Moonlight Only Mode, you can adjust brightness and select colors:
- Press the ON/M button to cycle through 9 available colors (red, orange, yellow, green, cyan, blue, purple, gradient cycle, and full spectrum).
- Use the Up/Down arrows to select from 6 brightness levels: 10%, 25%, 35%, 50%, 75%, and 100%.
5. Maintenance
The hygger LED light is designed for easy maintenance and long-term use.
- Cleaning: Regularly wipe the light fixture with a soft, dry cloth to remove dust and water spots. Ensure the light is unplugged before cleaning.
- Adapter Replacement: The separable adapter allows for easy replacement if damaged, preventing the need to replace the entire light fixture.
- LED Lifespan: The high-quality 2835 + 5050 model lamp beads have a long service life of at least 50,000 hours.
6. Troubleshooting
If you encounter issues with your hygger LED light, refer to the following common solutions:
- Light Not Turning On:
- Check if the power adapter is securely plugged into both the light and the electrical outlet.
- Ensure the power outlet is functional by testing it with another device.
- Verify that the in-line controller is properly connected and not damaged.
- Timer Malfunction:
- Ensure the timer is set correctly according to the operating instructions.
- If the light flashes or beeps unexpectedly, try unplugging and replugging the unit to reset the timer.
- Inconsistent Brightness/Color:
- Ensure the light is not in a timed mode that automatically adjusts brightness or color. Switch to Manual Mode to test direct control.
- Check for any loose connections in the power cord or controller.
- Mounting Issues:
- Ensure your tank rim thickness is less than 0.74 inches for proper fit of the clip-on brackets.
- Tighten all screws on the brackets firmly to prevent slipping.
7. Specifications
| Feature | Detail |
|---|---|
| Power | 26W |
| LED Quantity | 180 PCS (White: 110, Blue: 18, Red: 10, Green: 6, RGB: 36) |
| CRI (Color Rendering Index) | 84.3 |
| Application (Tank Length) | 31 inches ~ 37 inches |
| Power Cord Length | 4.9 ft + 2.3 ft |
| Input Voltage | AC100-240V |
| Output Voltage | DC20V |
| Kelvin (Color Temperature) | White 6500K, Blue 455nm, Red 620nm, Green 560nm |
| Lumens | 3579 lm |
| Material | Aluminum |
| Mounting Type | Clip (for tank thickness less than 0.74 in) |
| Product Dimensions | 3.1 x 28.5 x 2.6 inches |
8. Warranty and Support
This hygger product comes with a 1-year warranty from the date of purchase, covering manufacturing defects. For warranty claims, technical support, or any inquiries, please contact hygger customer service through the retailer where the product was purchased or visit the official hygger website.
For additional resources and product information, please visit the hygger Store on Amazon.


