
NICHE 519-CBC2227H
NICHE Smart Battery Charger Jump Starter (Model 519-CBC2227H) User Manual
For 12-Volt AGM, Gel, WET, and MF Lead-Acid Batteries
1. Introduction
This manual provides essential instructions for the safe and effective use of your NICHE Smart Battery Charger Jump Starter. This device is designed to charge and maintain all 12-volt lead-acid batteries, including WET, MF, AGM, and GEL types. It also features an engine start function for temporary power assistance.
Please read this manual thoroughly before operating the charger and retain it for future reference.

Image 1.1: Front view of the NICHE Smart Battery Charger Jump Starter.
2. Safety Information
WARNING: Always follow these safety precautions to prevent injury or damage to the charger or battery.
- Read all instructions before use.
- Do not expose the charger to rain or wet conditions.
- Ensure proper ventilation during charging.
- Wear eye protection and gloves when working with batteries.
- Keep out of reach of children.
- Do not attempt to charge non-rechargeable batteries.
- Disconnect AC power before making or breaking connections to the battery.
- Avoid sparks or flames near the battery, as batteries can produce explosive gases.
3. Package Contents
Verify that all items are present in the package:
- NICHE Smart Battery Charger Jump Starter Unit
- Battery Clamps (Red and Black)
- AC Power Cable
- User Manual (this document)

Image 3.1: NICHE Smart Battery Charger Jump Starter and its packaging.
4. Product Overview
Familiarize yourself with the components of your battery charger.
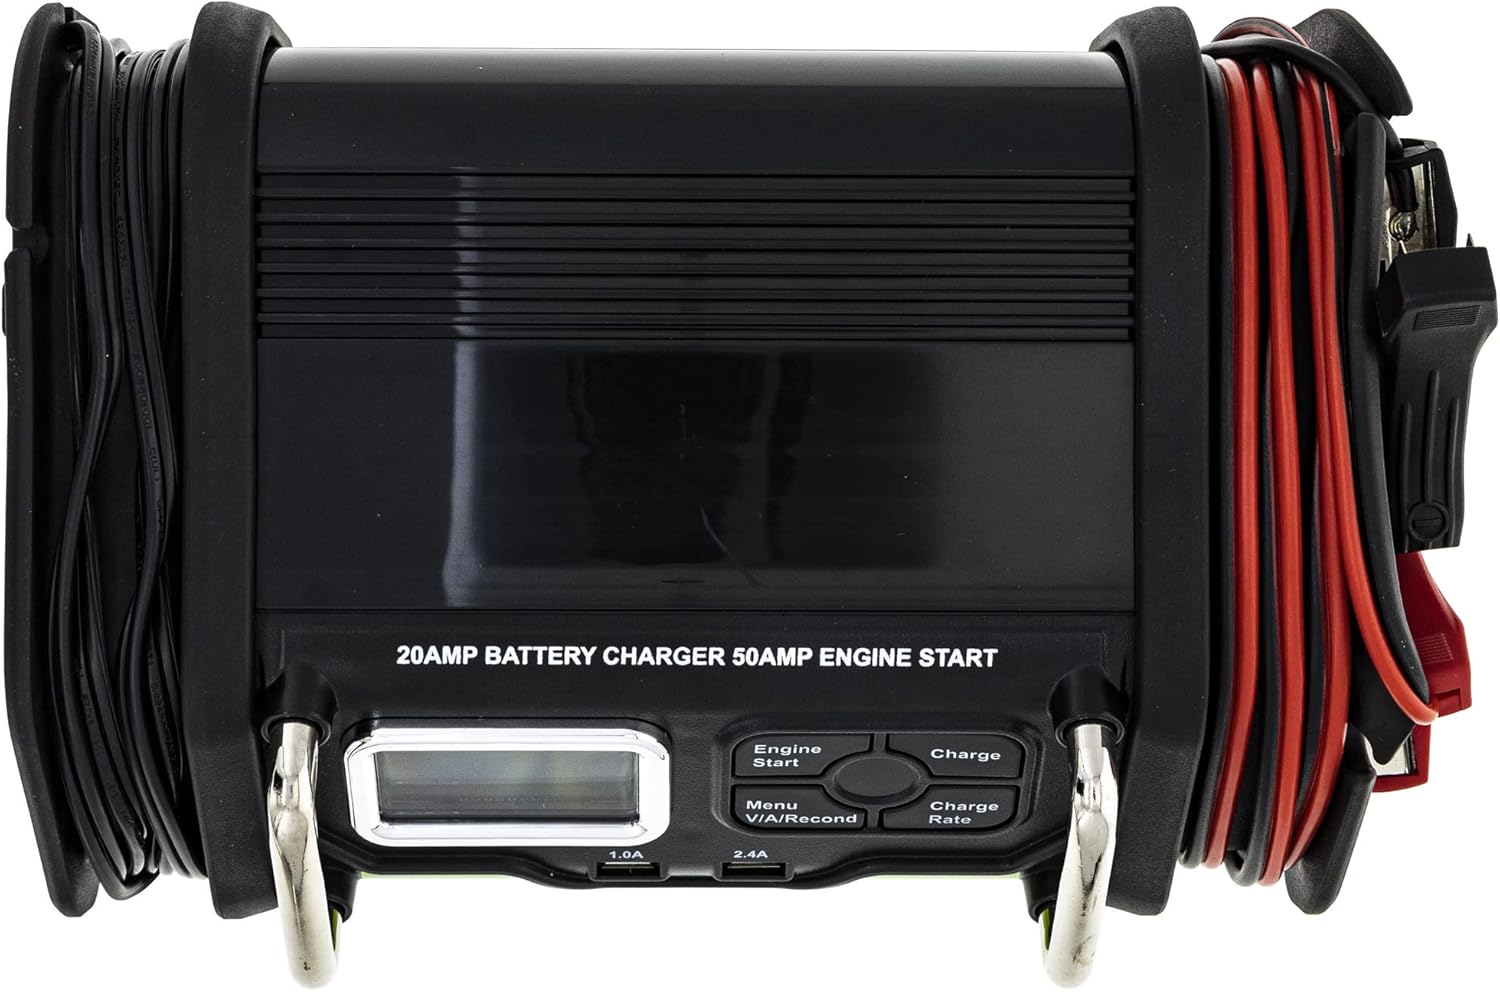
Image 4.1: Top view of the charger showing the display and control buttons.
- LCD Display: Shows voltage, charging status, and selected mode.
- Engine Start Button: Initiates the engine start assist function.
- Charge Button: Starts or stops the charging process.
- Menu V/A/Recond Button: Cycles through display information (Voltage/Amperage) and activates Recondition Mode.
- Charge Rate Button: Selects charging current (2A, 5A, 10A, 20A).
- USB Ports (1.0A, 2.4A): For charging external devices.

Image 4.2: Red (positive) and Black (negative) battery clamps.

Image 4.3: AC power plug for connecting to a wall outlet.
5. Setup
Follow these steps to prepare the charger for use:
- Position the Charger: Place the charger on a stable, dry surface away from direct sunlight, heat, or moisture. Ensure adequate ventilation around the unit.
- Connect Battery Clamps:
- Connect the RED positive (+) clamp to the positive (+) terminal of the battery.
- Connect the BLACK negative (-) clamp to the negative (-) terminal of the battery.
- Ensure connections are secure and free from corrosion.
- Connect to AC Power: Plug the AC power cable into a standard 120V AC wall outlet. The charger will power on and display the current battery voltage.

Image 5.1: The charger ensures safe charging and battery care.
6. Operating Instructions
6.1. Charging a Battery
- Ensure the charger is properly connected to the battery and AC power (refer to Section 5).
- Press the "Charge Rate" button to select the desired charging current: 2A (Maintain), 5A (Slow Charge), 10A (Fast Charge), or 20A (Rapid Charge). The default charging current is 10A.
- Press the "Charge" button to begin charging. The display will show charging status and current.
- The charger will automatically stop charging when the battery is full and switch to maintenance mode.

Image 6.1: Advanced charging modes for various needs.
6.2. Engine Start Feature
This feature provides a temporary boost to help start an engine with a weak battery.
- Ensure the charger is connected to the battery and AC power.
- Press the "Engine Start" button. The charger will provide a maximum 20A charging current for 90 seconds.
- During these 90 seconds, attempt to crank the engine. The charger will provide a peak current of up to 50A to assist with starting.
- If the engine does not start, wait a few minutes before attempting again to allow the charger to cool.
6.3. Recondition Mode
Periodic reconditioning is recommended to maintain the battery's optimum performance and extend its lifespan.
- Ensure the charger is connected to the battery and AC power.
- Press and hold the "Menu V/A/Recond" button until "Recond" appears on the display.
- The charger will begin a reconditioning cycle. This process can take several hours.
- The charger will automatically return to normal charging or maintenance mode upon completion.

Image 6.2: The charger adjusts for various climate conditions.
7. Maintenance
Proper maintenance ensures the longevity and performance of your charger and batteries.
- Cleaning: Disconnect the charger from AC power and the battery before cleaning. Wipe the exterior with a soft, damp cloth. Do not use harsh chemicals or abrasives.
- Storage: Store the charger in a cool, dry place when not in use. Ensure cables are neatly coiled and not kinked.
- Battery Care: For batteries not in regular use, connect them to the charger in 2A (Maintain) mode to keep them fully charged and prevent sulfation.

Image 7.1: The charger provides automatic charging and maintenance for a wide range of vehicles.
8. Troubleshooting
| Problem | Possible Cause | Solution |
|---|---|---|
| Charger does not power on. | No AC power; faulty connection. | Check AC outlet, ensure power cable is securely plugged in. |
| Battery not charging. | Incorrect battery connection; battery severely discharged or damaged. | Verify positive and negative clamp connections. If battery is below 7.3V, it may not activate. Consult a professional for battery health check. |
| Engine Start feature not working. | Battery too low; charger overheating. | Ensure battery is connected. Allow charger to cool if it has been used recently. |
| Display shows error code. | Internal fault; reverse polarity. | Disconnect and reconnect. If error persists, contact customer support. Check clamp polarity. |
9. Specifications
- Model: 519-CBC2227H
- Input Voltage: 120V AC
- Output Voltage: 12 Volts DC
- Compatible Battery Types: 12V WET, MF, AGM, GEL Lead-Acid Batteries
- Activated Voltage: 7.3V
- Charging Voltage (Normal Temp): 14.3V ± 0.2V
- Charging Voltage (Cold Temp): 14.7V ± 0.2V
- Charging Amperage: 2A (Maintain), 5A (Slow), 10A (Fast), 20A (Rapid)
- Engine Start Current: 20A max (charging), 50A (peak assist)
- AC Cable Length: 6 feet
- Output Cable Length: 6 feet
- Product Dimensions: 13 x 8.8 x 5 inches
- Item Weight: 5.4 pounds
10. Warranty and Support
The NICHE Smart Battery Charger Jump Starter is backed by a 2-Year Warranty, ensuring quality and reliability.
For technical assistance, warranty claims, or product inquiries, please contact NICHE customer support through the official NICHE Store on Amazon or refer to the contact information provided with your purchase.
11. Official Product Video
Video 11.1: An overview of NICHE Industries, your aftermarket powersports replacement parts brand. This video highlights the brand's commitment to quality across various environments and vehicle types.
Ask a question about this manual
Ask about setup, troubleshooting, compatibility, parts, safety, or missing instructions. Manuals+ will review the question and use this page’s manual context to help answer it.