
1. Introduction
Thank you for purchasing the JVC KD-X141 Digital Media Receiver. This unit is designed to provide high-quality audio entertainment in your vehicle, featuring versatile connectivity options and sound customization. This manual will guide you through the installation, operation, and maintenance of your new car stereo system.
2. Safety Information
- Installation: Ensure professional installation to prevent damage to the unit or your vehicle's electrical system. Incorrect wiring can cause fire or electric shock.
- Power Supply: Connect the unit only to a 12V DC car battery with a negative ground.
- Volume Level: Avoid operating the unit at excessively high volume levels for extended periods, as this may cause hearing damage or distract from driving.
- Moisture: Do not expose the unit to moisture or water to prevent electric shock or malfunction.
- Cleaning: Use a soft, dry cloth for cleaning. Avoid abrasive cleaners or solvents.
- Disassembly: Do not attempt to disassemble or modify the unit. Refer all servicing to qualified personnel.
3. Package Contents
Verify that all items are present in the package before proceeding with installation:
- JVC KD-X141 Digital Media Receiver Unit
- Wiring Harness
- Protective Front Panel Case
- Remote Control
- Instruction Manual (this document)
- Mounting Hardware (screws, brackets)

Figure 3.1: JVC KD-X141 Car Stereo Unit with Wiring Harness and Protective Case. This image displays the main receiver unit, the included wiring harness for electrical connections, and the black protective case for the detachable front panel.
4. Product Overview
The JVC KD-X141 is a single-DIN digital media receiver designed for in-car audio. It features a detachable front panel for security and a clear display for easy navigation.
4.1 Front Panel Features

Figure 4.1: JVC KD-X141 Front Panel in its Protective Case. The image shows the detachable front panel securely stored within its black protective case, highlighting the unit's compact design.
- Power/Source Button: Turns the unit on/off and switches between audio sources (Radio, USB, AUX, Bluetooth).
- Volume Knob: Adjusts the audio output level. Pressing it may access audio settings.
- USB Input: Located on the front panel for easy access to USB storage devices.
- AUX Input: 3.5mm jack for connecting external audio devices.
- Display: Shows current source, track information, radio frequency, and settings.
- Preset Buttons (1-6): For storing and recalling radio stations or direct track selection on USB.

Figure 4.2: JVC KD-X141 Front Panel and Remote Control. This image displays the main front panel of the car stereo alongside its compact remote control, illustrating the user interface and control options.
4.2 Rear Connections
The rear of the unit houses connections for power, speakers, antenna, and optional accessories. Refer to the wiring diagram in the installation section for detailed connections.

Figure 4.3: JVC KD-X141 Car Stereo Unit with Connected Wiring Harness. The image shows the rear of the JVC KD-X141 unit with the multi-pin wiring harness connected, illustrating the primary electrical interface.
5. Setup and Installation
Proper installation is crucial for optimal performance and safety. If you are unsure about any steps, consult a qualified car audio technician.
5.1 Before Installation
- Disconnect the negative terminal of your car battery to prevent short circuits.
- Ensure you have all necessary tools and mounting hardware.
- Check your vehicle's wiring diagram for compatibility.
5.2 Wiring Connections
Use the provided wiring harness to connect the unit to your vehicle's electrical system. Match wire colors and functions carefully.
- Yellow (Constant 12V): Connect to a constant 12V power source.
- Red (Accessory 12V): Connect to a switched 12V power source (ignition).
- Black (Ground): Connect to a clean chassis ground point.
- Blue/White (Remote Turn-On): Connect to the remote turn-on lead of an external amplifier or power antenna (if applicable).
- Speaker Wires: Connect to your vehicle's speakers. Ensure correct polarity (+/-). The unit supports 4 channels.
- Steering Wheel Control Input: If your vehicle has steering wheel controls, connect the appropriate adapter (sold separately) to the unit's steering wheel control input wire.
5.3 Mounting the Unit
Install the mounting sleeve into your vehicle's dashboard opening. Secure the unit into the sleeve until it locks into place. Reconnect the car battery and test the unit.
6. Operating Instructions
6.1 Basic Operations
- Power On/Off: Press the SOURCE button to turn the unit on. Press and hold to turn off.
- Source Selection: Press the SOURCE button repeatedly to cycle through available sources (Tuner, USB, AUX, Bluetooth).
- Volume Control: Rotate the VOLUME knob clockwise to increase volume, counter-clockwise to decrease.
6.2 Radio Operations
- Band Selection: In Tuner mode, press the BAND button to select FM1, FM2, FM3.
- Manual Tuning: Press the SEEK buttons (◀◀ / ▶▶) briefly to tune step-by-step.
- Automatic Tuning: Press and hold the SEEK buttons to automatically search for the next strong station.
- Preset Stations: Press a numbered button (1-6) to recall a stored station. To store a station, tune to the desired frequency, then press and hold a numbered button until you hear a beep.
6.3 USB Playback
- Insert a USB storage device into the front USB port. The unit will automatically switch to USB mode and begin playback.
- Track Selection: Use the SEEK buttons to skip tracks.
- Folder Navigation: Use the FOLDER buttons (if available) to navigate through folders.
- Supports MP3, WMA, and FLAC audio formats.
6.4 AUX Input
- Connect an external audio player (e.g., smartphone, portable music player) to the front 3.5mm AUX input jack using an audio cable.
- Select AUX as the source.
- Control playback from the connected device.
7. Audio Features and Connectivity
7.1 Sound Customization
- 13-Band Equalizer: The unit features a 13-band equalizer to fine-tune your audio output. Access equalizer settings via the VOLUME knob menu.
- Preset EQ: Utilize various preset equalizer settings like JAZZ, POP, ROCK, CLASSICAL, etc., for quick sound adjustments.
- Bass Boost: Enhance low-frequency response for a more powerful bass sound.
7.2 Bluetooth Connectivity
The integrated Bluetooth allows for wireless audio streaming and hands-free calling.
- Pairing: Enable Bluetooth on your smartphone. On the KD-X141, select Bluetooth source and enter pairing mode. Select "JVC KD-X141" from your phone's Bluetooth device list.
- Dual Phone Connection: The unit supports connecting two smartphones simultaneously.
- Audio Streaming: Play music from your paired smartphone wirelessly.
- Hands-Free Calling: Make and receive calls through the car stereo system.
7.3 Android Compatibility
The KD-X141 is compatible with Android devices, allowing for enhanced music playback control and voice control via Siri Eyes Free and Android Voice Control.
7.4 Steering Wheel Control
The unit supports connection to your vehicle's steering wheel controls (requires a compatible adapter, sold separately) for convenient operation without taking your hands off the wheel.
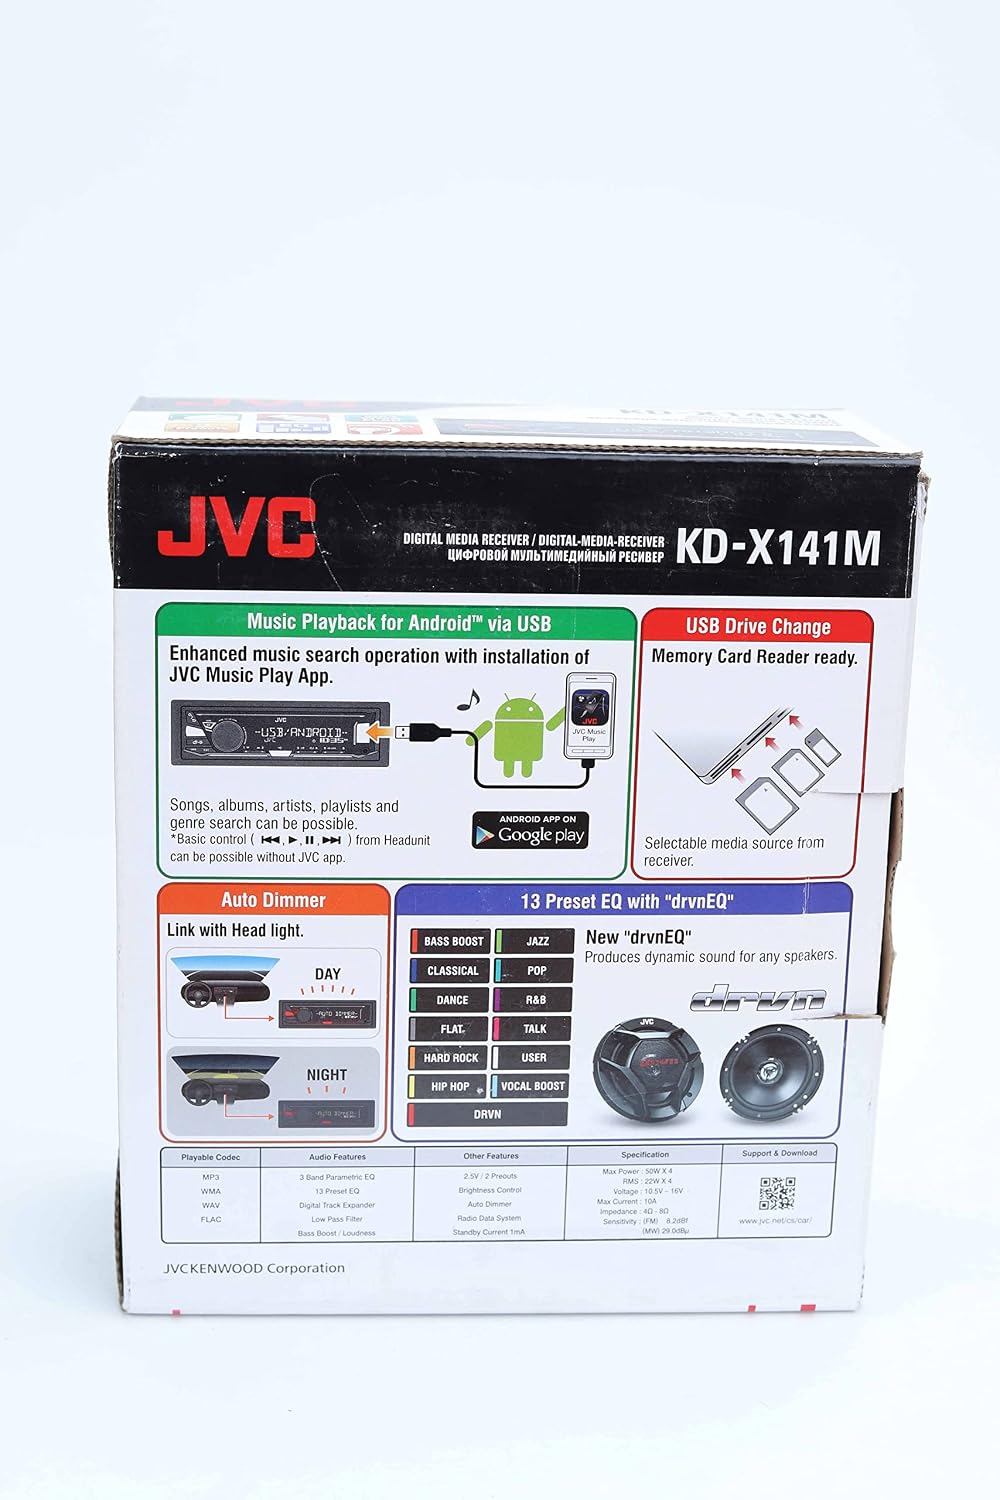
Figure 7.1: JVC KD-X141 Retail Box Highlighting Key Features. This image shows the product packaging, which details features such as Android compatibility, USB drive change, auto dimmer, and the 13-preset EQ with "drvnEQ".
8. Maintenance
- Cleaning the Unit: Wipe the front panel and chassis with a soft, dry cloth. Do not use harsh chemicals or abrasive materials.
- Detachable Front Panel: Always detach the front panel and store it in its protective case when leaving your vehicle to prevent theft and damage.
- USB Port: Keep the USB port free of dust and debris.
9. Troubleshooting
If you encounter issues with your KD-X141, refer to the following common problems and solutions:
| Problem | Possible Cause | Solution |
|---|---|---|
| No power | Blown fuse; incorrect wiring; loose connection | Check fuses (vehicle and unit); verify wiring connections (constant 12V, accessory 12V, ground); ensure secure harness connection. |
| No sound | Volume too low; mute activated; incorrect speaker wiring; amplifier issue | Increase volume; check if mute is on; verify speaker connections and polarity; check external amplifier (if used). |
| USB device not playing | Unsupported file format; damaged USB device; incompatible USB device | Ensure files are MP3, WMA, or FLAC; try a different USB device; check USB device for errors on a computer. |
| Bluetooth not connecting | Bluetooth off on phone; unit not in pairing mode; interference | Ensure phone's Bluetooth is on; put unit in pairing mode; try re-pairing; move closer to the unit. |
| Remote control not working | Dead battery; obstruction; incorrect angle | Replace remote battery; remove any obstructions; point remote directly at the unit's sensor. |
10. Specifications
| Feature | Specification |
|---|---|
| Brand | JVC |
| Model Number | KD-X141 (Part No. XR 100067) |
| Connectivity Technology | USB, Auxiliary (3.5mm Jack), Integrated Bluetooth |
| Compatible Devices | Smartphone (Android compatible) |
| Special Features | FM Radio, Integrated Bluetooth, AUX Input, 13-Band Equalizer, Steering Wheel Control Ready |
| Audio Output Mode | Stereo |
| Number of Channels | 4 |
| Supported Audio Formats | MP3, WMA, FLAC |
| Color | Black |
| Item Weight | 1 Kilogram |
| Shipping Dimensions | 32 x 22.8 x 8 cm |
| First Available Date | April 27, 2022 |
| ASIN | B09YXBGV6W |
11. Warranty and Support
11.1 Warranty Information
The JVC KD-X141 Digital Media Receiver comes with a one-year warranty from the date of purchase. This warranty covers manufacturing defects and malfunctions under normal use. Please retain your proof of purchase for warranty claims. The warranty does not cover damage caused by improper installation, misuse, accidents, or unauthorized repairs.
11.2 Customer Support
For technical assistance, troubleshooting beyond this manual, or warranty service, please contact JVC customer support through their official website or the contact information provided with your purchase documentation. When contacting support, please have your model number (KD-X141) and proof of purchase ready.


