1. Introduction
This manual provides comprehensive instructions for the setup, operation, and maintenance of your REACHER Small Digital Rainbow LED Alarm Clock, Model N188C-Black. Please read this manual thoroughly to ensure proper use and to maximize the functionality of your device.
2. Product Overview
Key Features:
- Large, colorful LED numbers for clear visibility day or night.
- Compact design (5.6" x 2.9" x 1.9") suitable for various spaces.
- Full range 0-100% brightness dimmer slider for personalized display intensity.
- Adjustable alarm volume from 30dB to 85dB.
- Easy-to-use snooze function by pressing any part of the top surface.
- Outlet powered with included DC adapter.
- Battery backup (2x AAA batteries, not included) to retain time and alarm settings during power outages.
What's in the Box:
- Small Colorful LED Alarm Clock
- USB Cable
- Power Adapter
- User Manual

Figure 2.1: Front view of the REACHER Small Digital Rainbow LED Alarm Clock.

Figure 2.2: The alarm clock's compact size, shown held in a hand.
3. Setup
3.1 Power Connection
- Connect the provided USB cable to the DC 5V port on the back of the alarm clock.
- Plug the other end of the USB cable into the included power adapter.
- Insert the power adapter into a standard electrical outlet. The clock display will illuminate.
3.2 Battery Backup Installation (Optional)
For battery backup functionality, which retains time and alarm settings during a power outage (display will be off to conserve power):
- Locate the battery compartment on the bottom of the clock.
- Open the battery compartment cover.
- Insert two (2) AAA batteries (not included), ensuring correct polarity (+/-).
- Close the battery compartment cover securely.
4. Operating Instructions

Figure 4.1: Rear controls of the alarm clock.
4.1 Setting the Time
- Press and hold the TIME SET button located on the back of the clock. The hour digits will begin to flash.
- Use the + or - buttons to adjust the hour. Pay attention to the PM indicator if using 12-hour format.
- Press the TIME SET button again to confirm the hour and move to minute adjustment. The minute digits will flash.
- Use the + or - buttons to adjust the minutes.
- Press the TIME SET button one more time to save the time setting.
4.2 Setting the Alarm
- Press and hold the ALARM SET button on the back of the clock. The alarm hour digits will begin to flash, and an alarm icon will appear on the display.
- Use the + or - buttons to adjust the alarm hour.
- Press the ALARM SET button again to confirm the alarm hour and move to alarm minute adjustment. The alarm minute digits will flash.
- Use the + or - buttons to adjust the alarm minutes.
- Press the ALARM SET button one more time to save the alarm setting.
4.3 Turning Alarm On/Off
Briefly press the ALARM ON/OFF button on the back of the clock to toggle the alarm function. The alarm icon on the display indicates if the alarm is active.
4.4 Adjusting Display Brightness
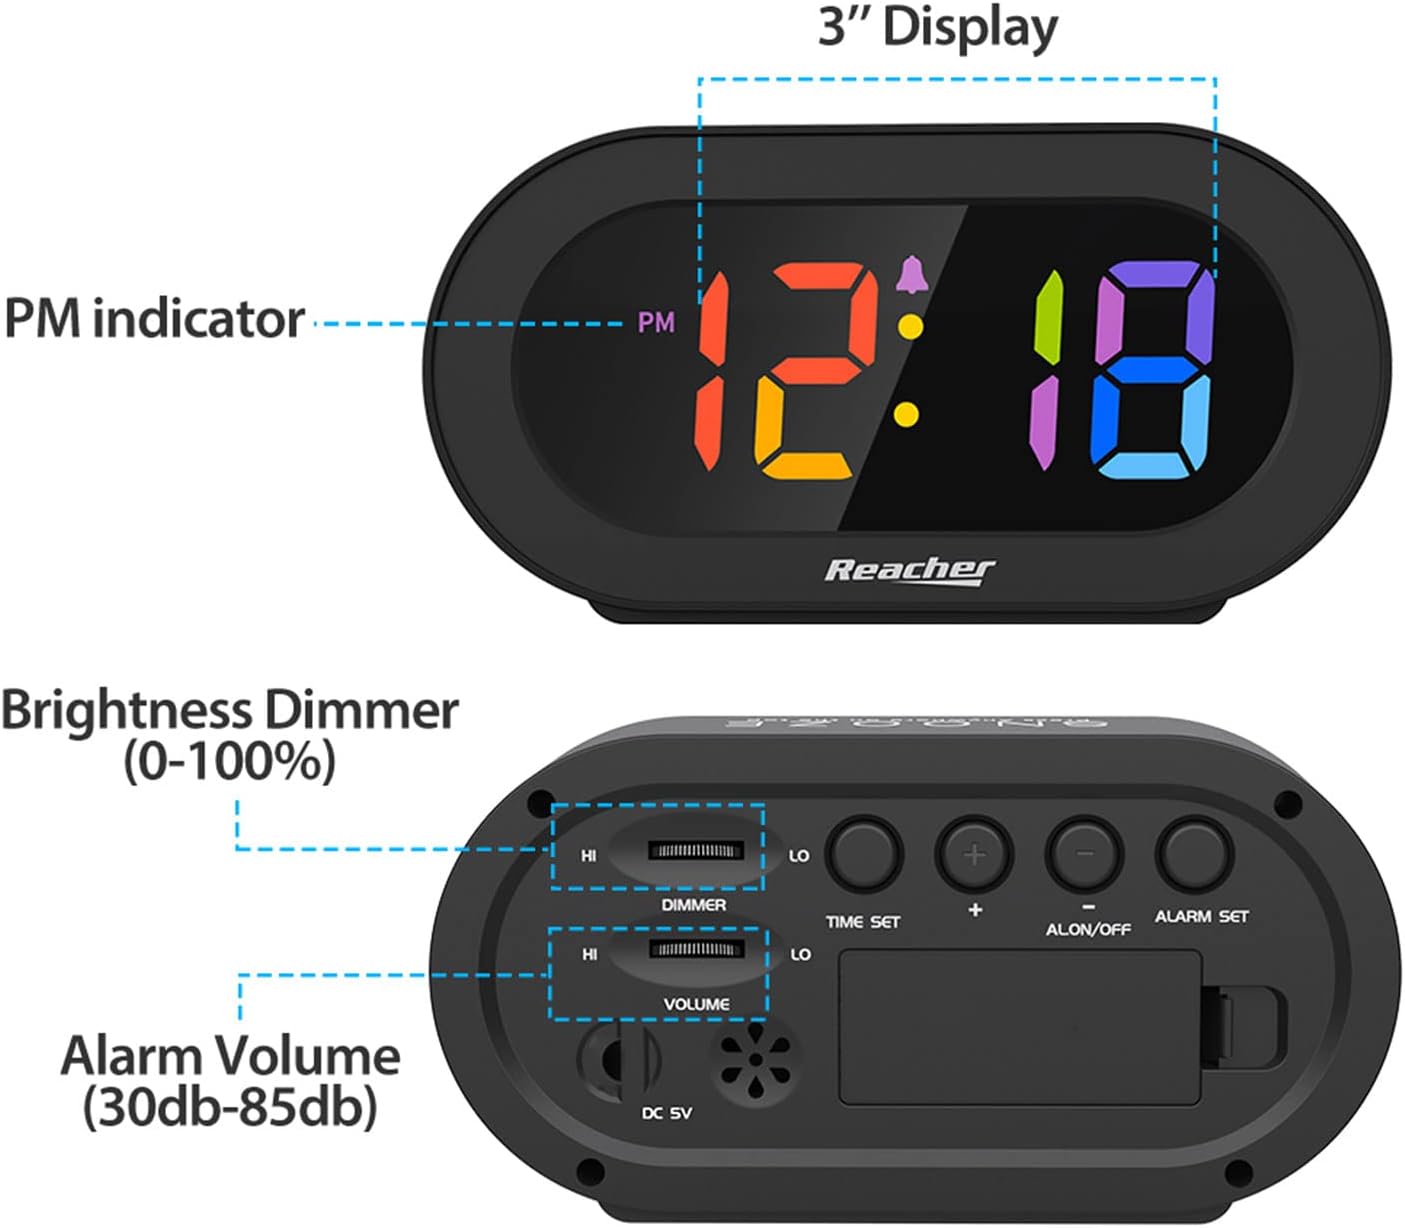
Figure 4.2: Dimmer slider control.
Use the DIMMER slider located on the back of the clock to adjust the display brightness from 0% (off) to 100% (maximum brightness). Slide towards 'HI' for brighter, and 'LO' for dimmer.
4.5 Adjusting Alarm Volume

Figure 4.3: Volume slider control.
Use the VOLUME slider located on the back of the clock to adjust the alarm sound level from 30dB (low) to 85dB (high). Slide towards 'HI' for louder, and 'LO' for quieter.
4.6 Snooze Function
When the alarm sounds, press any part of the top surface of the clock to activate the snooze function. The alarm will temporarily pause and sound again after a set interval (typically 9 minutes).
4.7 Stopping the Alarm
To stop the alarm completely after it sounds (not just snooze), press the ALARM ON/OFF button on the back of the clock. The alarm icon will disappear from the display.
5. Maintenance
To maintain your alarm clock in optimal condition:
- Wipe the clock surface with a soft, dry cloth.
- Avoid using abrasive cleaners or solvents, as these may damage the finish.
- Keep the device away from excessive moisture, direct sunlight, and extreme temperatures.
- If using battery backup, replace AAA batteries annually or if the clock frequently experiences power outages.
6. Troubleshooting
| Problem | Possible Cause | Solution |
|---|---|---|
| Clock display is off or dim. | No power, dimmer set to 0%, or battery backup active during power outage. | Ensure power adapter is securely plugged in. Adjust the DIMMER slider. If on battery backup, the display is intentionally off; it will return when main power is restored. |
| Alarm does not sound. | Alarm is not set, alarm is turned off, or volume is too low. | Verify alarm time is set correctly. Ensure the alarm icon is visible on the display (alarm is ON). Adjust the VOLUME slider to an audible level. |
| Time/Alarm settings are lost after power outage. | No battery backup installed or batteries are depleted. | Install two fresh AAA batteries for battery backup. |
| Buttons are unresponsive. | Temporary software glitch. | Unplug the power adapter, remove backup batteries (if installed), wait 30 seconds, then reconnect power. |
7. Specifications
- Model: N188C-Black
- Display Type: Digital LED (Rainbow Digits)
- Product Dimensions: 5.6" (Width) x 2.9" (Height) x 1.9" (Depth)
- Power Source: Corded Electric (DC 5V adapter included)
- Battery Backup: 2 x AAA batteries (not included)
- Material: Acrylonitrile Butadiene Styrene (ABS), Acrylic
- Item Weight: 5.5 Ounces
- Room Type: Bedroom, Bedside, Desk, Shelf
8. Warranty and Support
REACHER is committed to providing high-quality products and excellent customer service. While specific warranty periods may vary by region, we strive to address any product-related concerns promptly.
For technical support, warranty inquiries, or any questions regarding your REACHER Small Digital Rainbow LED Alarm Clock, please contact our customer service team:
- Email: customer@reachershop.com
Please provide your model number (N188C-Black) and a detailed description of the issue when contacting support.


