
RAINPOINT SK0101
RAINPOINT Bluetooth Soil Moisture Meter with Indoor Monitor
Model: SK0101
User Manual
Product Overview
The RAINPOINT Bluetooth Soil Moisture Meter with Indoor Monitor (Model SK0101) is designed to help you monitor the moisture and temperature levels of your soil, as well as the indoor temperature. This system consists of an indoor monitor unit (RD135) and a soil sensor (TCS005AFR, sold separately). It provides real-time data to help you maintain optimal growing conditions for your plants.

Image: The RAINPOINT indoor monitor unit, showing its digital display with indoor temperature and soil moisture readings.
The indoor monitor displays indoor temperature, soil temperature, and soil humidity. It supports up to three soil sensor channels, allowing you to monitor multiple locations. The soil sensor transmits data wirelessly to the indoor monitor, providing flexibility in placement.

Image: The indoor monitor and soil sensor in an outdoor setting, illustrating their combined use and indicating temperature and humidity measurement ranges.
Components
The RAINPOINT Bluetooth Soil Moisture Meter system includes the following main components:
- Indoor Monitor (RD135): The main display unit for readings.
- Soil Sensor (TCS005AFR): (Sold separately) The probe inserted into the soil to measure moisture and temperature.
- User Manual (this document).

Image: A detailed diagram of the soil sensor (TCS005AFR), highlighting its various parts and their functions.
Setup and Installation
1. Battery Installation
For Indoor Monitor (RD135):
- Open the battery compartment cover on the back of the indoor monitor.
- Insert 2 x AAA batteries (not included), ensuring correct polarity (+/-).
- Close the battery compartment cover.
For Soil Sensor (TCS005AFR):
- Open the battery compartment cover on the soil sensor.
- Insert 3 x AAA batteries (not included), ensuring correct polarity (+/-).
- Close the battery compartment cover.
2. Pairing the Devices
Follow these steps to pair the soil sensor with the indoor monitor:
- Step 1: Insert 2*AAA batteries into the indoor monitor. Long press the "CH" button on the indoor monitor to select the desired channel (e.g., CH1).
- Step 2: The indoor monitor display will start flashing, indicating it has entered pairing mode.
- Step 3: Insert 3*AAA batteries into the soil sensor. Ensure the channel switch on the soil sensor is set to the same channel selected on the indoor monitor (e.g., CH1).
- Step 4: On the soil sensor, long press both the left and right buttons simultaneously until the green light flashes, indicating it has entered pairing mode.
- Step 5: The devices will successfully pair after waiting 30-60 seconds. Once paired, you can insert the soil sensor into the soil and begin using it.
Note: If you wish to connect additional soil sensors (CH2/CH3), repeat the above steps, ensuring you select the corresponding channel on both the indoor monitor and the new soil sensor.

Image: Visual instructions for battery installation and the pairing process between the indoor monitor and soil sensor.
3. Placement
Indoor Monitor: Place the indoor monitor on a tabletop using its integrated stand or mount it on a wall using the hanging slot. Ensure it is within the wireless transmission range (up to 160ft/50m) of the soil sensor.
Soil Sensor: Insert the soil sensor probes into the soil of the plant or area you wish to monitor. Ensure the sensor is placed where it can accurately measure the soil conditions without being submerged in water or exposed to extreme elements beyond its operating range.
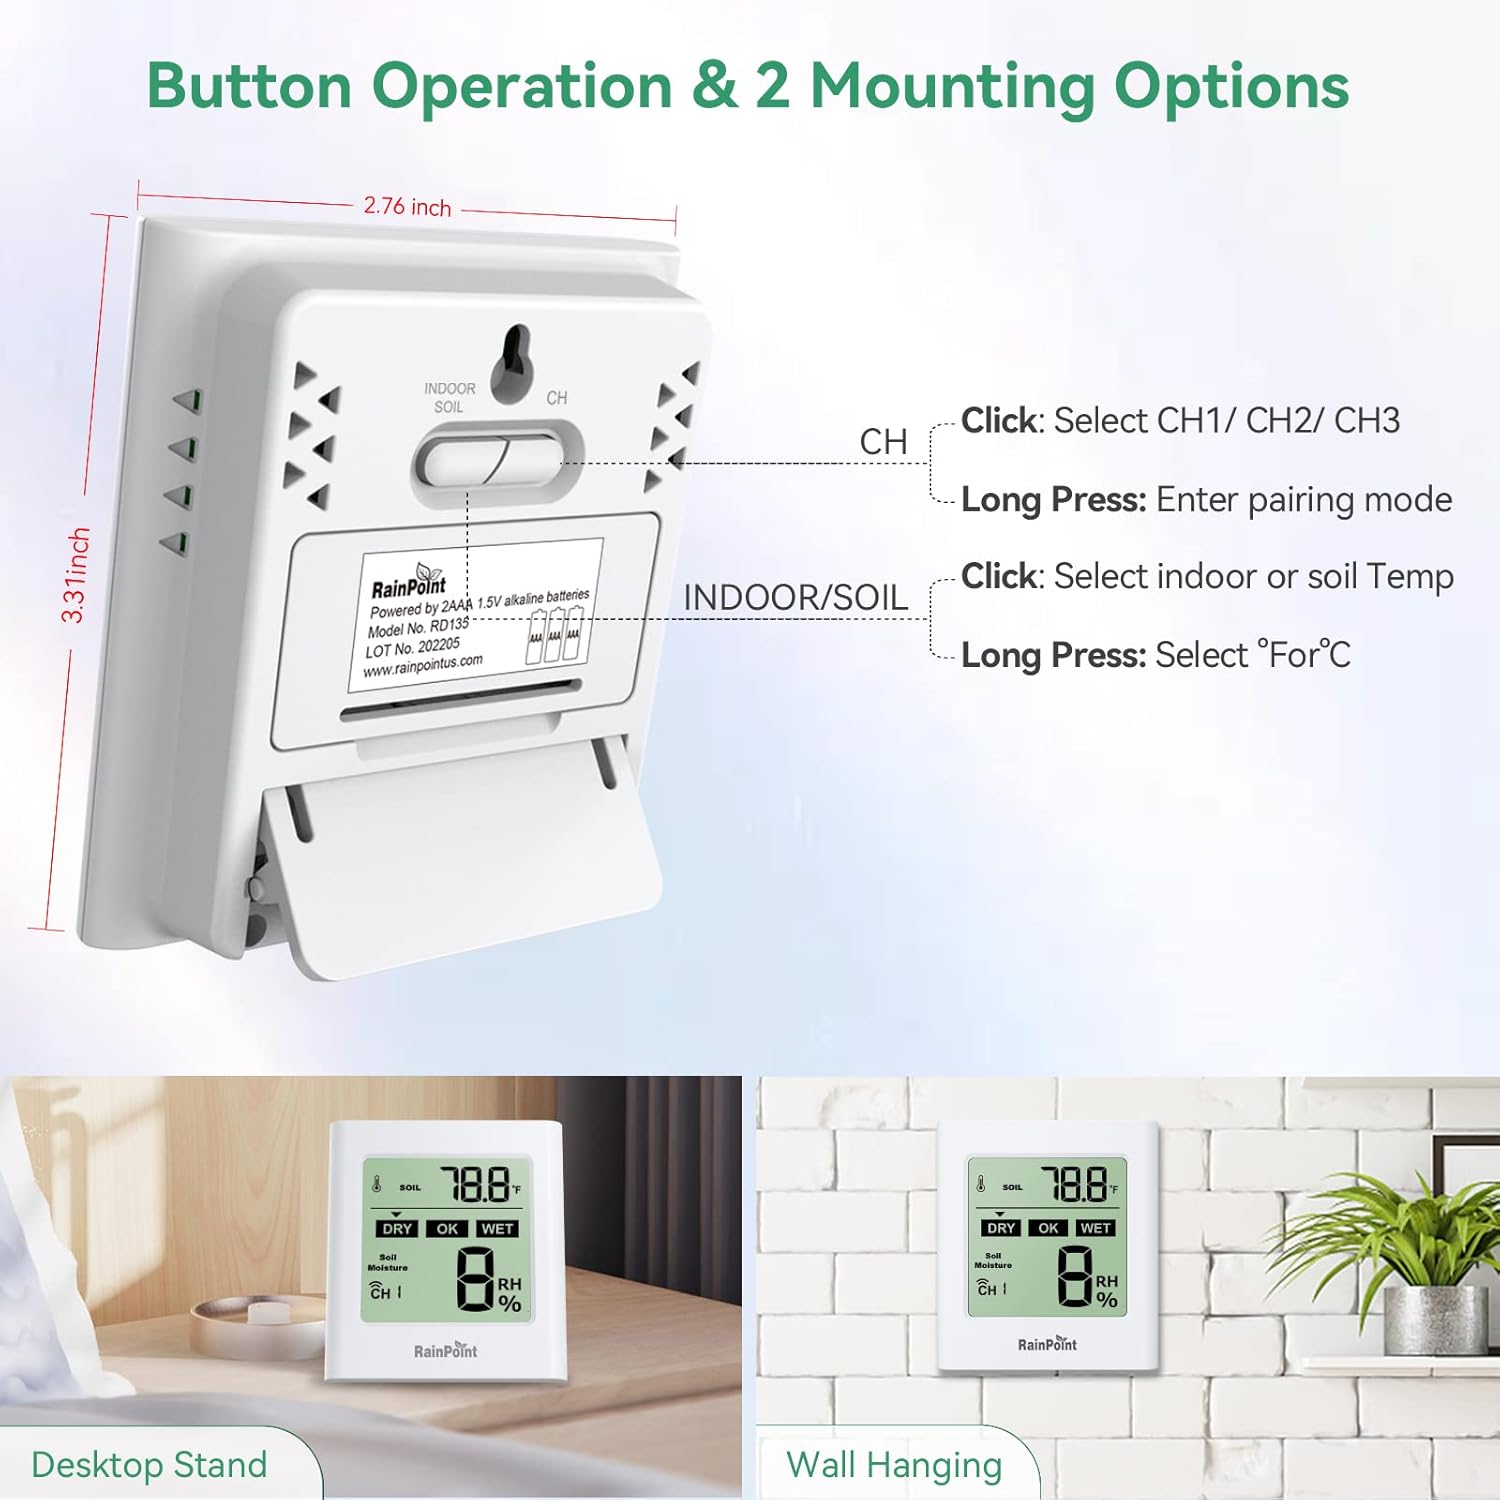
Image: The back of the indoor monitor, detailing button functions and illustrating both desktop and wall-mounting options.

Image: The indoor monitor showing its wireless transmit range and examples of its application in various environments like greenhouses, farmlands, and potted plants.
Operating Instructions
Indoor Monitor Button Functions:
- INDOOR/SOIL Button:
- Click: Switches the display between indoor temperature and soil temperature.
- Long Press: Switches the temperature unit between Celsius (℃) and Fahrenheit (℉).
- CH Button:
- Click: Switches the display to show soil sensor data from Channel 1, Channel 2, or Channel 3.
- Long Press: Enters pairing mode for a new soil sensor.
Soil Sensor Button Functions:
- Left and Right Buttons (on soil sensor):
- Press and hold both simultaneously: Wakes up the program and enters pairing mode.
- Right Button (on soil sensor):
- Click: Checks the current soil moisture level.
- CH Switch (on soil sensor):
- Selects the channel (1, 2, or 3) for the soil sensor to transmit data. This must match the channel selected on the indoor monitor.
Interpreting the Display:
- Temperature Display: Shows either indoor temperature or soil temperature, depending on the selected mode. The unit (°C or °F) is also displayed.
- Soil Moisture Display: Shows the soil humidity as a percentage (RH%). Indicators for "DRY", "OK", and "WET" provide a quick visual assessment of the moisture level.
- CH Indicator: Displays the current channel (CH1, CH2, or CH3) from which soil sensor data is being received.
- Battery Indicators: Icons for both the indoor monitor and the active soil sensor will show their respective battery levels.
Maintenance
- Cleaning: Wipe the indoor monitor and soil sensor with a soft, damp cloth. Do not use abrasive cleaners or immerse the indoor monitor in water. The soil sensor is designed for outdoor use but should not be left submerged in standing water for extended periods.
- Battery Replacement: Replace batteries in both units when the low battery indicator appears on the indoor monitor's display. Use new AAA alkaline batteries.
- Storage: If storing the device for an extended period, remove all batteries to prevent leakage and corrosion. Store in a cool, dry place.
Troubleshooting
| Problem | Possible Cause | Solution |
|---|---|---|
| No display on indoor monitor. | Batteries are dead or incorrectly inserted. | Replace batteries with new ones, ensuring correct polarity. |
| Soil moisture/temperature not displayed or showing "---". |
|
|
| Inaccurate readings. |
|
|
| Indoor monitor display is dim or flickering. | Low battery on indoor monitor. | Replace indoor monitor batteries. |
Specifications
| Feature | Detail |
|---|---|
| Indoor Monitor Model | RD135 |
| Soil Sensor Model | TCS005AFR (Sold Separately) |
| Indoor Temperature Range | -10℃ to 60℃ (14℉ to 140℉) |
| Soil Temperature Range | -10℃ to 60℃ (14℉ to 140℉) |
| Soil Humidity Range | 0%RH to 100%RH |
| Wireless Transmit Range | Up to 160ft / 50m (open air) |
| Indoor Monitor Power Supply | 2 x AAA batteries (not included) |
| Soil Sensor Power Supply | 3 x AAA batteries (not included) |
| Indoor Monitor Dimensions | Approx. 3.31 inches (H) x 2.76 inches (W) |
| Soil Sensor Dimensions | Approx. 5.31 inches (L) x 3.88 inches (W) |
| Item Weight | 3.2 ounces (Indoor Monitor) |
Warranty Information
RAINPOINT products typically come with a limited warranty. For specific warranty terms, duration, and conditions applicable to your SK0101 model, please refer to the official RAINPOINT website or contact their customer support directly. Keep your purchase receipt as proof of purchase for any warranty claims.
Customer Support
For further assistance, technical support, or inquiries regarding your RAINPOINT Bluetooth Soil Moisture Meter, please contact RAINPOINT customer service through the following channels:
- Email Support: Refer to the official RAINPOINT website for their customer service email address.
- Live Chat: Available on the RAINPOINT official website during business hours.
- Local Business Support: Check the RAINPOINT website for information on local service centers or distributors.
- Online Resources: Visit the RAINPOINT Store on Amazon for product information and updates.
RAINPOINT aims to provide a response within 24 hours for customer inquiries.
Related documentsSK0101


Ask a question about this manual
Ask about setup, troubleshooting, compatibility, parts, safety, or missing instructions. Manuals+ will review the question and use this page’s manual context to help answer it.