1. Introduction
Thank you for choosing the BLACK+DECKER All-in-One Bottle Sterilizer. This appliance is designed to sterilize and dry baby bottles, pacifiers, and other feeding accessories using powerful steam, ensuring a hygienic environment for your baby's items. Please read this manual thoroughly before first use and retain it for future reference.
2. Important Safety Information
When using electrical appliances, basic safety precautions should always be followed to reduce the risk of fire, electric shock, and/or injury to persons, including the following:
- Read all instructions before using the appliance.
- Do not touch hot surfaces. Use handles or knobs.
- To protect against electrical shock, do not immerse cord, plugs, or appliance in water or other liquid.
- Close supervision is necessary when any appliance is used by or near children.
- Unplug from outlet when not in use and before cleaning. Allow to cool before putting on or taking off parts.
- Do not operate any appliance with a damaged cord or plug, or after the appliance malfunctions or has been damaged in any manner. Contact customer service for examination, repair, or adjustment.
- The use of accessory attachments not recommended by the appliance manufacturer may cause injuries.
- Do not use outdoors.
- Do not let cord hang over edge of table or counter, or touch hot surfaces.
- Do not place on or near a hot gas or electric burner, or in a heated oven.
- Extreme caution must be used when moving an appliance containing hot oil or other hot liquids.
- Always attach plug to appliance first, then plug cord into the wall outlet. To disconnect, turn any control to "off", then remove plug from wall outlet.
- Do not use appliance for other than intended use.
- This appliance is for household use only.
- Always ensure the water reservoir contains water before operating the sterilizer to prevent boil-dry damage.
- Use only purified or distilled water to prevent mineral buildup on the heating plate.
3. Package Contents
Please check the box for the following items:
- Sterilizer Base Unit with Heating Plate
- Tall Basket
- Accessory Tray
- Lid
- Bottle Tongs
- Measuring Cup
- Instruction Manual
4. Product Overview and Components
The BLACK+DECKER All-in-One Bottle Sterilizer features a modular design, allowing for flexible use based on your needs. It consists of a base unit, a tall basket, an accessory tray, and a lid.

Image: The sterilizer shown in three modular configurations: full height with accessory tray, medium height with tall basket, and compact with accessory tray only. This illustrates the versatile 3-in-1 design.

Image: A view of the sterilizer's main components laid out: the base unit with control panel, the accessory tray, the tall basket, and the lid. This highlights the convenient accessory tray and modular parts.
Key Components:
- Base Unit: Contains the heating plate and control panel with LED display and capacitive touch sensing.
- Tall Basket: Used for sterilizing larger items like standard or wide-neck bottles.
- Accessory Tray: Designed to hold smaller items such as bottle collars, nipples, pacifiers, and pump parts.
- Lid: Covers the top of the sterilizer during operation.
- Control Panel: Features intuitive touch controls for Sterilize, Dry, and Sterilize + Dry functions, along with selectable drying times.
5. Setup and First Use
5.1 Unpacking and Initial Cleaning
- Remove all packaging materials and labels from the sterilizer.
- Wash the tall basket, accessory tray, and lid in warm soapy water. Rinse thoroughly and dry.
- Wipe the base unit with a damp cloth. Do not immerse the base unit in water.
5.2 Assembly
The sterilizer can be assembled in various configurations:
- Full Capacity: Place the tall basket onto the base unit, then place the accessory tray on top of the tall basket. Cover with the lid. This configuration holds up to 13 standard bottles or 9 wide-neck bottles.
- Medium Capacity: Place the tall basket directly onto the base unit. Cover with the lid.
- Compact: Place the accessory tray directly onto the base unit. Cover with the lid. This is ideal for smaller items like pacifiers or pump parts.
6. Operating Instructions
6.1 Preparing Items for Sterilization
Before placing items in the sterilizer, ensure they are thoroughly washed and rinsed to remove any milk residue or food particles.
6.2 Adding Water

Image: A hand pouring purified water into the heating plate reservoir of the sterilizer base unit. Bottles and pacifiers are visible nearby, ready for sterilization.
- Using the provided measuring cup, add purified or distilled water to the heating plate in the base unit. Refer to the markings on the measuring cup for the appropriate amount (typically 100-120ml for a full cycle).
- Important: Do not overfill. Using tap water may lead to mineral buildup and affect performance.
6.3 Loading Items
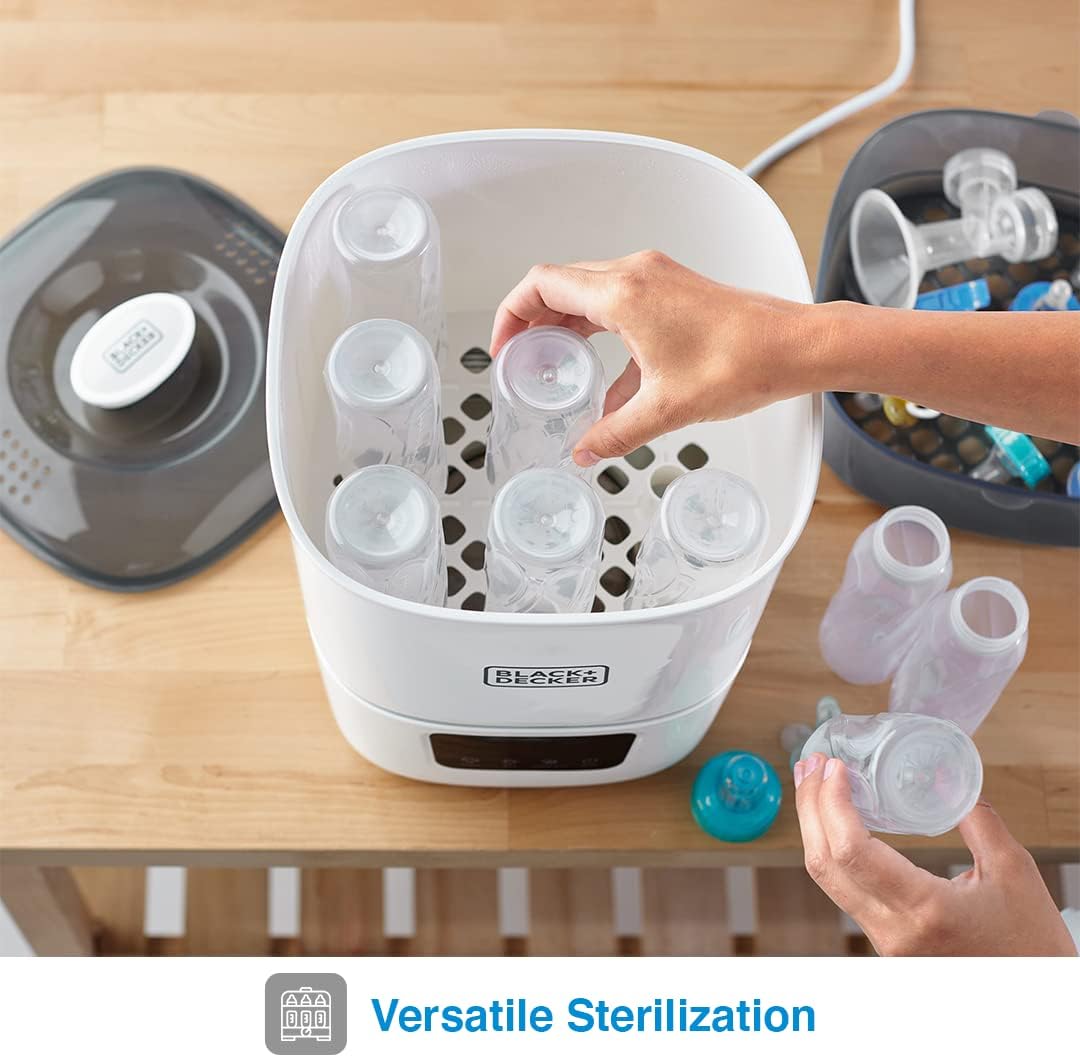
Image: A hand arranging baby bottles upside down in the tall basket of the sterilizer. Other bottle components are visible on the accessory tray and countertop, demonstrating versatile sterilization.
- Place bottles upside down in the tall basket.
- Arrange smaller items like nipples, pacifiers, and bottle rings in the accessory tray. Ensure items are not overlapping excessively to allow steam to circulate.
- Place the lid securely on top.
6.4 Selecting a Cycle

Image: A close-up of the sterilizer's control panel, showing the LED display with a countdown timer and touch-sensitive buttons for Sterilize, Dry, and Power functions. A hand is shown interacting with the controls.
Plug the sterilizer into a suitable electrical outlet. The LED display will illuminate.
- Sterilize Only: Press the 'Sterilize' button. The cycle will begin, using powerful steam to sterilize contents.
- Dry Only: Press the 'Dry' button. You can select the desired drying time using the controls.
- Sterilize + Dry: Press the 'Sterilize + Dry' button. The unit will first sterilize, then automatically proceed to the drying cycle. You can adjust the drying time.
The LED display will show the remaining time for the selected cycle. The unit features auto shut-off and boil-dry protection for safety.

Image: The BLACK+DECKER sterilizer in operation, with steam visible rising from under the lid, indicating the air drying process is active. This demonstrates the unit's drying capability.
6.5 After the Cycle
- Once the cycle is complete, the unit will automatically shut off.
- Allow the unit to cool down for a few minutes before opening the lid. Use the provided bottle tongs to remove hot items.
- Exercise caution as steam may still be present and items will be hot.
7. Maintenance and Cleaning
Regular cleaning is essential to maintain the performance and longevity of your sterilizer.
7.1 Daily Cleaning
- Unplug the sterilizer and allow it to cool completely.
- Discard any remaining water from the heating plate.
- Wash the tall basket, accessory tray, and lid in warm soapy water, rinse, and dry. These parts are typically top-rack dishwasher safe, but hand washing is recommended for best care.
- Wipe the exterior of the base unit with a damp cloth. Do not use abrasive cleaners or immerse the base unit in water.
7.2 Descaling the Heating Plate
Mineral deposits (limescale) may accumulate on the heating plate, especially if tap water is used. Descale the unit regularly (e.g., weekly or bi-weekly depending on usage and water hardness) to ensure efficient operation.
- Ensure the sterilizer is unplugged and cool.
- Pour 100ml of white vinegar into the heating plate reservoir.
- Let it stand for approximately 30 minutes to 1 hour, or until the mineral deposits dissolve. For stubborn deposits, you may gently scrub with a soft brush or sponge.
- Pour out the vinegar and rinse the heating plate thoroughly with purified water several times to remove any vinegar residue.
- Wipe dry with a clean cloth.
8. Troubleshooting
| Problem | Possible Cause | Solution |
|---|---|---|
| Unit does not turn on. | Not plugged in; power outage; faulty outlet. | Ensure unit is securely plugged into a working outlet. Check household circuit breaker. |
| Items are still wet after a Sterilize + Dry cycle. | Drying time too short; items overloaded; poor air circulation. | Increase drying time. Ensure items are not excessively crowded. Arrange items to allow air to circulate freely. Consider running a 'Dry Only' cycle if needed. |
| White/brown residue on heating plate. | Mineral buildup from tap water. | Descale the heating plate using white vinegar as described in Section 7.2. Use purified or distilled water for future cycles. |
| Sterilizer stops mid-cycle. | Insufficient water; boil-dry protection activated. | Ensure adequate water is added before starting a cycle. Allow unit to cool, then add water and restart. |
9. Specifications
| Feature | Detail |
|---|---|
| Model Number | BDXBSB15 |
| Power | 600W (Steam Sterilization + Drying) |
| Capacity | Up to 13 standard bottles / 9 wide-neck bottles |
| Material | Food-grade Plastic |
| Dimensions (Product) | 26.8 x 25.6 x 34.01 cm |
| Weight (Item) | 2.22 kg (4.89 lbs) |
| Special Features | Modular Design, Auto Shut-off, Boil-Dry Protection, LED Display, Capacitive Touch Sensing |
| Mounting Type | Countertop Mount |
| UPC | 850015104367 |
10. Warranty and Support
For warranty information, technical support, or customer service inquiries, please refer to the warranty card included with your product or visit the official BLACK+DECKER website. Please have your model number (BDXBSB15) and proof of purchase ready when contacting support.


