1. Important Safety Information
WARNING: Before assembly, carefully read the installation video (if available) and the installation instructions. The awning must only be mounted on a wall, not on eaves or ceilings. Additional tools such as a drill, tape, and wrenches (M10 and M12) are required for assembly. Ensure the area is clear of obstructions and that the mounting surface is structurally sound. Always use appropriate safety gear during installation.
CAUTION: The articulated arms are under tension. Do not open the arms with the adhesive tapes until they are properly mounted. For installation, it is best to have two people. The crank is located on the left when facing the awning. The Dripex awning is stable in moderate wind. In strong wind, heavy rain, or heavy snowfall, it must be retracted.
2. Product Overview
The Dripex Manual Retractable Awning provides effective sun protection and reduces heat for your terrace or balcony. It features a robust and durable frame made of spray-painted aluminum alloy with an oxidation-treated surface. The fabric is a high-quality polyester with PU surface treatment, ensuring it is waterproof and UV-resistant. Its manual retractable design allows for easy extension and retraction using a hand crank, providing flexible shade as needed.

Image: Overview of the Dripex Manual Retractable Awning, showing the main unit, hand crank, and mounting bolts.

Image: The Dripex awning extended over a patio area of a modern house, providing shade.

Image: Icons illustrating the water-resistant, anti-UV, and light-resistant properties of the awning fabric, with a close-up of water droplets on the material.
3. Setup and Installation
The Dripex awning requires assembly and wall mounting. Follow these general steps for installation. Refer to the detailed instructions provided in the packaging for specific diagrams and measurements.
3.1 Pre-Installation Checklist
- Ensure you have all components as listed in the packing list.
- Gather necessary tools: drill, tape measure, M10 and M12 wrenches, level, pencil.
- Identify a suitable wall for mounting. The wall must be solid concrete or brick.
- Confirm the mounting location allows for the full extension of the awning (2.5 meters projection).
- It is recommended that two people perform the installation.
3.2 Assembly Steps
- Assemble the awning frame according to the provided diagrams. The awning fabric must be mounted before attaching the unit to the wall.
- Attach the articulated arms to the main frame. Remember that these arms are under tension; do not remove any securing tapes until the awning is fully mounted.
- Prepare the mounting location on the wall. The wall bracket has a hole spacing of 8.5-9.5 cm for a 3.5 cm rod, with a specific hole spacing of 9 cm.
- Drill holes into the wall at the marked positions. Use the provided screws and metal expansion anchors suitable for reinforced concrete and brick walls.
- Securely mount the awning frame to the wall brackets.
- Once the awning is securely mounted, carefully release the tension on the articulated arms.
- Attach the hand crank mechanism.
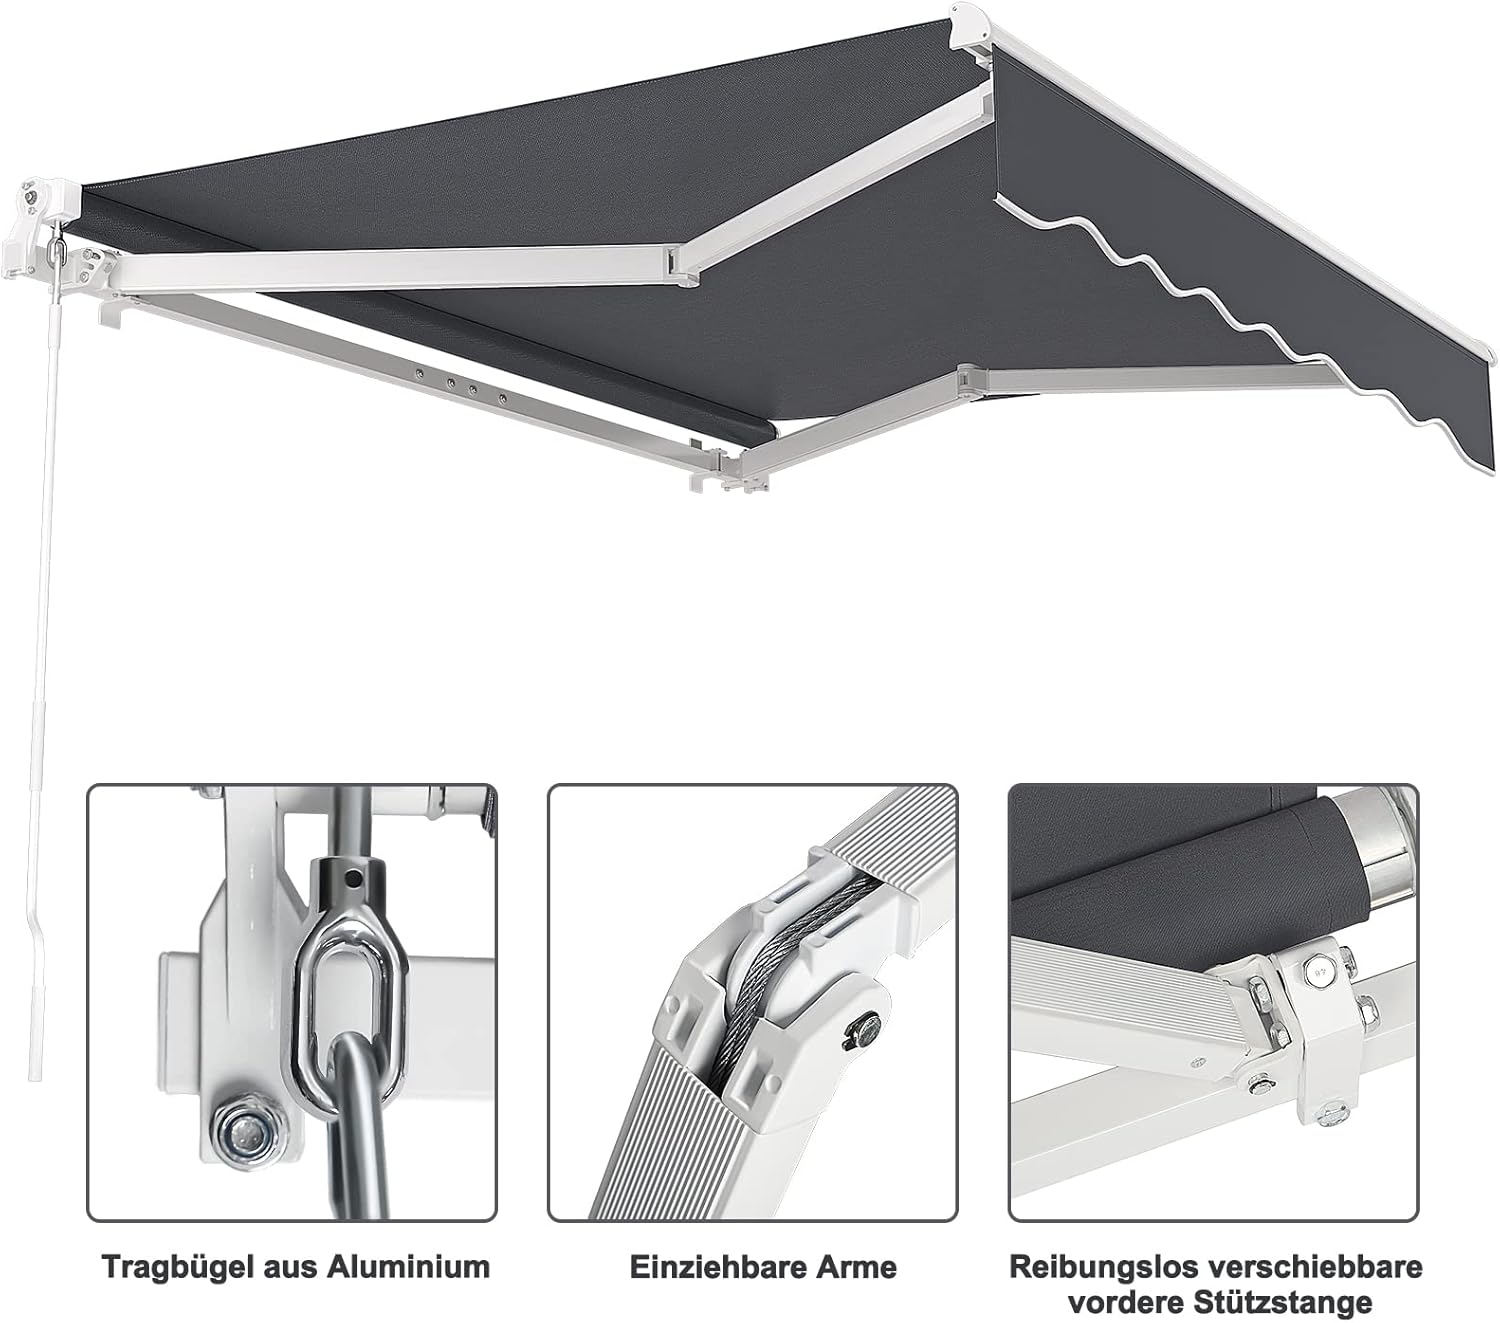
Image: Detailed view of the awning's structural components, including the aluminum bracket, retractable arms, and the smoothly movable front support rod.

Image: A graphic illustrating product details, including the 45-degree angle of the awning, material properties, and key installation tips such as requiring two people and the need to retract in strong weather.
4. Operating Instructions
The Dripex awning is operated manually using the provided hand crank.
4.1 Extending the Awning
- Insert the hook of the 1.2-meter hand crank into the loop of the awning's operating mechanism.
- Turn the hand crank clockwise to extend the awning.
- Continue turning until the awning reaches the desired extension. You can adjust the awning to any width to meet different needs, providing shade when extended and not blocking the view when contracted.
- Do not force the awning beyond its maximum extension.
4.2 Retracting the Awning
- Insert the hook of the hand crank into the loop.
- Turn the hand crank counter-clockwise to retract the awning.
- Retract the awning completely when not in use, especially during strong winds, heavy rain, or snowfall, to prevent damage.

Image: A diagram showing the awning extending and retracting, with an inset image of a hand turning the crank, demonstrating the easy manual operation.
5. Maintenance
Proper maintenance will extend the lifespan of your Dripex awning.
5.1 Fabric Care
- Clean the polyester fabric regularly with mild soap and water. Use a soft brush or cloth.
- Rinse thoroughly with clean water and allow the fabric to air dry completely before retracting the awning to prevent mildew.
- Avoid using harsh chemicals or abrasive cleaners, as these can damage the fabric's PU coating.
5.2 Frame and Mechanism Care
- Inspect the aluminum frame and moving parts periodically for any signs of wear, corrosion, or loose fasteners.
- Tighten any loose bolts or screws.
- Lubricate the articulated arms and other moving parts with a suitable silicone spray or grease annually to ensure smooth operation and prevent creaking.
- Keep the mechanism free from dirt and debris.
6. Troubleshooting
This section addresses common issues you might encounter with your awning.
| Problem | Possible Cause | Solution |
|---|---|---|
| Awning difficult to extend/retract or creaks. | Lack of lubrication in moving parts; dirt/debris in mechanism. | Lubricate the articulated arms and other moving parts with silicone spray or grease. Clean any visible dirt or debris from the mechanism. |
| Awning does not extend/retract smoothly. | Misalignment of arms; bent components; mechanism obstruction. | Inspect arms for damage or bending. Ensure no foreign objects are obstructing the mechanism. If issues persist, contact customer support. |
| Awning fabric appears loose or sags. | Improper tensioning; fabric stretching over time. | Check the tensioning of the fabric according to the installation manual. If the fabric has stretched significantly, it may require professional adjustment or replacement. |
| Difficulty during initial assembly. | Instructions not fully followed; parts not aligned correctly. | Review the installation manual carefully, paying attention to diagrams. Ensure all parts are correctly oriented before tightening. It is recommended to have two people for assembly. Remember the arms are under tension and should only be released after mounting. |
7. Specifications
| Feature | Detail |
|---|---|
| Brand | Dripex |
| Model Number | TB1912011 |
| Product Dimensions (L x W x H) | 300 x 250 x 120 cm (approx. 2.5T x 3B x 1.2H m) |
| Weight | 22.76 Kilograms |
| Color | Dark Grey |
| Fabric Type | Polyester fabric with PU surface treatment |
| Frame Material | Spray-painted aluminum alloy |
| Features | Waterproof, UV-resistant, Manually retractable |
| Sail Cloth Size (approx.) | 2.88 x 2.5 meters |
| Wall Bracket Hole Spacing | 8.5-9.5 cm (for 3.5 cm rod), specific hole spacing: 9 cm |

Image: A diagram illustrating the key dimensions of the awning, including its length (3M), projection (2.5M), and height (1.2M), with the approximate sail cloth size noted.
8. Warranty and Support
For warranty information, please refer to the documentation included with your purchase or contact Dripex customer support directly. If you require assistance with installation, operation, or troubleshooting that is not covered in this manual, please reach out to the manufacturer's customer service.
Contact Information: Please visit the official Dripex website or refer to your purchase receipt for the most up-to-date contact details.


