
1. Introduction
This manual provides detailed instructions for the installation, operation, and maintenance of your WOWiViD Android 12 Car Stereo, Model WCP0901C3. This unit is designed specifically for Toyota Camry models from 2006 to 2011. Please read this manual thoroughly before installation and use to ensure proper function and to maximize your experience.
2. Safety Information
- Always operate the device safely and in accordance with local traffic laws. Distracted driving can lead to accidents.
- Do not attempt to install or repair the unit if you are not qualified. Improper installation can cause damage to the unit or your vehicle.
- Ensure all wiring connections are secure and properly insulated to prevent short circuits.
- Keep the screen clean and free from obstructions to maintain clear visibility.
- Avoid exposing the unit to extreme temperatures or direct sunlight for prolonged periods.
3. Package Contents
Verify that all items listed below are included in your package:
- 1 x WOWiViD Android 12 Car Stereo Head Unit
- 1 x Power Harness & 1 x RCA Cable
- 1 x Backup Camera & 1 x CAM-IN Wire
- 1 x GPS Antenna
- 2 x USB Cables
- 1 x Microphone
- 1 x Instruction Manual (this document)

Image: WOWiViD Android 12 Car Stereo with included accessories, showing the main unit, backup camera, external microphone, GPS antenna, power harness, RCA cables, and USB cables.
4. Setup and Installation
4.1. Compatibility Check
This car stereo is designed for Toyota Camry models from 2006 to 2011. Before installation, confirm your vehicle's specific model and audio system configuration.
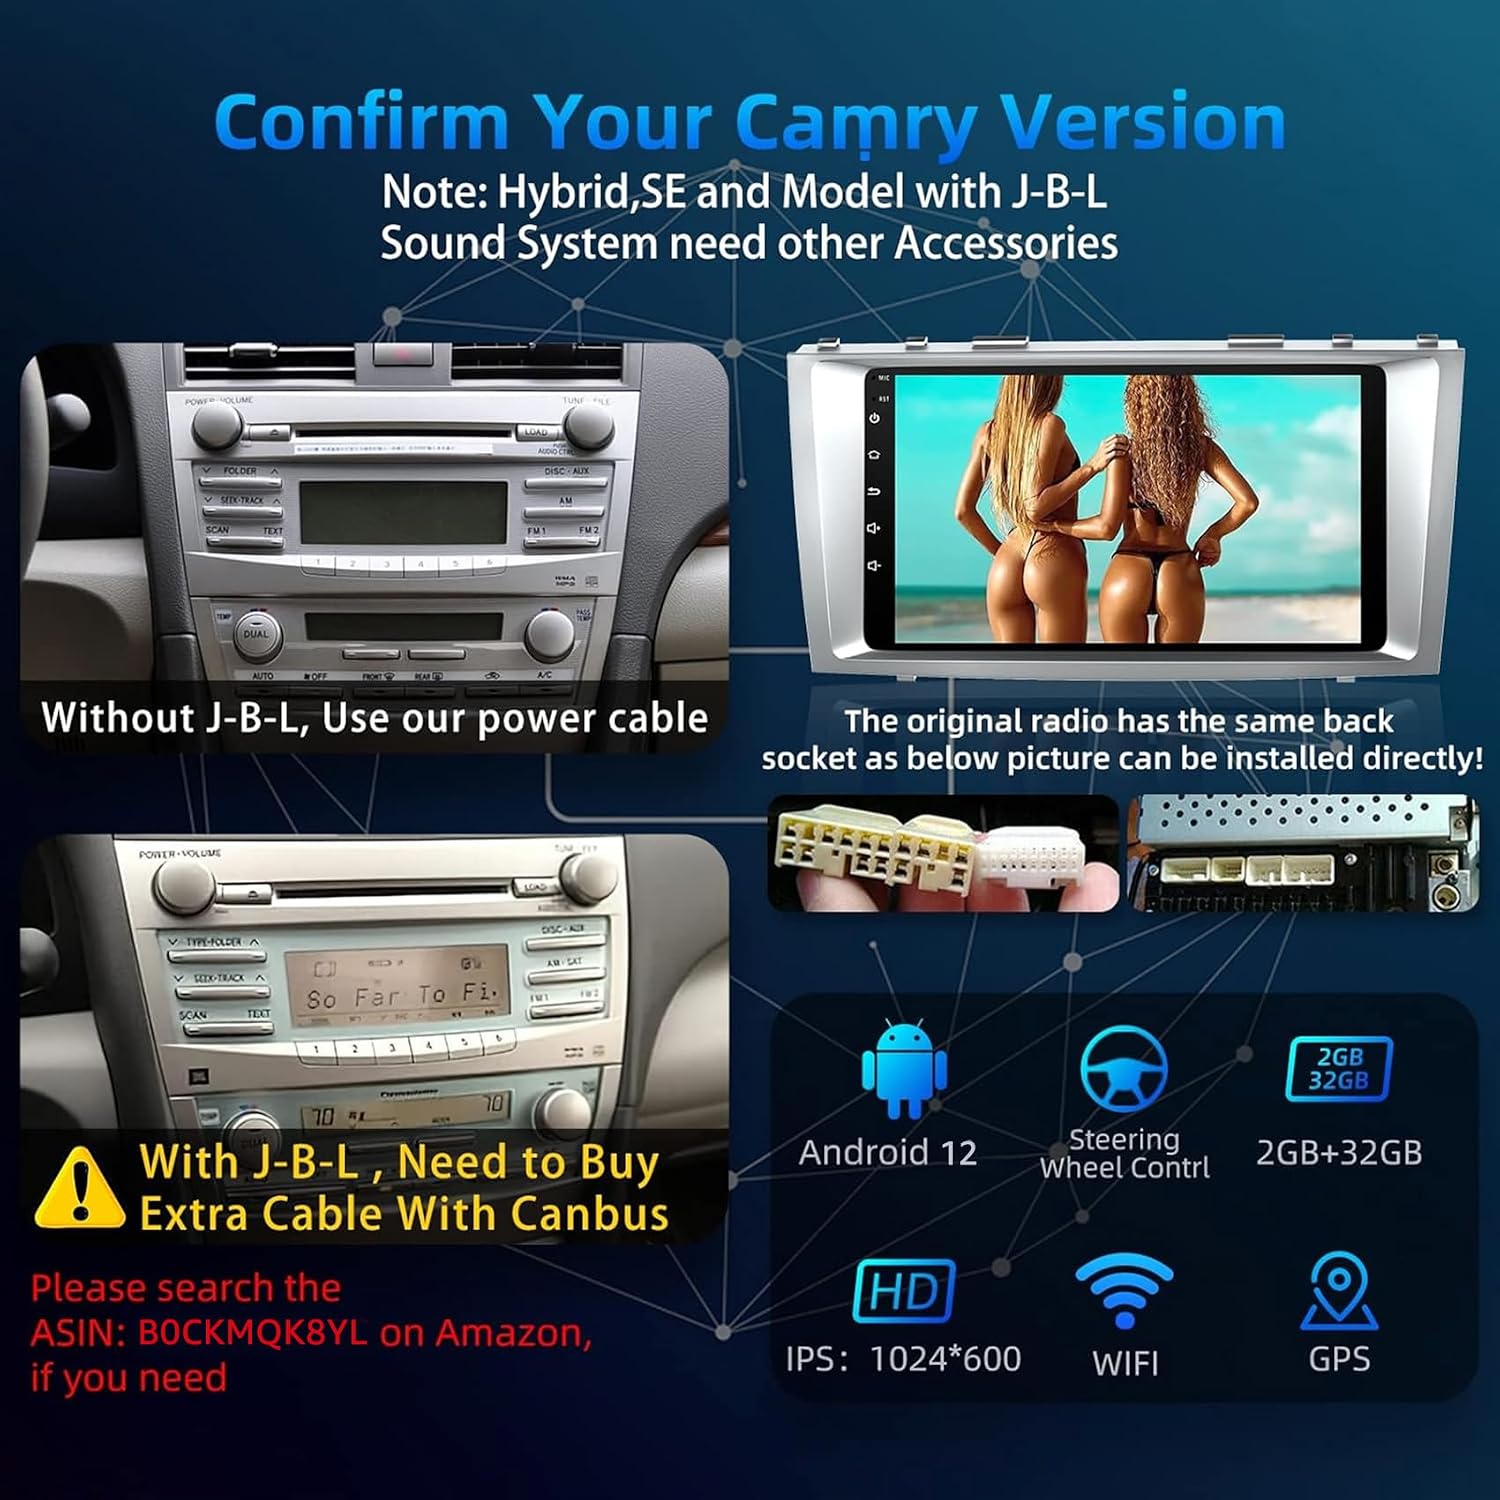
Image: Visual guide for confirming Camry version, highlighting the difference between models with and without the original JBL sound system. It shows the original radio's back socket for direct installation and notes that Hybrid/SE models with JBL require an extra CANBUS harness.
- Standard Audio Systems: If your Camry does NOT have the original JBL amplifier, the included power cable is typically sufficient for installation.
- JBL Audio Systems: If your car is equipped with the original JBL amplifier (common in Hybrid and SE models), you will need to purchase an optional harness with CANBUS. Search for ASIN B0CKMQK8YL on Amazon for the compatible harness.
4.2. Wiring Connections
Refer to the wiring diagram provided with your unit and the image below for correct connections. Ensure all cables are securely connected.

Image: Detailed diagram illustrating the various ports on the back of the head unit and their corresponding connections, including Power Cable, Fuse, RCA Cable, USB Cables, CAM-IN Wire, Radio Antenna, and GPS Antenna.
- Power Connection: Connect the main power harness to your vehicle's wiring. Ensure the yellow (B+), red (ACC), and black (GND) wires are correctly connected to constant power, accessory power, and ground, respectively.
- Antenna: Connect the radio antenna and GPS antenna to their respective ports.
- USB: Connect the provided USB cables for external device connectivity.
- Backup Camera: Connect the CAM-IN wire and the backup camera as instructed.
- Microphone: Plug in the external microphone for improved call quality.
4.3. Mounting the Unit
Carefully install the head unit into the dashboard opening. Ensure it is securely fastened and that no wires are pinched. The unit is designed to fit the Toyota Camry 2006-2011 dashboard seamlessly.

Image: Comparison showing the original Toyota Camry dashboard before installation and the dashboard after the 9-inch IPS touchscreen car stereo has been installed, demonstrating a flush and integrated fit.
5. Operating Instructions
5.1. Wireless CarPlay and Wired Android Auto
Connect your smartphone to the car stereo to access navigation, music, calls, and messages directly on the unit's display.

Image: Display of the car stereo screen showing both Apple CarPlay and Android Auto interfaces. CarPlay demonstrates Siri voice commands for finding a restaurant and calling a contact, while Android Auto shows Google Assistant commands for navigation and music control.
- Wireless CarPlay: For iOS devices, enable Wi-Fi and Bluetooth on your iPhone, then connect to the stereo's Bluetooth. Follow on-screen prompts to activate CarPlay.
- Wired Android Auto: For Android devices, connect your phone via a USB cable. Ensure Android Auto is installed on your phone.
- Voice Control: Use Siri or Google Assistant for hands-free operation.
5.2. GPS Navigation
The unit supports both offline and online GPS navigation.

Image: The car stereo screen showing a detailed GPS navigation map with route information. Icons for various navigation applications like iGO and Google Maps are also visible, indicating support for both offline and online mapping services.
- Offline Maps: Pre-loaded maps provide navigation without an internet connection.
- Online Navigation: Connect to Wi-Fi or a mobile hotspot to use online navigation apps like Google Maps for real-time traffic and updates.
5.3. Bluetooth 5.0
Pair your smartphone for hands-free calling and audio streaming.

Image: The car stereo screen displaying a Bluetooth hands-free call interface on the left, showing an incoming call. On the right, a split-screen view is shown with a navigation map on one side and a music player on the other, demonstrating multi-tasking capabilities.
- Pairing: Go to the Bluetooth settings on the stereo and your phone. Select the stereo's name from your phone's available devices to pair.
- Hands-Free Calls: Make and receive calls directly from the stereo screen.
- Audio Streaming: Play music from your phone through the car's speakers.
5.4. FM/RDS Radio
Access local radio stations with clear reception.
- Tuning: Use the radio application to scan for and save your favorite FM stations.
- RDS Function: Radio Data System displays station information where available.
5.5. Split-Screen Mode
Run two applications simultaneously on the 9-inch display.
- To activate, open one app, then long-press the recent apps button or drag another app from the recent apps list to the side of the screen.
5.6. Backup Camera Support
Enhance parking safety with the included backup camera.
- When the vehicle is shifted into reverse, the camera feed will automatically display on the screen.
- Features 170° viewing angle and night vision for optimal visibility.
5.7. Steering Wheel Control (SWC)
Program your vehicle's steering wheel buttons to control the stereo.
- Without JBL Amplifier: Access the 'Steering Learn' function in the car settings. Follow the on-screen instructions to assign functions to your steering wheel buttons.
- With JBL Amplifier (CANBUS required): After connecting the CANBUS harness, ensure the protocol is correctly set in the stereo's settings for SWC functionality.
6. Maintenance
- Screen Cleaning: Use a soft, lint-free cloth to gently wipe the screen. For stubborn marks, slightly dampen the cloth with water or a screen-safe cleaner. Avoid harsh chemicals.
- General Care: Keep the unit free from dust and debris. Ensure proper ventilation around the unit to prevent overheating.
7. Troubleshooting
This section addresses common issues you might encounter. For problems not listed here, please contact customer support.
7.1. Sound Issues with JBL System
Problem: Sound is unstable, fading in and out with an original JBL amplifier.
Solution: Locate the wire labeled 'AMP CTRL' on the wire harness and connect it to the ACC (Accessory) wire.
7.2. Sound Adjustment and Equalizer Settings
Problem: Unable to adjust sound or find equalizer settings.
Solution:
- Adjust volume using the 'up' and 'down' buttons on the unit or steering wheel controls.
- To access equalizer settings, navigate to the menu page and select the equalizer icon. The unit supports a 30-Band EQ.
- If issues persist, press the RST button for 3 seconds to reboot the unit, or unplug and re-plug the power cord.
7.3. Bluetooth Connection Problems
Problem: Cannot connect to Bluetooth.
Solution:
- Ensure Bluetooth is enabled on your mobile phone before turning on the car radio.
- Delete any existing Bluetooth records on your mobile phone and re-attempt pairing.
- Ensure the Camera Input wire is properly connected, as it can improve the Bluetooth signal.
7.4. Touch Screen Unresponsive
Problem: The touch screen does not respond.
Solution: Perform a long press (approximately five fingers) on the car stereo screen, then follow any on-screen prompts to re-calibrate or learn touch inputs. If unresponsive, try pressing the RST button.
7.5. CarPlay Not Working
Problem: CarPlay functionality issues.
Solution:
- Ensure the Camera Input wire is connected to improve the Wi-Fi signal, which CarPlay relies on.
- Turn on Wi-Fi on your mobile phone and connect to the stereo's Wi-Fi network (usually displayed at the top of the Wi-Fi list).
7.6. FM Radio Issues
Problem: Cannot search for stations or no local stations.
Solution:
- Verify that the radio antenna is securely connected.
- Go to 'Settings' on the stereo, slide down to 'Radio Area', and select the correct region for your location.
7.7. Steering Wheel Control Not Working
Problem: Steering wheel controls are not functional.
Solution:
- Without JBL Amplifier: After connecting the steering wheel connector, go to 'Car Settings' and then 'Steering Learn'. Touch a button on the screen, then quickly press the corresponding button on your original car steering wheel until the unit confirms 'Setup success'. Repeat for all buttons.
- With JBL Amplifier (CANBUS required): Ensure the optional CANBUS harness (ASIN B0CKMQK8YL) is correctly installed and the protocol is set in the stereo's settings.
7.8. Noise Issues
Problem: Audible noise from speakers.
Solution:
- If the original speaker power is low, noise may occur at high volumes. Reduce volume or consider speaker upgrades.
- If the speaker cable is grounded, ensure the iron speaker cable is directly connected to the unit's speaker cable.
7.9. Memory Function/Channel Saving Issues
Problem: Settings or saved channels are lost after turning off the vehicle.
Solution: This indicates incorrect wiring of the power cables. The yellow (B+) and red (ACC) wires may be reversed or not receiving constant power. Ensure the yellow wire is connected to a constant 12V power source (battery positive), the red wire to an accessory 12V source (switched with ignition), and the black wire to ground. These three wires must remain energized for the memory function to work correctly.
7.10. Automatic Shut-down or Unit Stuck
Problem: The unit automatically shuts down, freezes, or becomes unresponsive.
Solution:
- Incorrect Wiring: If the blue cable (automatic antenna power supply) is incorrectly connected to the unit's main power cord, it can cause automatic shutdowns. Verify correct wiring.
- Unstable Voltage: Test the unit with a stable 12V-5A power supply. If it functions correctly, the issue may be with your vehicle's power supply.
- Unit Stuck: Insert a needle into the 'RST' (Reset) hole for more than three seconds to restore factory settings. Back up any important data before performing a reset.
8. Specifications
| Feature | Specification |
|---|---|
| Operating System | Android 12.0 |
| RAM + ROM | 2GB RAM + 32GB ROM |
| Screen Size | 9 Inches |
| Screen Type | IPS HD Touch Screen |
| Resolution | 1024 x 600 |
| Connectivity | Bluetooth 5.0, USB, Wi-Fi, Wired Android Auto, Wireless CarPlay |
| Special Features | Wireless CarPlay, Wired Android Auto, GPS Navigation (Offline/Online), DSP, SWC, Backup Camera Input, FM/RDS Radio |
| Audio Output Mode | Stereo |
| Voltage | DC 12V |
| Out Power | 50W * 4 |
| Product Dimensions | 11.57 x 5.51 x 1.97 inches |
| Item Weight | 3.12 pounds |
9. Warranty and Support
Your WOWiViD car stereo comes with a standard manufacturer's warranty. Please refer to the warranty card included in your package for specific terms and conditions.
For technical assistance, troubleshooting not covered in this manual, or warranty claims, please contact WOWiViD customer support through the retailer where you purchased the product or visit the official WOWiViD website for contact information.
When contacting support, please have your product model number (WCP0901C3) and purchase details readily available.