
Weller WLSKD7012A
Weller Digital Soldering Station WLSKD7012A User Manual
Comprehensive guide for setup, operation, and maintenance of your Weller 70W Digital Soldering Station.
Introduction
Thank you for choosing the Weller Digital Soldering Station WLSKD7012A. This manual provides detailed instructions for safe and efficient use of your new soldering station. Please read this manual thoroughly before operation and keep it for future reference.

Figure 1: Weller Digital Soldering Station WLSKD7012A, showing the main unit, soldering iron, and included tips.
Important Safety Information
Always observe the following safety precautions to prevent injury or damage to the equipment:
- Ensure the soldering station is connected to a properly grounded outlet.
- Do not touch the soldering iron tip or heating element when hot. Temperatures can reach up to 896°F (480°C).
- Always place the soldering iron in its integrated safety rest when not in use.
- Use in a well-ventilated area to avoid inhaling solder fumes.
- Keep flammable materials away from the work area.
- Unplug the unit from the power source before cleaning or maintenance.
Setup
Unpacking and Inspection
Carefully remove all components from the packaging and inspect for any damage. The package should include:
- Digital Soldering Station Unit
- 70-Watt Soldering Iron
- 2.4mm Screwdriver Tip (WLTS24IR70)
- 1.6mm Conical Tip (WLTS16IR70)
- 0.8mm Conical Tip (WLTC08IR70)
- Integrated Iron Holder with Cleaning Sponge
- User Manual
- Helping Hands (if included in specific kit)
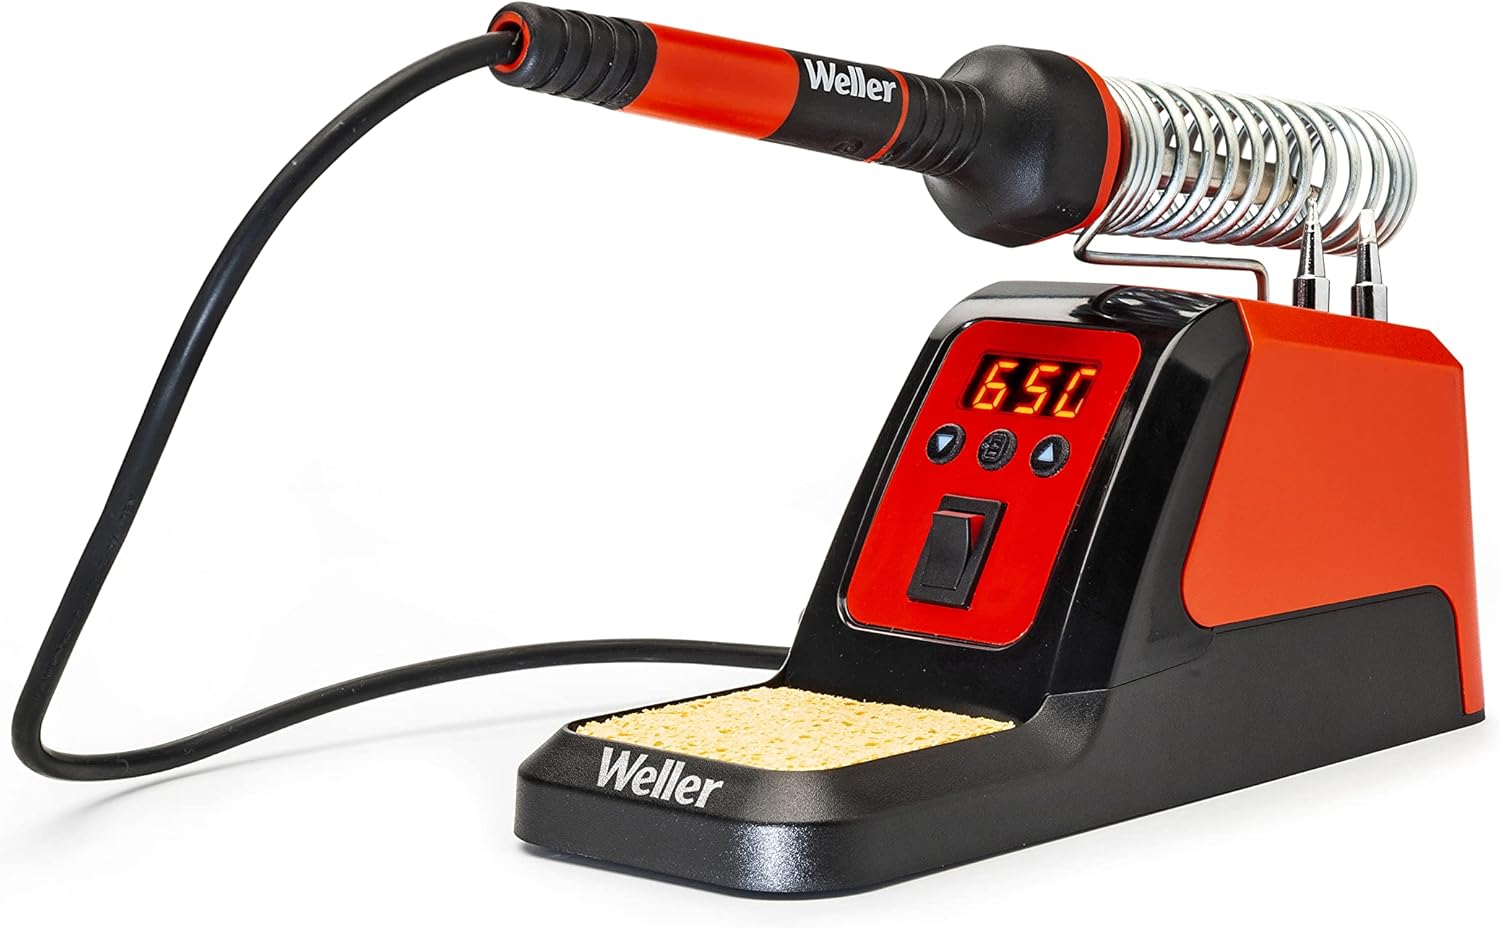
Figure 2: The soldering station with the iron securely placed in its integrated holder.
Connecting the Station
- Place the soldering station on a stable, heat-resistant surface.
- Insert the soldering iron's connector firmly into the designated port on the front of the soldering station.
- Ensure the power switch on the station is in the OFF position.
- Plug the power cord into a standard 120V AC electrical outlet.
Initial Power-On
Flip the power switch to the ON position. The digital display will illuminate, showing the current temperature setting. The iron will begin to heat up rapidly.
Video 1: Official Weller video demonstrating the quick heat-up time and ease of use of the digital soldering station. This video highlights features such as quick tip change and integrated safety rest.
Operating Instructions
Temperature Adjustment
The Weller WLSKD7012A allows for precise temperature control. Use the UP and DOWN arrow buttons on the front panel to adjust the desired temperature. The display will show the set temperature, and the iron will quickly reach it. The station heats up from 212°F to 650°F in approximately 15 seconds.
- Temperature Range: 350°F (177°C) to 896°F (480°C)
- Temperature Display: Switch between Fahrenheit (°F) and Celsius (°C) using the dedicated button.
Tip Installation and Removal
The soldering iron features a quick tip change mechanism. Ensure the iron is cool before changing tips to avoid burns.
- Allow the soldering iron to cool completely.
- Gently unscrew the retaining collar at the base of the tip.
- Carefully pull the old tip straight out.
- Insert the new tip, ensuring it is fully seated.
- Screw the retaining collar back on until snug. Do not overtighten.


Figure 3: Left: Soldering iron with the tip detached. Right: Demonstrating the insertion of a new tip into the soldering iron.
The station comes with three interchangeable tips:
- 2.4mm Screwdriver Tip (WLTS24IR70): Ideal for general purpose soldering and larger components.
- 1.6mm Conical Tip (WLTS16IR70): Suitable for precision work and small components.
- 0.8mm Conical Tip (WLTC08IR70): For very fine soldering and intricate circuits.


Figure 4: From left to right: 2.4mm Screwdriver Tip, 1.6mm Conical Tip, and 0.8mm Conical Tip.
Soldering Techniques
For optimal results, ensure your work area is clean and well-lit. Always tin your soldering iron tip before and after use to prolong its life and ensure efficient heat transfer.
- Prepare Components: Clean the surfaces to be soldered. Apply flux if necessary.
- Tin the Tip: Heat the iron to the desired temperature. Apply a small amount of solder to the tip until it is coated. Wipe excess on a damp sponge or brass wool.
- Apply Heat: Place the tinned tip against both the component lead and the PCB pad simultaneously.
- Apply Solder: Once the joint is hot enough (usually 1-2 seconds), touch the solder wire to the joint, not the iron tip. The solder should flow smoothly and create a shiny, concave joint.
- Remove Solder and Iron: Remove the solder wire first, then the iron. Allow the joint to cool undisturbed.

Figure 5: Ergonomic design of the Weller soldering iron for comfortable and precise handling during soldering tasks.
Maintenance
Tip Cleaning
Regular tip cleaning is crucial for optimal performance and tip longevity.
- Damp Sponge: Use the included damp sponge to wipe off excess solder and oxidation from the tip. Ensure the sponge is damp, not soaking wet, to avoid thermal shock to the tip.
- Brass Wool: For more stubborn oxidation, gently rub the hot tip against brass wool. This cleans the tip without significantly lowering its temperature.
- Tip Tinner/Activator: If the tip becomes heavily oxidized and solder no longer adheres, use a tip tinner/activator. Dip the hot tip into the compound, then clean it.
Station Care
- Keep the station clean and free of solder splashes and debris.
- Wipe the exterior with a soft, damp cloth. Do not use abrasive cleaners or solvents.
- Ensure proper ventilation around the unit.
Troubleshooting
Refer to the table below for common issues and their solutions.
| Problem | Possible Cause | Solution |
|---|---|---|
| Iron not heating up. | Power switch off, loose connection, faulty heating element. | Check power switch and connections. Ensure iron is properly plugged into the station. If problem persists, contact support. |
| Solder not melting or poor joint quality. | Incorrect temperature setting, oxidized tip, insufficient contact. | Increase temperature. Clean and re-tin the tip. Ensure good contact with both component and pad. |
| Temperature display error. | Sensor issue, internal fault. | Turn off and unplug the station, then restart. If error persists, contact support. |
Specifications
| Feature | Detail |
|---|---|
| Model Number | WLSKD7012A |
| Wattage | 70 Watts |
| Voltage | 120 Volts |
| Temperature Range | 350°F - 896°F (177°C - 480°C) |
| Heat-up Time | Approx. 15 seconds (212°F to 650°F) |
| Display Type | LCD |
| Included Components | Digital Soldering Station, 70-Watt Iron, 2.4mm Screwdriver Tip (WLTS24IR70), 1.6mm (WLTS16IR70), 0.8 Conical (WLTC08IR70), Iron Holder, User Manual, and Helping Hands |
| Item Weight | 1.5 pounds |
| Product Dimensions | 12 x 3.25 x 7 inches |
| Manufacturer | Apex Tool Group |
Warranty Information
The Weller Digital Soldering Station WLSKD7012A comes with a 7-Year Warranty. This warranty covers defects in materials and workmanship under normal use. Please retain your proof of purchase for warranty claims. For full terms and conditions, refer to the warranty card included with your product or visit the official Weller website.
Customer Support
For technical assistance, troubleshooting, or warranty inquiries, please contact Weller Customer Support:
- Website: www.weller-tools.com
- Phone: Refer to your regional Weller contact information.
- Email: Refer to your regional Weller contact information.
When contacting support, please have your product model number (WLSKD7012A) and serial number (if applicable) ready.
Related documentsWLSKD7012A


Ask a question about this manual
Ask about setup, troubleshooting, compatibility, parts, safety, or missing instructions. Manuals+ will review the question and use this page’s manual context to help answer it.