1. Introduction
Thank you for choosing the Toshiba Smart 3-in-1 Portable Electric Air Conditioner. This versatile unit is designed to provide efficient cooling, dehumidification, and fan-only operation for your indoor spaces. Its portable design allows for flexible placement, and smart features offer convenient control. This manual provides essential information for safe and effective operation, setup, maintenance, and troubleshooting.
2. Setup and Installation
2.1 Unpacking
Carefully remove all packaging materials. Ensure all components are present: the portable AC unit, exhaust hose, window slider kit, remote control, and user manual. Inspect the unit for any shipping damage.
2.2 Placement
Place the air conditioner on a flat, stable surface. For optimal performance, ensure there is at least 20 inches (50 cm) of space around the unit to allow for proper airflow. This unit is designed to cool areas up to 300 square feet.

Figure 2.1: Front view of the Toshiba portable air conditioner.
2.3 Window Kit Installation
The window slider kit is essential for exhausting hot air outside.
- Assemble the window slider kit to fit your window opening.
- Attach one end of the exhaust hose to the air outlet on the back of the unit.
- Attach the other end of the exhaust hose to the adapter in the window slider kit.
- Secure the window slider kit in the window opening, ensuring a tight seal to prevent hot air from re-entering the room.

Figure 2.2: Back view with exhaust port and power cord.
2.4 Power Connection
Plug the unit into a standard 115 Volt AC outlet. Ensure the power cord is not pinched or damaged.
3. Operating Instructions
3.1 Control Panel Overview
The control panel on top of the unit allows you to manage all functions.

Figure 3.1: Control Panel with various buttons and digital display.
- Power Button: Turns the unit On/Off.
- Mode Button: Cycles through Cool, Fan, and Dry (Dehumidifier) modes.
- Fan Speed Button: Adjusts fan speed (High, Medium, Low).
- Temperature Up/Down Arrows: Sets the desired temperature.
- Timer Button: Sets the auto On/Off timer.
- Vent Angle Button: Adjusts the angle of the air vent.
- Sleep Mode: Optimizes settings for quiet night operation.
3.2 Remote Control
The included remote control provides convenient access to all functions from a distance. Ensure batteries are correctly inserted.
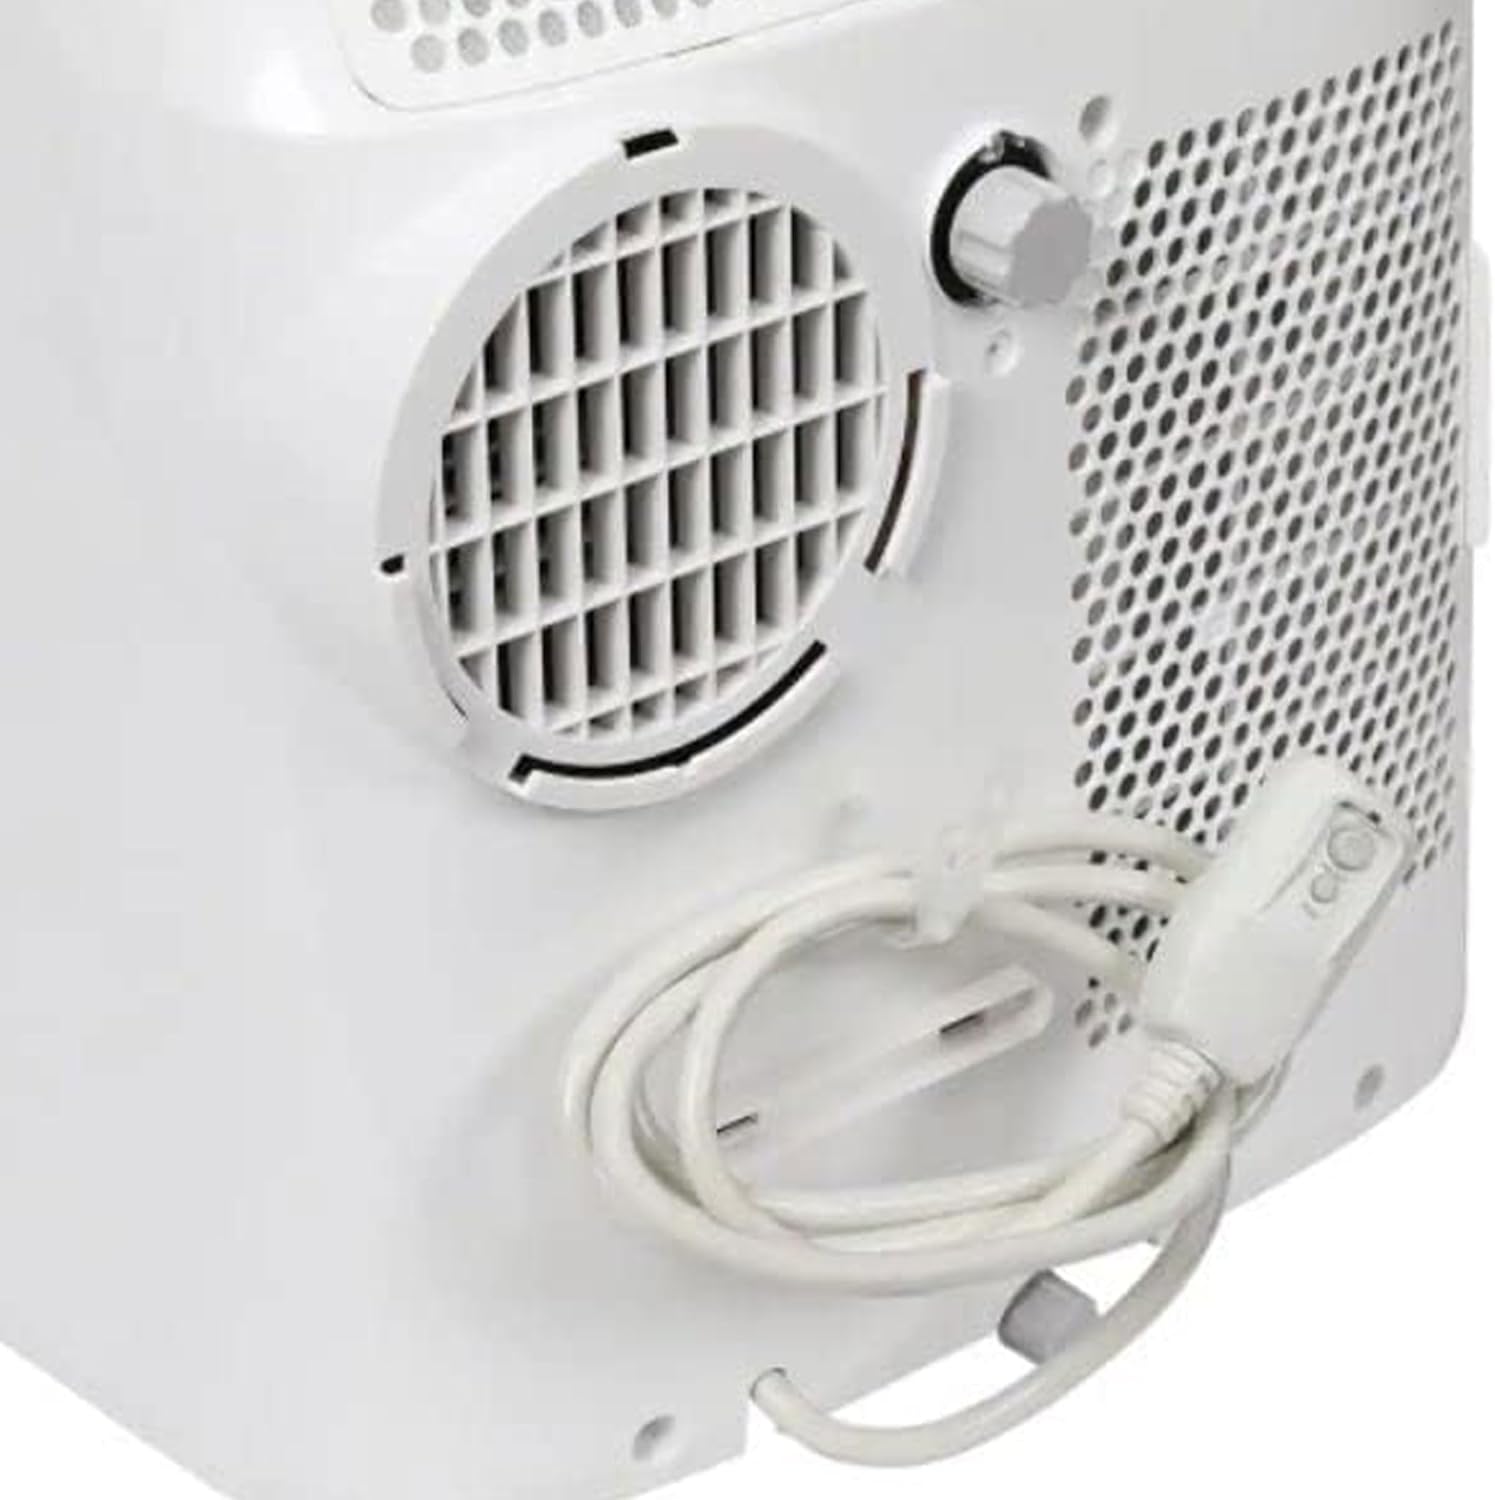
Figure 3.2: Remote Control for convenient operation.
3.3 Smart Features (Smartphone Compatibility)
This unit is compatible with smartphones, allowing for remote control and scheduling via a dedicated app. Refer to the separate smart features guide or app instructions for pairing and usage.
4. Maintenance
Regular maintenance ensures optimal performance and longevity of your air conditioner.
4.1 Air Filter Cleaning
The unit features a reusable air filter. Clean the filter every two weeks or more frequently if used in dusty environments.
- Turn off and unplug the unit.
- Locate the air filter access panel (usually on the back or side).
- Remove the filter and clean it with warm, soapy water.
- Rinse thoroughly and allow to air dry completely before reinserting.

Figure 4.1: Side view indicating air filter location.
4.2 Water Drainage
In dehumidifier mode or high humidity conditions, the unit will collect condensed water. The unit may have an internal reservoir that requires periodic draining or a continuous drainage option.
- When the internal reservoir is full, the unit may stop operating and display an indicator.
- Place a shallow pan or bucket under the drainage port (usually at the bottom rear of the unit).
- Remove the drain plug to allow water to flow out.
- For continuous drainage, attach a suitable drain hose (not included) to the drainage port and direct it to a floor drain.
4.3 Storage
Before long-term storage, ensure the unit is completely drained of water and the filter is clean and dry. Store in a cool, dry place, preferably covered to protect from dust.
5. Troubleshooting
If you encounter issues, refer to the following common problems and solutions.
| Problem | Possible Cause | Solution |
|---|---|---|
| Unit does not turn on. | No power, tripped circuit breaker, full water tank. | Check power cord, reset breaker, drain water tank. |
| Unit is not cooling effectively. | Dirty air filter, blocked air intake/exhaust, room too large, open doors/windows. | Clean filter, clear obstructions, ensure room size is within capacity, close openings. |
| Excessive noise. | Unit not on a level surface, fan obstruction. | Place on a flat surface, check for foreign objects in fan. |
| Water leaking. | Drain plug not secured, continuous drainage hose kinked/blocked. | Secure drain plug, check and clear drainage hose. |
For issues not covered here, please contact customer support.
6. Specifications
| Feature | Detail |
|---|---|
| Brand | TOSHIBA |
| Model Number | RAC-PD1013CWRU |
| Item Weight | 66 pounds |
| Product Dimensions | 27.6 x 17.9 x 27.6 inches |
| Installation Type | Portable |
| Special Features | Portable, Remote control, Smartphone Compatible |
| Color | White |
| Voltage | 115 Volts |
| Floor Area Coverage | Up to 300 Square Feet |
| Refrigerant | R 410A |
| Filter Type | Reusable Filter |
| Power Source | Corded Electric |
7. Warranty and Support
For warranty information and customer support, please refer to the documentation included with your product or visit the official Toshiba support website.
This product is part of the Amazon Renewed program, indicating it has been professionally inspected and tested to work and look like new. Renewed products are eligible for replacement or refund under the Amazon Renewed Guarantee if not satisfied with the purchase.
8. Official Product Videos
No official seller-created product videos were found for this model in the provided data. Please refer to the written instructions and diagrams for guidance.


