
1. Introduction
The Futaba 10PX is a high-performance 2.4GHz 10-channel T-FHSS Spec Radio System designed for precision control in remote-controlled applications. This system features a full-color touch screen LCD, measuring 4.3 inches, which offers clear visibility in various lighting conditions due to its transreflective technology. This manual provides essential information for the proper setup, operation, and maintenance of your Futaba 10PX system.
2. Safety Information
Important Safety Precautions:
- Always follow the manufacturer's instructions provided with the product.
- Avoid exposing the radio system to water, excessive moisture, or extreme temperatures.
- Keep the device and its components out of reach of children to prevent accidental damage or injury.
- Ensure proper ventilation during operation and charging to prevent overheating.
- Do not attempt to disassemble or modify the transmitter or receiver, as this may void the warranty and cause malfunction.
3. Product Overview
3.1 Key Features
- Full-color 4.3-inch transreflective touch screen LCD for clear visibility.
- F-4G system with telemetry capabilities.
- S.BUS2 system supporting up to 10 channels.
- MINIZ system compatibility.
- Advanced mixing functions: Gyro mixing, Brake mixing for large cars, Steering mixing for precise servo settings, 4WS mixing for crawlers, Dual ESCs mixing for independent control.
- Adjustable Futaba car gyro sensitivity.
3.2 Components
The Futaba 10PX system includes the transmitter unit and an R404SBS Receiver. Familiarize yourself with the main components of the transmitter:
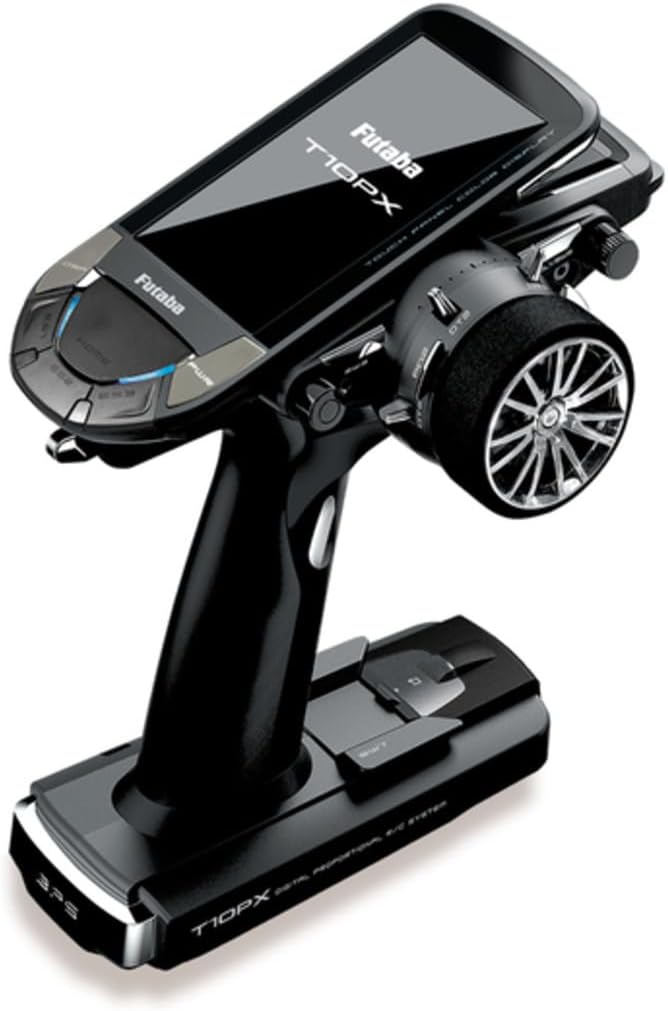
Figure 1: Futaba 10PX Transmitter. This image shows the black-colored transmitter with its large, angled color touch screen display, a prominent steering wheel on the right side, and various control buttons and switches on the left and top surfaces. The base of the transmitter is wide, providing stability.
- Touch Screen LCD: Main interface for settings and telemetry data.
- Steering Wheel: For precise steering control.
- Throttle Trigger: For acceleration and braking control.
- Control Buttons/Switches: Various programmable buttons and switches for auxiliary functions.
- Antenna: Integrated for 2.4GHz signal transmission.
- Battery Compartment: Located at the base for power source.
4. Setup
4.1 Battery Installation
The Futaba 10PX requires a compatible battery for operation. While AA batteries can be used temporarily, a dedicated Futaba LiPo battery and charger are recommended for optimal performance and extended use. Refer to the battery manufacturer's instructions for charging and handling.
- Open the battery compartment cover located at the bottom of the transmitter.
- Carefully insert the charged battery, ensuring correct polarity if applicable.
- Securely close the battery compartment cover.
4.2 Receiver Binding (R404SBS)
To establish communication between the transmitter and the R404SBS receiver, a binding process is required. Consult the detailed instructions provided with the R404SBS receiver for the specific binding procedure, as it may vary slightly depending on the firmware version.
- Ensure both the transmitter and receiver are powered off.
- Follow the receiver's instructions to put it into binding mode (usually involves holding a button while powering on).
- Initiate the binding process on the 10PX transmitter via the system menu.
- Confirm successful binding indicated by the receiver's LED status.
4.3 Initial Power-On and Basic Settings
After battery installation and receiver binding:
- Power on the transmitter using the power button.
- The full-color touch screen LCD will display the main menu.
- Navigate through the menus using the touch screen to set basic parameters such as model memory, trim settings, and servo directions. Refer to the on-screen prompts and the detailed digital manual for advanced configurations.
5. Operating Instructions
5.1 Basic Control
- Steering: Rotate the steering wheel left or right to control the direction of your vehicle.
- Throttle: Pull the throttle trigger towards you for acceleration (forward) and push it away for braking/reverse.
5.2 Using the Touch Screen LCD
The 4.3-inch touch screen is the primary interface for advanced settings and monitoring. Tap icons and menus to navigate. Use swipe gestures for scrolling through lists or pages.
- Main Menu: Access various functions like Model Select, System Settings, Telemetry, and Mixing.
- Telemetry: Monitor real-time data from your vehicle (e.g., battery voltage, temperature) if compatible sensors are installed and connected via S.BUS2.
- Mixing Functions: Configure advanced control schemes such as gyro mixing for stability, brake mixing for large vehicles, and 4WS mixing for crawlers directly from the touch screen interface.
5.3 Advanced Settings and Customization
The 10PX offers extensive customization options. Explore the system menus to fine-tune your control experience:
- Channel Assignment: Assign functions to different channels and programmable switches.
- End Point Adjustment (EPA): Set the maximum travel for each servo.
- Dual Rate (D/R): Adjust the sensitivity of steering and throttle.
- Exponential (EXP): Modify the response curve of controls around the center.
- Model Memory: Store and recall settings for multiple vehicles.
6. Maintenance
6.1 Cleaning
- Wipe the transmitter body and screen with a soft, dry, lint-free cloth.
- For stubborn dirt, slightly dampen the cloth with water; avoid harsh chemicals or abrasive cleaners.
- Ensure no moisture enters openings or ports.
6.2 Storage
- Store the transmitter in a cool, dry place, away from direct sunlight and extreme temperatures.
- If storing for an extended period, remove the battery to prevent leakage or damage.
- Use a protective case to prevent physical damage during transport or storage.
6.3 Battery Care
- Always use the recommended charger for your battery type.
- Do not overcharge or over-discharge batteries.
- Inspect batteries regularly for any signs of damage or swelling.
7. Troubleshooting
This section addresses common issues you might encounter. For more complex problems, refer to the official Futaba support resources.
| Problem | Possible Cause | Solution |
|---|---|---|
| Transmitter does not power on. | Dead or improperly installed battery. | Ensure battery is fully charged and correctly inserted. Check battery contacts. |
| No control response from vehicle. | Receiver not bound, receiver not powered, or out of range. | Perform binding procedure again. Check receiver power. Ensure vehicle is within operating range. |
| Erratic control or signal loss. | Interference, low transmitter/receiver battery, or damaged antenna. | Move to an area with less interference. Charge batteries. Inspect antennas for damage. |
| Touch screen unresponsive. | Software glitch or physical damage. | Restart the transmitter. If issue persists, contact Futaba support. |
If you encounter issues not listed here or require further assistance, please contact Futaba customer support or visit their official website for detailed troubleshooting guides and FAQs.
8. Specifications
| Attribute | Detail |
|---|---|
| Model Number | 10PX |
| Brand | Futaba |
| Product Dimensions | 10.9 x 10.9 x 6.9 inches |
| Item Weight | 3.5 pounds |
| Connectivity Technology | S.BUS2, MINIZ |
| Power Source | Battery Powered |
| Material | Metal |
| Display | Full-color touch screen LCD (4.3-inch) |
| Channels | 10-Channel |
| Frequency | 2.4GHz (T-FHSS Spec) |
9. Warranty and Support
For detailed warranty information, please refer to the official Futaba warranty policy included with your product packaging or available on the Futaba official website. Warranty terms typically cover manufacturing defects for a specified period from the date of purchase.
For technical support, service, or inquiries regarding parts, please contact Futaba customer service directly. Keep your proof of purchase and product serial number ready when contacting support.
Official Futaba Website: www.futabarc.com (Please verify the current official website for support contact details.)


