
Introduction
Thank you for choosing the Hyper Tough Keyed Ball Doorknob and Deadbolt Twin Pack. This product is designed to provide enhanced security and functionality for your exterior residential and light commercial doors. This manual provides detailed instructions for proper installation, operation, and maintenance to ensure optimal performance and longevity of your lock set.

Image: The Hyper Tough Keyed Ball Doorknob and Deadbolt Twin Pack, showcasing two doorknobs and two deadbolts in an antique brass finish.
Safety Information
- Always wear appropriate safety gear, such as gloves and eye protection, during installation.
- Ensure the door is stable and properly supported before beginning installation.
- Keep small parts away from children to prevent choking hazards.
- Do not use abrasive cleaners or solvents on the lock finish, as this may damage the antique brass.
- If you are unsure about any step, consult a qualified professional.
Setup and Installation
This section provides step-by-step instructions for installing your Hyper Tough doorknob and deadbolt. The process is similar for both components.
Tools Required:
- Phillips head screwdriver
- Measuring tape
- Pencil
- Drill (if pre-drilled holes are not present)
- Wood chisel (optional, for mortising strike plate)
Pre-Installation Check:
Ensure your door is prepared for installation. The lock set is compatible with standard doors 1-3/8" to 1-3/4" thick. The adjustable latch supports backsets of 2-3/8" or 2-3/4".
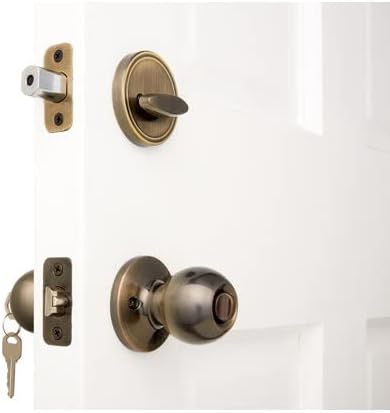
Image: An example of the Hyper Tough doorknob and deadbolt installed on a white door, showing the exterior components and a key.
Installation Steps:
- Prepare the Door: If installing on a new door, drill a 2-1/8 inch diameter hole for the lock body and a 1-inch diameter hole for the latch bolt. Ensure the backset (distance from door edge to center of lock hole) is either 2-3/8 inches or 2-3/4 inches.
- Install the Latch Bolt: Insert the latch bolt into the 1-inch hole on the edge of the door. Ensure the bevel of the latch faces the door frame. Secure it with the provided screws. The latch is reversible for left or right-handed doors.
- Install the Exterior Assembly: For the doorknob, insert the exterior knob assembly through the 2-1/8 inch hole, ensuring the spindle passes through the latch mechanism. For the deadbolt, insert the exterior cylinder assembly.
- Install the Interior Assembly: Place the interior mounting plate over the spindle/tailpiece and secure it to the exterior assembly with the provided screws. Ensure the components are aligned and the screws are tightened evenly.
- Attach the Interior Knob/Thumb Turn: For the doorknob, attach the interior knob to the spindle. For the deadbolt, attach the thumb turn to the tailpiece. Secure with set screws if applicable.
- Install the Strike Plate: Mark the position of the latch bolt on the door frame. Chisel out a shallow mortise for the strike plate so it sits flush with the frame. Secure the strike plate with the provided screws.
- Test Operation: Close the door and test the doorknob and deadbolt operation with the key and from the interior. Ensure smooth locking and unlocking.
Operating Instructions
Doorknob Operation:
- Doorknob: The latch bolt is operated by turning the knob from either side. This allows for easy entry and exit.
Deadbolt Operation:
- Unlocking from Exterior: Insert the key into the cylinder and turn to retract the deadbolt.
- Locking from Exterior: Insert the key into the cylinder and turn to extend the deadbolt.
- Unlocking/Locking from Interior: Turn the thumb turn on the interior side to retract or extend the deadbolt.
Both the doorknob and deadbolt are keyed alike, meaning the same key will operate both locks in the twin pack.
Maintenance
- Cleaning: Clean the lock set regularly with a soft, damp cloth. Avoid using abrasive cleaners, solvents, or harsh chemicals, as these can damage the finish.
- Lubrication: Periodically apply a small amount of graphite lubricant or a silicone-based spray to the keyway and internal mechanisms to ensure smooth operation. Do not use oil-based lubricants as they can attract dirt.
- Tightening Screws: Over time, screws may loosen. Periodically check and tighten all mounting screws to ensure the lock set remains securely attached to the door.
Troubleshooting
| Problem | Possible Cause | Solution |
|---|---|---|
| Key is difficult to insert or turn. | Dirt or debris in keyway; lack of lubrication; bent key. | Apply graphite lubricant to keyway. Check key for damage; use a spare key. |
| Latch bolt does not retract fully. | Misalignment of lock components; screws too tight. | Loosen mounting screws slightly and re-align components. Re-tighten carefully. |
| Deadbolt does not extend or retract smoothly. | Strike plate misalignment; debris in bolt hole. | Adjust strike plate position. Clear any obstructions from the bolt hole in the door frame. |
| Doorknob/deadbolt feels loose. | Mounting screws are loose. | Tighten all visible mounting screws. |
Specifications
- Model: HT3142-109
- Product Type: Keyed Ball Doorknob and Deadbolt Combo
- Finish: Antique Brass
- Material: Brass
- Backset: Adjustable 2-3/8" or 2-3/4"
- Door Thickness: Fits 1-3/8" to 1-3/4" thick doors
- Lock Type: Key Lock (Keyed Alike)
- Security Features: Pick, bump, and drill resistant; anti-pry shield; anti-saw pins (deadbolt)
- Package Contents: Two (2) Ball Doorknobs, Two (2) Single-Cylinder Deadbolts, Keys, Installation Hardware
Warranty Information
Hyper Tough products are manufactured to high-quality standards. For specific warranty details regarding your Keyed Ball Doorknob and Deadbolt Twin Pack, please refer to the warranty card included in your product packaging or visit the official Hyper Tough website. Please retain your proof of purchase for any warranty claims.
Support
If you require further assistance or have questions not covered in this manual, please contact Hyper Tough customer support. Contact information can typically be found on the product packaging or the official Hyper Tough website.
For more information, you may visit the Hyper Tough brand page on Amazon.