1. Introduction
This manual provides comprehensive instructions for the safe and effective operation, setup, and maintenance of the Sealey VS869 Smoke Diagnostic Tool Leak Detector EVAP. This tool is designed to assist technicians in identifying leaks within various automotive systems, including air intake, cooling, evaporation (EVAP), fuel, exhaust, and vacuum systems.
Please read this manual thoroughly before operating the device to ensure proper usage and to prevent damage or injury.
2. Safety Information
WARNING: Failure to follow these safety instructions may result in electric shock, fire, serious injury, or property damage.
- Ensure the work area is well-ventilated to prevent accumulation of smoke.
- Connect the unit only to a 12V vehicle battery. Do not exceed the specified voltage.
- The unit may become hot during operation. Avoid direct contact with hot surfaces.
- Use only approved mineral oil for smoke generation. Do not substitute with other liquids.
- Wear appropriate personal protective equipment (PPE), including eye protection and gloves.
- Keep children and unauthorized personnel away from the operating area.
- Disconnect the power supply before performing any maintenance or refilling oil.
- Do not operate the tool if it is damaged or malfunctioning.
3. Product Overview
The Sealey VS869 is a compact and efficient diagnostic tool. Below is an illustration of the main unit and its primary components.
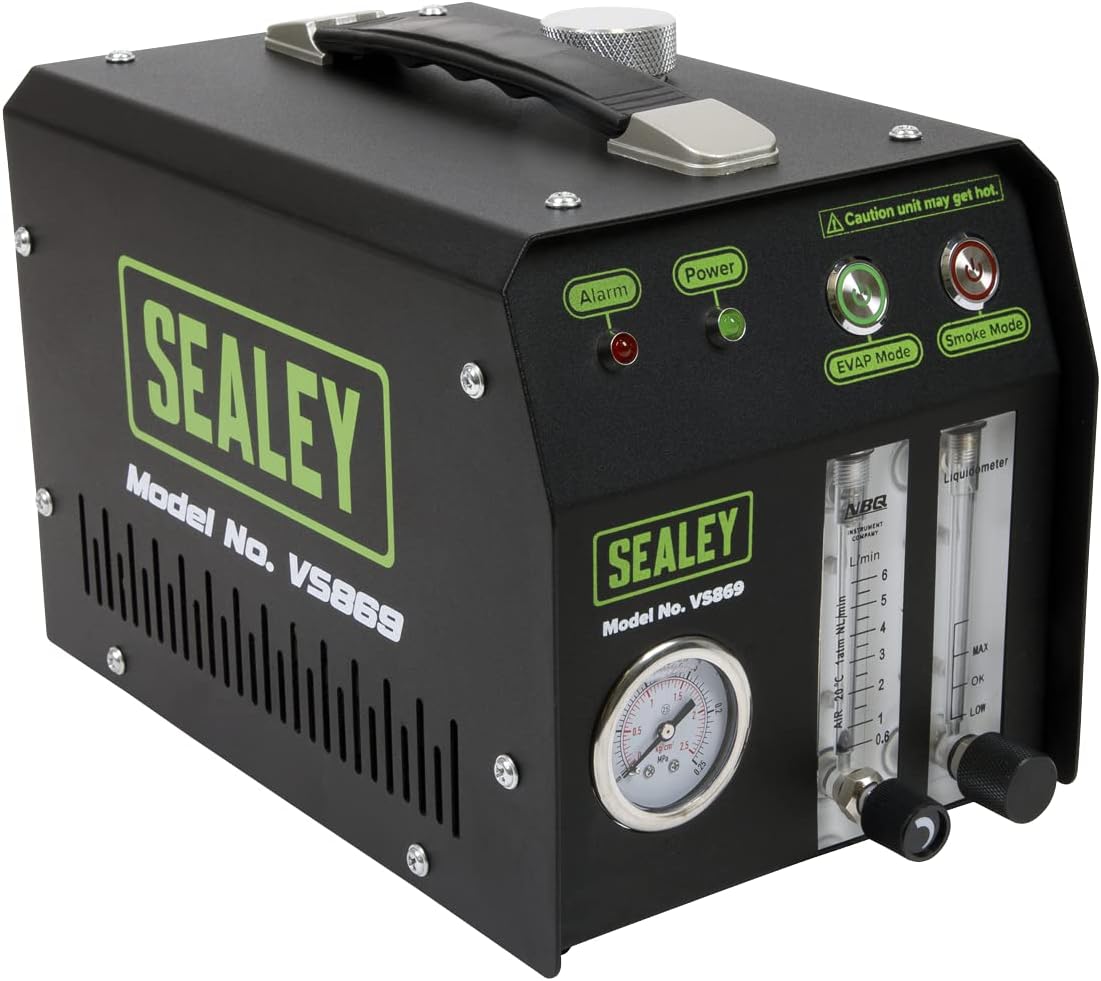
Figure 3.1: Front view of the Sealey VS869 Smoke Diagnostic Tool, showing the control panel, pressure gauge, and flow meters.
3.1. Main Unit Controls and Indicators
- Power Button: Activates or deactivates the unit.
- EVAP Mode Button: Engages the EVAP test mode.
- Smoke Mode Button: Engages the smoke generation mode.
- Alarm Indicator: Illuminates to signal an alert or error condition.
- Power Indicator: Illuminates when the unit is powered on.
- Pressure Gauge: Displays the internal pressure during operation.
- Liquid Meter (Flow Meter): Indicates the flow rate of smoke/air.
3.2. Included Components
The Sealey VS869 comes with the following accessories to facilitate various diagnostic tasks:
Figure 3.2: The Sealey VS869 unit displayed with all accompanying accessories, including various adapters, hoses, and power cables.
- Cone Adapter
- Power Cord Clamp (for 12V battery connection)
- Valve Core Wrench
- Test Oil Refill Bottle
- Smoke Hose
- EVAP Connector
- Universal Airbag Adapter
- Rubber Blanking Cones (8 pieces)

Figure 3.3: Close-up of the universal airbag adapter, used for sealing various openings during testing.

Figure 3.4: The set of eight rubber blanking cones, available in various sizes for sealing different diameter openings.
Rubber cone sizes included: Ø5-10mm, 9-15mm, 14-19mm, 18-26mm, 25-35mm, 32-45mm, 45-60mm, 60-75mm.

Figure 3.5: The cone adapter, designed for sealing larger openings or inlets.
4. Setup
4.1. Adding Mineral Oil
- Ensure the unit is powered off and disconnected from any power source.
- Locate the oil filler cap on the top of the unit.
- Unscrew the cap and carefully pour the recommended mineral oil (not included) into the reservoir using the provided refill bottle. Do not overfill; observe the 'MAX' and 'MIN' markings on the liquid meter.
- Securely replace the oil filler cap.
4.2. Power Connection
- Connect the power cord clamp to a 12V vehicle battery. Ensure correct polarity (red to positive, black to negative).
- The Power indicator light on the unit should illuminate.
4.3. Hose Connection
- Attach the smoke hose to the designated outlet on the unit.
- Connect the appropriate adapter (e.g., cone adapter, universal airbag adapter, or EVAP connector) to the other end of the smoke hose, depending on the system being tested.
5. Operating Instructions
Before beginning any test, ensure the system to be tested is clean and dry. Identify the entry point for the smoke or air and seal any other openings using the provided blanking cones or adapters.
5.1. Smoke Mode Operation
- With the unit powered and connected, press the Smoke Mode button. The corresponding indicator light will illuminate.
- The unit will begin generating smoke. Observe the pressure gauge and liquid meter to ensure proper operation.
- Direct the smoke hose into the system being tested.
- Visually inspect the system for smoke escaping, which indicates a leak.
- Once the leak is identified or testing is complete, press the Smoke Mode button again to stop smoke generation.
5.2. EVAP Mode Operation
The EVAP mode is specifically designed for testing automotive evaporative emission control systems.
- Connect the EVAP connector to the vehicle's EVAP system test port.
- Press the EVAP Mode button. The corresponding indicator light will illuminate.
- The unit will introduce a controlled flow of air/smoke into the EVAP system.
- Monitor the pressure gauge and flow meter for any drops or fluctuations that may indicate a leak.
- Use the flow control valve to adjust the flow rate as needed for accurate diagnosis.
- After testing, press the EVAP Mode button to deactivate the mode.
5.3. Flow Control Valve
The flow control valve allows adjustment of the smoke/air output. Turn clockwise to decrease flow and counter-clockwise to increase flow. Adjust as necessary to achieve optimal diagnostic conditions without over-pressurizing the system.
6. Maintenance
6.1. Refilling Mineral Oil
Regularly check the oil level in the liquid meter. When the level approaches the 'MIN' mark, refill the reservoir as described in Section 4.1. Use only the specified mineral oil to ensure proper function and longevity of the unit.
6.2. Cleaning
After each use, wipe down the exterior of the unit with a clean, damp cloth. Do not use abrasive cleaners or solvents. Ensure all hoses and adapters are free from debris before storage.
6.3. Storage
Store the Sealey VS869 in a cool, dry place, away from direct sunlight and extreme temperatures. Ensure all components are properly stored to prevent damage.
7. Troubleshooting
| Problem | Possible Cause | Solution |
|---|---|---|
| No smoke output | Low oil level; Clogged smoke hose; Unit not powered. | Refill mineral oil; Check and clear smoke hose; Verify 12V power connection. |
| Alarm indicator on | Over-pressure; Low oil; Internal fault. | Check system for blockages; Refill oil; Contact Sealey support if problem persists. |
| Inaccurate pressure/flow readings | Gauge/meter malfunction; Loose hose connections. | Ensure all connections are secure; Contact Sealey support for calibration or repair. |
For issues not listed here, please contact Sealey customer support.
8. Specifications
| Feature | Detail |
|---|---|
| Model Number | VS869 |
| Power Source | 12V Vehicle Battery |
| Product Dimensions | 1 x 1 x 1 cm (approximate, as per product data) |
| Item Weight | 3.77 kg |
| Included Components | Cone adapter, power cord clamp, valve core wrench, test oil refill bottle, smoke hose, EVAP connector, universal airbag adapter, 8 rubber blanking cones. |
| Alarm Type | Visual |
9. Warranty and Support
The Sealey VS869 Smoke Diagnostic Tool is covered by a 1-Year Guarantee. Please refer to the official Sealey website or your purchase documentation for full terms and conditions.

Figure 9.1: Sealey 1 Year Guarantee emblem.
For technical assistance, troubleshooting beyond this manual, or warranty claims, please contact Sealey customer support through their official channels.


