
1. Introduction
This manual provides instructions for the MOES Tuya ZigBee Wireless Scene Switch. This device functions as both a wireless dimmer switch for ZigBee lamps and a scenario switch for triggering smart home automations within the Tuya Smart App. It operates on the ZigBee 3.0 protocol and is battery-powered for flexible placement.
Important Note: A Tuya ZigBee Hub is required for the normal operation of this device and is sold separately. Search for B09LM644XJ or B091BRGMTZ on Amazon for compatible hubs.

Figure 1: System overview of the Smart Knob Scene Switch, illustrating its connection through a ZigBee Gateway (Hub) to a WiFi router and smartphone app for control.
2. Setup
2.1 Package Contents
- MOES Tuya ZigBee Wireless Scene Switch
- CR2032 3V DC Battery (pre-installed or included)
- User Manual (this document)
2.2 Battery Installation and Activation
- Carefully remove the back cover of the switch.
- If present, pull out the battery insulation tag to activate the pre-installed CR2032 3V DC battery.
- Ensure the battery is correctly seated with the positive (+) side facing up.
- Replace the back cover securely.
2.3 Pairing with Tuya ZigBee Hub
Before pairing the scene switch, ensure your Tuya ZigBee Hub is properly set up and connected to the Tuya Smart App.
- Open the Tuya Smart App on your smartphone.
- Navigate to your ZigBee Hub in the app and select the option to add a sub-device.
- On the MOES Wireless Scene Switch, locate the 'RESET' button (usually a small pinhole or a recessed button).
- Press and hold the 'RESET' button for approximately 6 seconds until the LED indicator on the switch starts flashing. This indicates it has entered pairing mode.
- Follow the on-screen instructions in the Tuya Smart App to complete the pairing process. The app will confirm once the device is successfully added.

Figure 2: The MOES Smart Knob Scene Switch, demonstrating its compact size and the location of the reset button for initiating pairing mode with the Tuya Smart App.
3. Operating Instructions
The MOES Tuya ZigBee Wireless Scene Switch supports two primary modes of operation: Remote Mode for direct control of ZigBee lamps and Scenario Mode for triggering smart automations.
3.1 Remote Mode (for ZigBee Lamps)
In Remote Mode, the switch acts as a direct controller for compatible ZigBee dimmer lamps that have been added to your Tuya Smart App and linked to the switch. This mode is only available for ZigBee bulbs.
- Single Press: Turns the connected ZigBee lamp ON or OFF.
- Rotate: Adjusts the brightness (dimming) of the lamp. Rotate clockwise to increase brightness, counter-clockwise to decrease.
- Press and Rotate: Sets the color temperature of the lamp (if supported).
- Long Press (>3 seconds): Sets the color of the lamp (if supported).

Figure 3: Brightness adjustment of a ZigBee lamp using the MOES Smart Knob Scene Switch in Remote Mode.

Figure 4: Detailed controls for ZigBee bulbs in Remote Mode, including ON/OFF, dimming, color temperature, and color adjustment.
3.2 Scenario Mode (for Smart Automations)
In Scenario Mode, the switch can be configured within the Tuya Smart App to trigger various smart home automations and scenes involving multiple Tuya smart devices. This allows for complex actions with simple physical interactions.
To set up scenarios:
- Open the Tuya Smart App.
- Go to the 'Smart' section or 'Automation' tab.
- Create a new automation or scene.
- Select the MOES Wireless Scene Switch as the trigger device.
- Choose the specific action on the switch that will act as the trigger (e.g., Single Press, Double Press, Long Press, Rotate, Press and Rotate).
- Define the actions that will occur when the trigger is activated (e.g., turn on multiple lights, adjust thermostat, activate a security mode).
- Save the automation.

Figure 5: Creating smart scenes and routines in the Tuya Smart App using various trigger actions of the MOES Smart Knob Scene Switch.
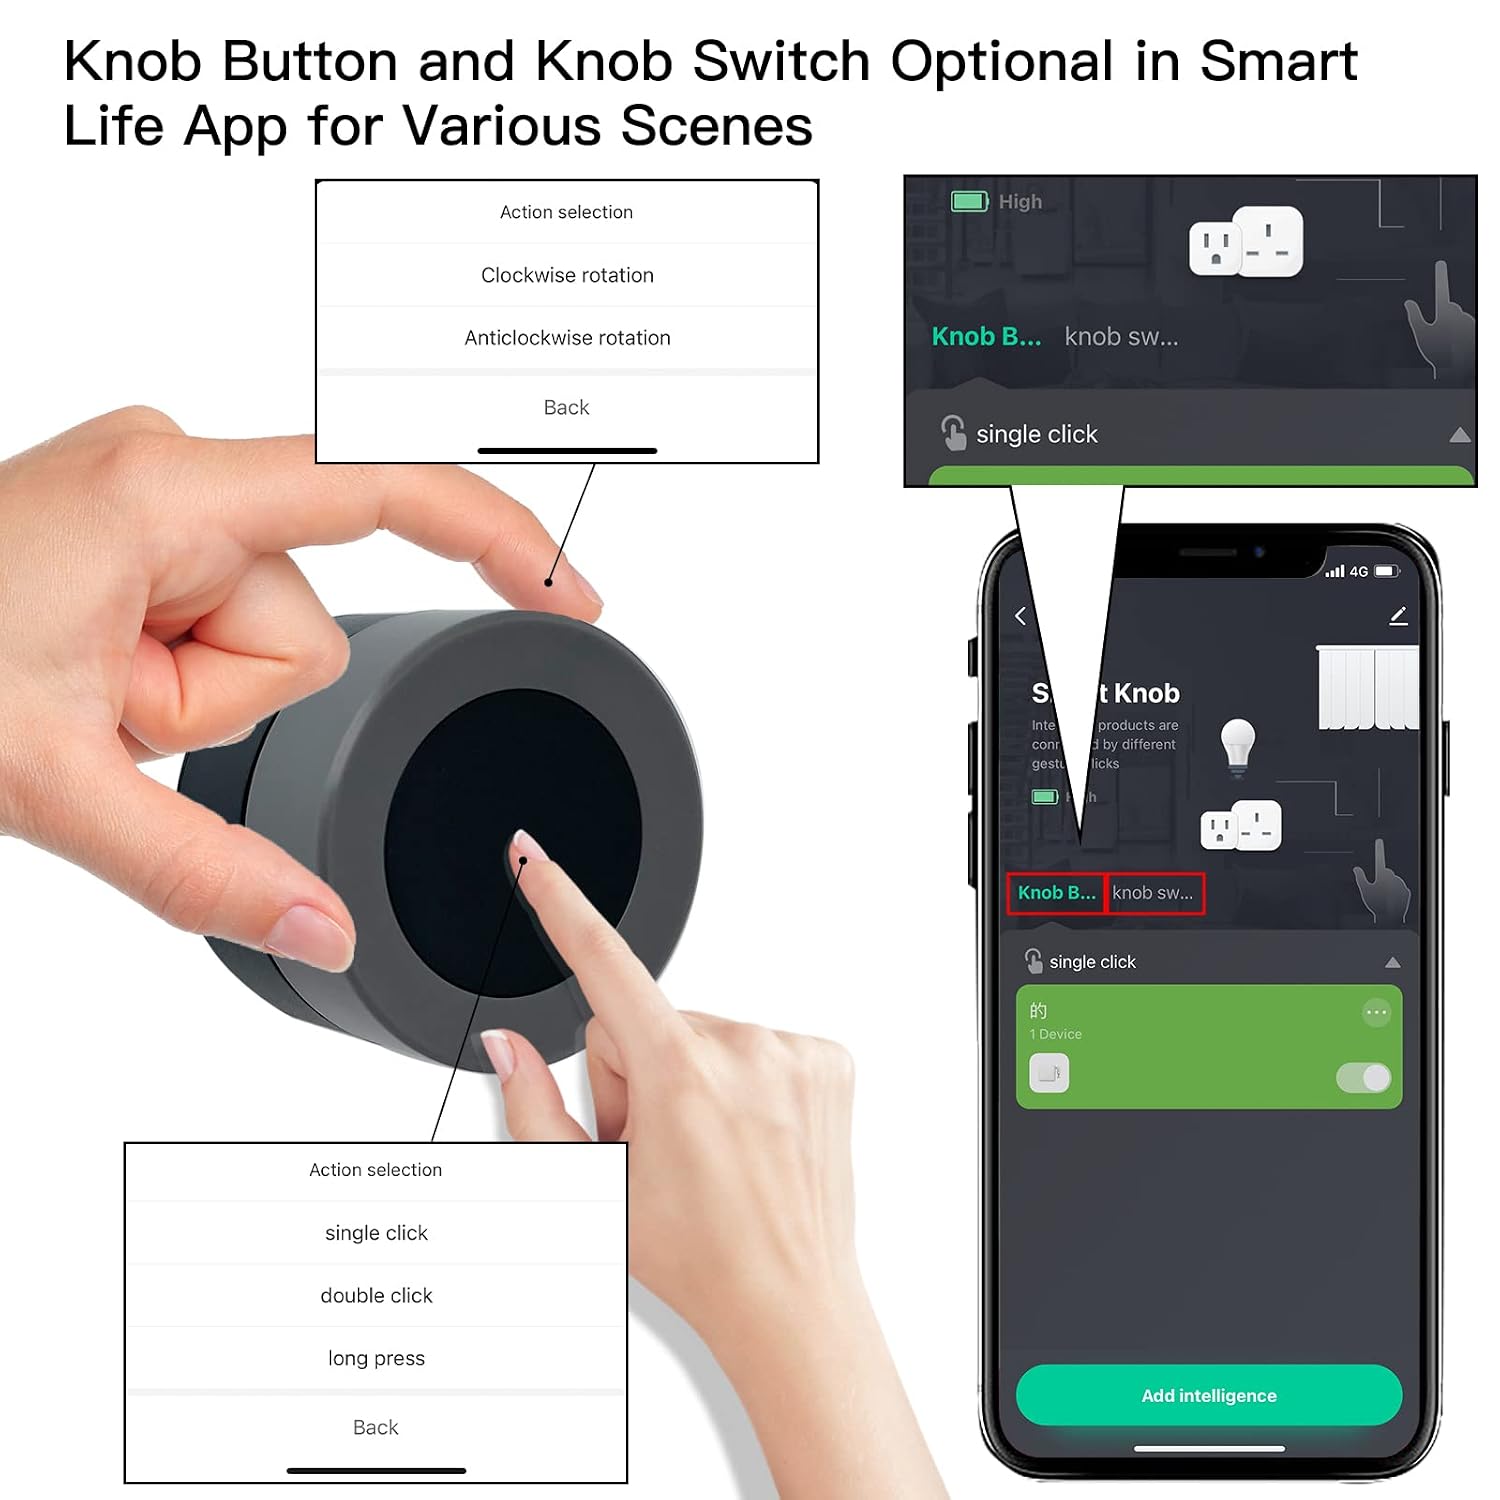
Figure 6: App interface demonstrating the configuration options for the knob button and switch actions within the Smart Life App (compatible with Tuya Smart App).
4. Maintenance
4.1 Battery Replacement
The MOES Wireless Scene Switch is powered by a CR2032 3V DC battery. The typical battery life is approximately 1 year under general use. When the battery is low, the device's performance may degrade, or it may stop responding.
- Remove the back cover of the switch.
- Carefully remove the old CR2032 battery.
- Insert a new CR2032 3V DC battery, ensuring the positive (+) side is facing up.
- Replace the back cover securely.
4.2 Cleaning
To clean the device, use a soft, dry cloth. Do not use liquid cleaners, aerosols, or abrasive materials, as these can damage the device.
5. Troubleshooting
- Device not responding:
- Check if the battery needs replacement.
- Ensure the device is within range of the Tuya ZigBee Hub.
- Verify that the Tuya ZigBee Hub is powered on and connected to your network.
- Cannot pair the device:
- Confirm that you have a Tuya ZigBee Hub and it is in pairing mode within the app.
- Ensure you are holding the 'RESET' button on the switch for the required 6 seconds until the LED flashes.
- Move the switch closer to the ZigBee Hub during the pairing process.
- Remote Mode not controlling lights:
- Verify that the lights you are trying to control are ZigBee lamps. This switch is not compatible with Wi-Fi or other protocol lamps in Remote Mode.
- Ensure the ZigBee lamps are properly added to your Tuya Smart App and linked to the switch.
- Scenario Mode not triggering automations:
- Check the automation settings in the Tuya Smart App to ensure the trigger conditions and actions are correctly configured.
- Verify that all devices involved in the automation are online and functioning correctly.
6. Specifications

Figure 7: Detailed specifications and dimensions of the MOES Tuya ZigBee Wireless Scene Switch.
| Feature | Specification |
|---|---|
| Model | B09VXF285N |
| Power Supply | CR2032 3V DC Battery |
| Communication Protocol | ZigBee 3.0 |
| Control Distance | 50m (open area) |
| Dimensions (L x W x H) | 40 x 40 x 29 mm (1.6 x 1.6 x 1.15 inches) |
| Operating Temperature | -10°C to 45°C (14°F to 113°F) |
| Working Humidity | <90% RH (non-condensing) |
| Battery Life | Approx. 1 year (general use) |
| Control Method | Remote |
| Switch Type | Dimmer Switch, Scene Switch |
| Mounting Type | Wall Mount (via adhesive or screws, not explicitly stated but implied by 'install the cover') |
7. Warranty and Support
For warranty information, please refer to the documentation provided with your purchase or visit the official MOES website. If you encounter any issues that cannot be resolved using this manual, please contact MOES customer support for assistance.


