1. Introduction
This manual provides essential information for the safe and efficient operation, setup, and maintenance of your Scheppach HC06 oil-free air compressor. Please read these instructions thoroughly before using the compressor to ensure proper function and to prevent injury or damage.
The Scheppach HC06 is a compact, oil-free air compressor designed for various applications such as airbrushing, bolting, tire inflation, and sanding. It features a 6-liter tank and operates quietly.
2. Safety Instructions
Always observe the following safety precautions to reduce the risk of electric shock, fire, and serious injury.
- Read the Manual: Familiarize yourself with all controls and proper use before operating the compressor.
- Wear Eye Protection: Always wear safety glasses or goggles when operating the compressor or using air tools.
- Ventilation: Operate the compressor in a well-ventilated area. Do not operate near flammable liquids or gases.
- Electrical Safety: Ensure the power supply matches the voltage specified on the compressor (220-240V). Do not use in wet conditions or expose to rain. Always use a grounded outlet.
- Pressure Safety: Never exceed the maximum operating pressure of the compressor or the air tool being used. Do not direct compressed air at people or animals.
- Maintenance: Disconnect the power supply before performing any maintenance or repairs.
- Children and Bystanders: Keep children and bystanders away from the operating compressor.
3. Product Description and Components
The Scheppach HC06 air compressor is designed for portability and ease of use. It features an oil-free pump, reducing maintenance requirements.
Included Components:
- Scheppach HC06 Air Compressor Unit
- 5-meter Air Hose
- User Manual
Product Overview:
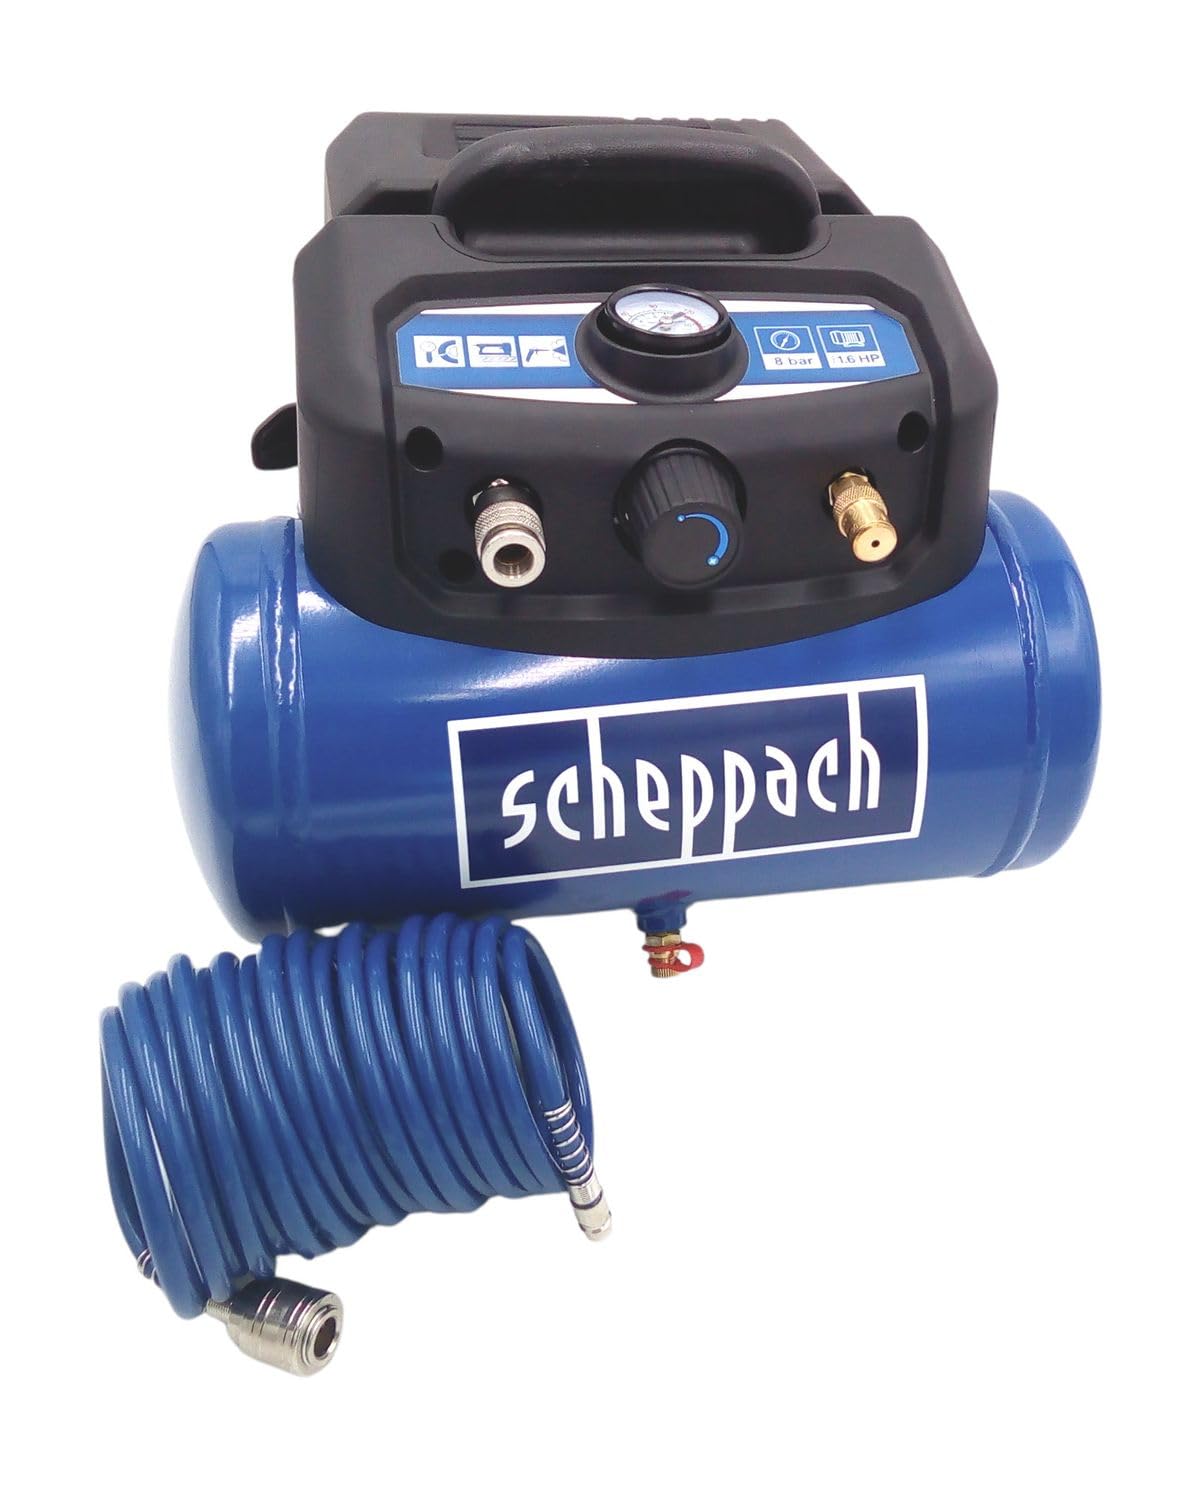
Figure 1: Front view of the Scheppach HC06 air compressor, showing the main unit and handle.

Figure 2: Side view of the Scheppach HC06 air compressor, highlighting the compact design.

Figure 3: Rear view of the Scheppach HC06 air compressor, showing the power switch and label.
4. Setup
- Unpacking: Carefully remove the compressor from its packaging. Inspect for any shipping damage. Report any damage to your supplier immediately.
- Placement: Place the compressor on a stable, level surface in a clean, well-ventilated area. Ensure there is sufficient space around the unit for air circulation.
- Hose Connection: Connect the supplied 5-meter air hose to the compressor's air outlet. Ensure a secure connection to prevent air leaks.
- Electrical Connection: Ensure the power switch is in the "OFF" position. Plug the power cord into a grounded electrical outlet (220-240V, 50Hz).
5. Operating Instructions
- Starting the Compressor: Turn the power switch to the "ON" position. The compressor will start to build pressure in the tank. It will automatically shut off once the maximum pressure (8 bar) is reached.
- Connecting Air Tools: Attach your desired air tool (e.g., airbrush, tire inflator, impact wrench) to the free end of the air hose. Ensure the connection is secure.
- Using the Air Tool: Operate your air tool as per its specific instructions. The compressor will automatically restart when the tank pressure drops below a preset level.
- Stopping Operation: When finished, turn the power switch to the "OFF" position. Disconnect the air tool.
- Draining Condensation: After each use, or at least daily, drain any condensation from the air tank. This prevents rust and extends the life of the tank. Locate the drain valve at the bottom of the tank, place a suitable container underneath, and open the valve until all moisture is expelled. Close the valve securely.
Recommended Uses: This compressor is suitable for airbrushing, bolting, tire inflation, and sanding applications.
6. Maintenance
Regular maintenance ensures the longevity and safe operation of your compressor. Always disconnect the power supply before performing any maintenance.
- Oil-Free Operation: The Scheppach HC06 is an oil-free compressor, meaning no oil changes or lubrication of the pump are required.
- Drain Condensation: As mentioned in the operating instructions, drain the air tank daily or after each use to remove accumulated moisture.
- Cleaning: Keep the compressor clean. Wipe down the exterior with a damp cloth. Ensure air vents are free from dust and debris to prevent overheating. Do not use harsh chemicals or abrasive cleaners.
- Inspect Hoses and Connections: Periodically check the air hose and all connections for wear, damage, or leaks. Replace damaged components immediately.
- Storage: Store the compressor in a dry, clean, and frost-free location when not in use.
7. Troubleshooting
Before attempting any repairs, ensure the compressor is disconnected from the power supply.
| Problem | Possible Cause | Solution |
|---|---|---|
| Compressor does not start | No power supply; Power switch off; Thermal overload activated. | Check power cord and outlet; Turn power switch ON; Allow compressor to cool down, then restart. |
| Low air pressure or continuous running | Air leak in hose or connections; Drain valve open; Faulty check valve. | Check and tighten all connections; Close drain valve; Contact customer support for service. |
| Excessive noise or vibration | Loose components; Compressor not on a stable surface. | Check for and tighten any loose parts; Place compressor on a firm, level surface. |
| Moisture in compressed air | Condensation buildup in tank. | Drain the air tank thoroughly. |
If you encounter problems not listed here or if solutions do not resolve the issue, please contact Scheppach customer support.
8. Technical Specifications
| Model | HC06 |
| Manufacturer | Scheppach |
| Dimensions (L x W x H) | 40 x 37 x 38 cm |
| Weight | 9.7 kg |
| Color | Blue |
| Power Type | Electric Cable |
| Voltage | 220-240 Volts |
| Maximum Power | 1200 Watt |
| Air Flow Capacity | 6 Liters per minute |
| Tank Capacity | 6 Liters |
| Maximum Pressure | 8 Bars |
| Hose Length | 5 Meters |
| Special Features | Oil-free operation |
| Recommended Uses | Airbrushing, Bolting, Tire inflation, Sanding |
9. Warranty and Support
For warranty information, please refer to the documentation provided with your purchase or contact your retailer. Scheppach provides customer support for product inquiries and technical assistance.
Spare Parts Availability: Information regarding the availability of spare parts is currently unavailable. Please contact Scheppach customer service for further assistance.
For further assistance, please visit the official Scheppach website or contact their customer service department.


