
LUVODI XMR-C28-218-AU
LUVODI Lighted LED Bathroom Mirror Instruction Manual
Model: XMR-C28-218-AU | Brand: LUVODI
Product Overview
The LUVODI Lighted LED Bathroom Mirror is a sophisticated and functional addition to any bathroom, offering both aesthetic appeal and practical features. This 48"L x 24"W mirror incorporates dual LED light strips for both front and backlit illumination, providing ample light for various needs. It features dimmable brightness, adjustable color temperatures (warm, natural, white), and an effective anti-fog demister pad, all controlled via intuitive smart touch buttons. Designed for durability and ease of use, this mirror enhances your daily routine with its intelligent features and elegant design.

Figure 1: LUVODI Lighted LED Bathroom Mirror in a modern bathroom setting.
Safety Information
Please read all instructions carefully before installation and use. Failure to follow these instructions may result in electric shock, fire, or other injuries.
- Ensure power is disconnected at the circuit breaker before installation or maintenance.
- Installation should be performed by a qualified electrician in accordance with local electrical codes.
- Do not attempt to disassemble or modify the mirror.
- Keep the mirror away from excessive moisture or direct water spray.
- This mirror is designed for indoor use only.
- The mirror is made with 5mm explosion-proof glass for enhanced safety.
- All electrical components are UL certified and the light bar features IP65 waterproof silicone sleeves.
Package Contents
Verify that all components are present and undamaged before proceeding with installation.
- LUVODI Lighted LED Bathroom Mirror (1 unit)
- Mounting Screws and Wall Anchors (set)
- Instruction Manual (this document)
Specifications
| Feature | Description |
|---|---|
| Brand | LUVODI |
| Model Number | XMR-C28-218-AU |
| Product Dimensions | 48"L x 24"W |
| Material | Aluminum, Glass (5mm explosion-proof) |
| Mounting Type | Wall Mount |
| Lighting Type | Dual LED (Backlit and Front Light) |
| LED Lamp Beads | 2835 type, 120LED/m |
| Lumen Output | 8280-9936lm |
| Color Rendering Index (CRI) | ≥90 (also stated as ≥95-97%) |
| LED Lifespan | Up to 50,000 hours |
| Color Temperature | 3500K (Warm), 4000K (Natural), 6500K (White) |
| Dimming | Stepless dimming (100% to 20%) |
| Anti-fog Demister | Built-in, 800x300mm area, heats to 40°C in 3-4 minutes |
| Power | 75W |
| Voltage | 110V |
| Output Current | 0-3.13A |
| Waterproof Rating | IP65 (for light bar silicone sleeves) |
| Control | Smart Touch Buttons, Wall Switch Control & Memory Function |
Installation Guide (Setup)
Before beginning installation, ensure you have the necessary tools (drill, level, measuring tape, screwdriver) and that the power supply is turned off at the main circuit breaker.

Figure 2: Mirror size selection and wall mounting diagram.
- Preparation: Unpack the mirror carefully and inspect for any damage. Ensure all package contents are present. Choose a suitable location on the wall, considering the mirror's dimensions (48"L x 24"W) and desired height above the vanity (typically 5-8 inches).
- Marking: Use a level and measuring tape to mark the precise drilling points for the mounting screws on the wall. The mirror's hanging brackets are designed for secure wall mounting.
- Drilling: Drill holes at the marked points. Insert the wall anchors into the drilled holes.
- Wiring: The mirror can be connected via a plug or hardwired. Ensure the power supply is OFF. Connect the mirror's electrical wires to the corresponding household wires (Live, Neutral, Ground) according to local electrical codes. The mirror features careful cable outlet design on both sides to help install the switch in different directions and hide wires (2m long).
- Mounting: Carefully lift the mirror and align the hanging brackets with the installed screws/anchors. Secure the mirror firmly to the wall.
- Final Check: Once mounted, turn on the power at the circuit breaker and test all functions of the mirror.
Operating Instructions
The LUVODI LED Bathroom Mirror features smart touch controls for easy operation of its various functions.
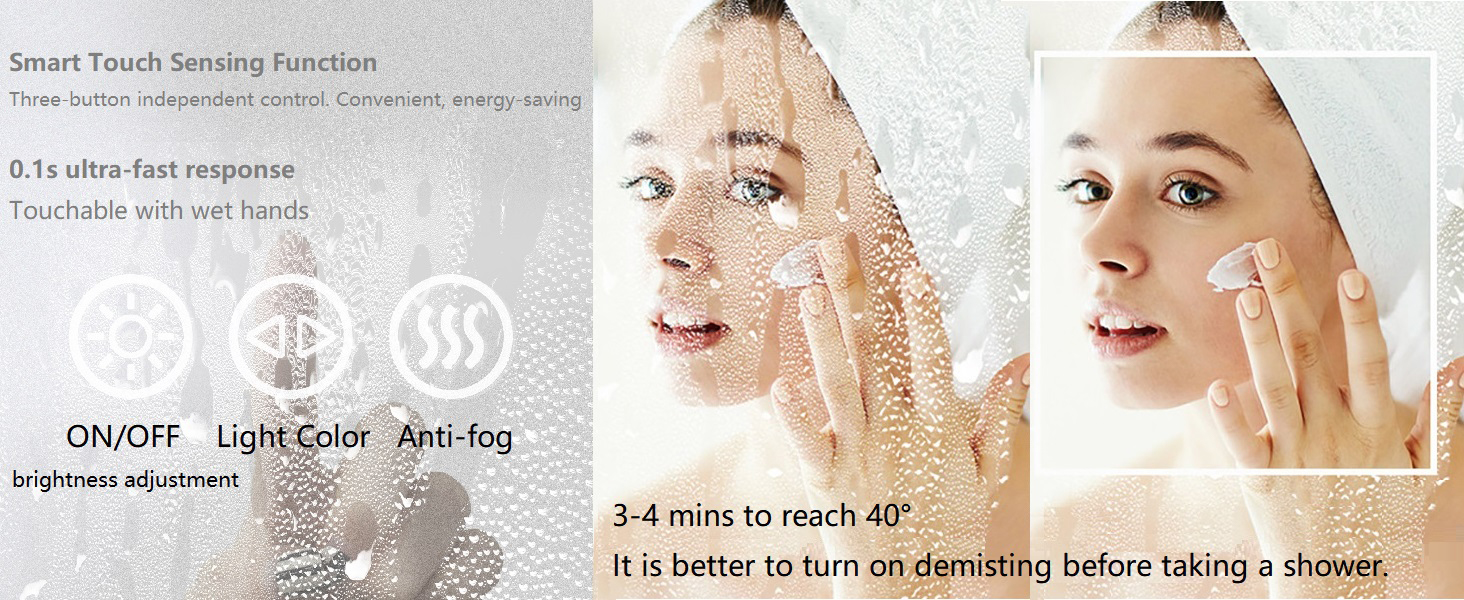
Figure 3: Smart Touch Sensor controls for the mirror.
- Power ON/OFF & Brightness Adjustment: Locate the left touch button (often indicated by a sun icon). A short touch will turn the light ON or OFF. Long touch this button to steplessly dim the light from 100% to 20% brightness. The mirror will remember your last brightness setting.
- Light Color Adjustment: Locate the middle touch button (often indicated by a color temperature icon). A short touch will cycle through the three available color temperatures: Warm (3500K), Natural (4000K), and White (6500K). The mirror will remember your last color temperature setting.
- Anti-fog Function: Locate the right touch button (often indicated by a steam icon). A short touch will activate or deactivate the built-in demister pad. The demister will heat up to 40°C (104°F) within 3-4 minutes to clear fog. This function can be controlled independently of the light. It is recommended to turn on the demisting function before taking a shower for optimal results.
- Wall Switch Control & Memory: If hardwired to a wall switch, turning the wall switch ON/OFF will directly control the mirror's power. The mirror will automatically restore the light and color status from its last use.
Product Feature Demonstration Video
Video 1: A demonstration of the LUVODI Lighted LED Bathroom Mirror's features, including touch controls, lighting adjustments, and anti-fog function. This video highlights the mirror's intelligent design and ease of use in a bathroom setting.
Maintenance and Care
Proper care will ensure the longevity and optimal performance of your LUVODI LED Bathroom Mirror.
- Cleaning: Use a soft, damp cloth with a mild, non-abrasive glass cleaner to wipe the mirror surface. Avoid using harsh chemicals or abrasive materials that could scratch the glass or damage the frame.
- Frame Care: The aluminum frame can be wiped with a soft, dry cloth. Do not use water directly on the frame or electrical components.
- Electrical Components: Do not attempt to clean or service internal electrical components. If any electronic accessories are broken, they are designed for easy replacement by the user, even without extensive repair knowledge.
- Demister Pad: The demister pad requires no special maintenance. Ensure it is kept dry when not in use.
- General: Regularly check the mounting hardware to ensure the mirror remains securely fastened to the wall.
Troubleshooting
If you encounter any issues with your LUVODI LED Bathroom Mirror, refer to the following common problems and solutions:
| Problem | Possible Cause | Solution |
|---|---|---|
| Mirror lights do not turn on. | No power supply; loose wiring; faulty touch switch. | Check circuit breaker. Ensure wiring is secure. Contact customer support if touch switch is unresponsive after power reset. |
| Lights are dim or flickering. | Incorrect brightness setting; power fluctuation; LED strip issue. | Long touch the brightness button to adjust. Check power supply stability. Contact customer support if problem persists. |
| Anti-fog function not working. | Anti-fog function not activated; demister pad issue. | Short touch the anti-fog button to activate. Allow 3-4 minutes for heating. Contact customer support if no heat is detected. |
| Touch buttons are unresponsive. | Wet hands (though designed for wet touch, excessive water may interfere); temporary electronic glitch. | Ensure hands are not excessively wet. Turn off power at the circuit breaker for 1 minute, then restore power to reset the system. |
| Mirror does not remember settings. | Memory function error. | Ensure the mirror is powered off via the touch button, not just the wall switch, for settings to save. If using a wall switch, the mirror should restore the last state automatically. If not, contact customer support. |
Warranty and Support
LUVODI products are manufactured with high-quality materials and craftsmanship. This mirror comes with a standard manufacturer's warranty covering defects in materials and workmanship. For specific warranty terms and duration, please refer to the warranty card included with your purchase or contact LUVODI customer support.
For technical assistance, troubleshooting, or warranty claims, please contact LUVODI Customer Support through the retailer where you purchased the product or visit the official LUVODI brand store online. Please have your model number (XMR-C28-218-AU) and purchase date available when contacting support.
LUVODI Brand Store: Visit LUVODI Store on Amazon
Ask a question about this manual
Ask about setup, troubleshooting, compatibility, parts, safety, or missing instructions. Manuals+ will review the question and use this page’s manual context to help answer it.