
Introduction
This manual provides essential information for the setup, operation, and maintenance of your Klipsch Reference Premiere RP-6000F II Floorstanding Speaker. Please read these instructions carefully to ensure optimal performance and longevity of your product. Retain this manual for future reference.

Image: Klipsch RP-6000F II Floorstanding Speaker in Walnut finish, showcasing the front-facing woofers and Tractrix horn.
Setup
1. Unpacking
Carefully remove the speaker from its packaging. Inspect for any signs of damage. Keep all packaging materials for potential future transport or service.
2. Placement
Proper speaker placement is crucial for optimal sound performance. Consider the following guidelines:
- Place speakers equidistant from the primary listening position.
- Maintain a clear path between the speakers and the listening area.
- Avoid placing speakers directly against walls or in corners, which can overemphasize bass. Experiment with distance from walls to find the best balance.
- Ensure speakers are stable and level on their integrated feet.

Image: Example of Klipsch RP-6000F II speakers positioned in a home theater environment, demonstrating typical placement relative to a television and seating.
3. Connections
The RP-6000F II features dual input terminals for bi-wiring/bi-amping capabilities and hidden connections for Dolby Atmos integration.
Standard Connection:
For standard connection, ensure the jumper wires are in place between the high-frequency (H) and low-frequency (L) terminals. Connect your speaker wire from your amplifier/receiver to either the H or L terminals, ensuring correct polarity (+ to + and - to -).

Image: Close-up of the speaker's rear input terminals, showing the default jumper wires connecting the high and low frequency inputs for standard wiring.
Bi-Wiring/Bi-Amping:
To utilize bi-wiring or bi-amping, remove the jumper wires. Connect separate speaker cables from your amplifier/receiver to the high-frequency terminals and the low-frequency terminals. This can reduce distortion and improve midrange clarity.
Dolby Atmos Integration:
The RP-6000F II is designed for easy integration with Dolby Atmos enabled speakers (sold separately). Connect the Dolby Atmos module to the dedicated hidden connections on the back of the speaker using the provided jumper wires from the Atmos module. This allows for an immersive, overhead sound experience.

Image: The rear of the Klipsch RP-6000F II speaker with a Dolby Atmos module placed on top, illustrating the connection to the hidden terminals.
Operating Instructions
Once properly connected to your amplifier or receiver, your Klipsch RP-6000F II speakers are ready for use. Ensure your audio source is playing and adjust the volume on your amplifier/receiver to a comfortable listening level.
Break-in Period
Like many high-fidelity speakers, the RP-6000F II may benefit from a break-in period. Initial sound characteristics may evolve over the first few hours of use, typically becoming more open and dynamic. Allow for several hours of playback at moderate volumes for the drivers to settle.
Removable Grille
The speaker includes a magnetic grille. You may choose to operate the speakers with or without the grille. Removing the grille can sometimes offer a slightly more open sound, while keeping it on provides protection for the drivers and a more discreet aesthetic.
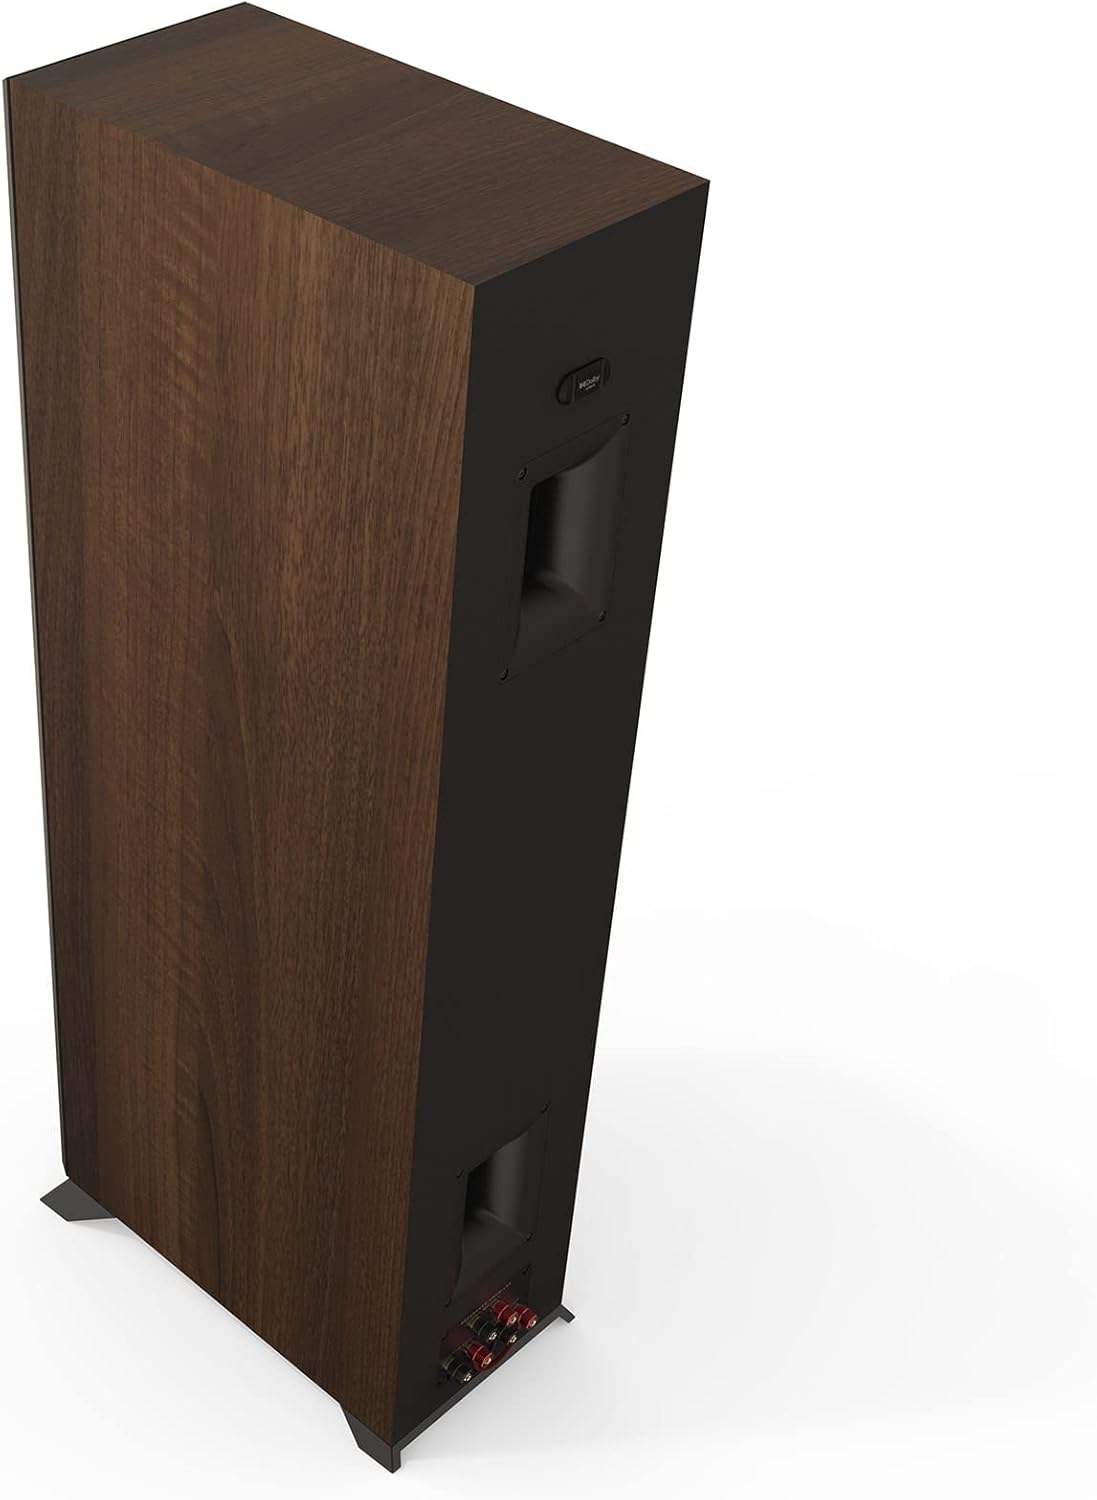
Image: Side view of the Klipsch RP-6000F II speaker with the magnetic grille removed, revealing the speaker drivers.
Features and Technology
The Klipsch Reference Premiere RP-6000F II incorporates advanced design elements for superior audio reproduction:
- Bigger Tractrix Horn: A new, larger 90° x 90° silicone composite hybrid Tractrix horn provides efficient transfer of high-frequency waves for crisper, clearer sound. The phase plug and compression molded silicone face ensure smooth frequency response.
- Linear Travel Suspension (LTS) Titanium Diaphragm Tweeter: The exclusive 1” LTS tweeter minimizes distortion for enhanced, detailed performance.
- Vented Tweeter Design: The vented tweeter housing reduces standing waves that create unwanted harmonics, resulting in enhanced detail and clarity in high-frequency reproduction.
- All-New Cerametallic Woofers: Updated for flawless sound reproduction, minimum distortion, and maximum efficiency.
- Tractrix Ports: Utilizing Tractrix geometry, the ports allow for efficient, fast air transfer from the cabinet for cleaner, more powerful bass.
- Advanced Cabinet Design: Additional bracing and a divided cabinet minimize vibrations, with an improved input panel and furniture-grade materials.
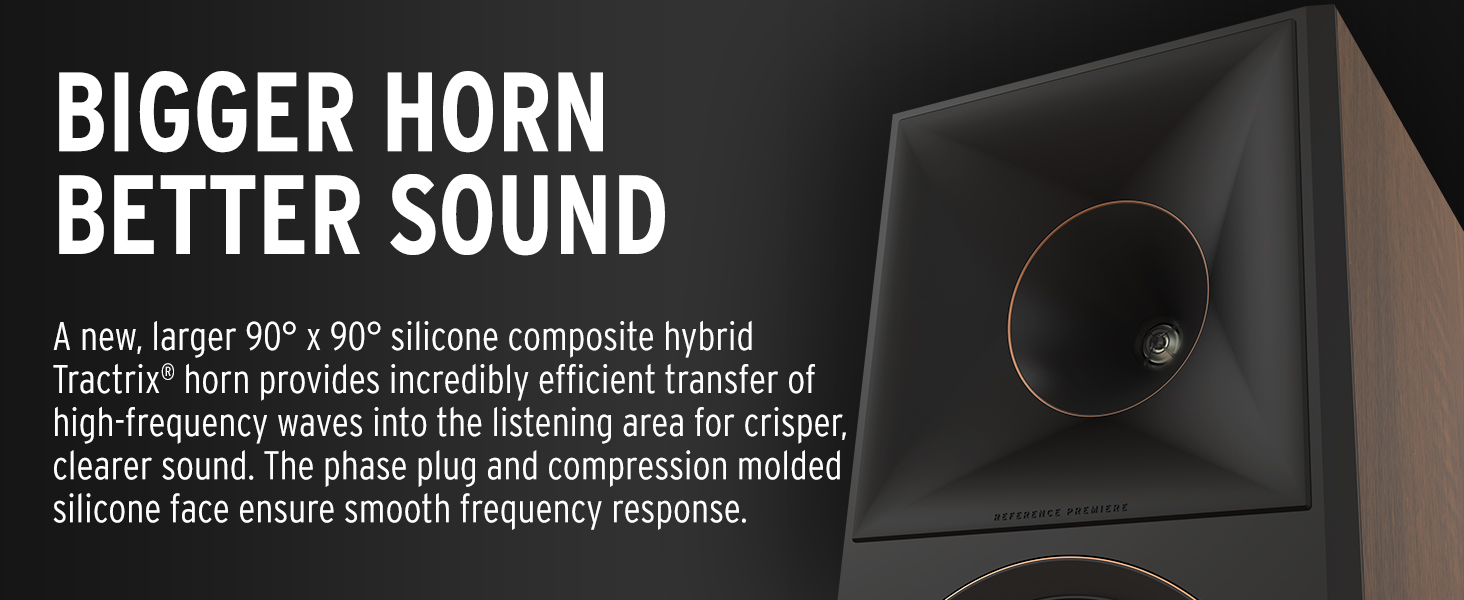
Image: Detailed view of the larger 90° x 90° silicone composite hybrid Tractrix horn, designed for enhanced high-frequency dispersion.
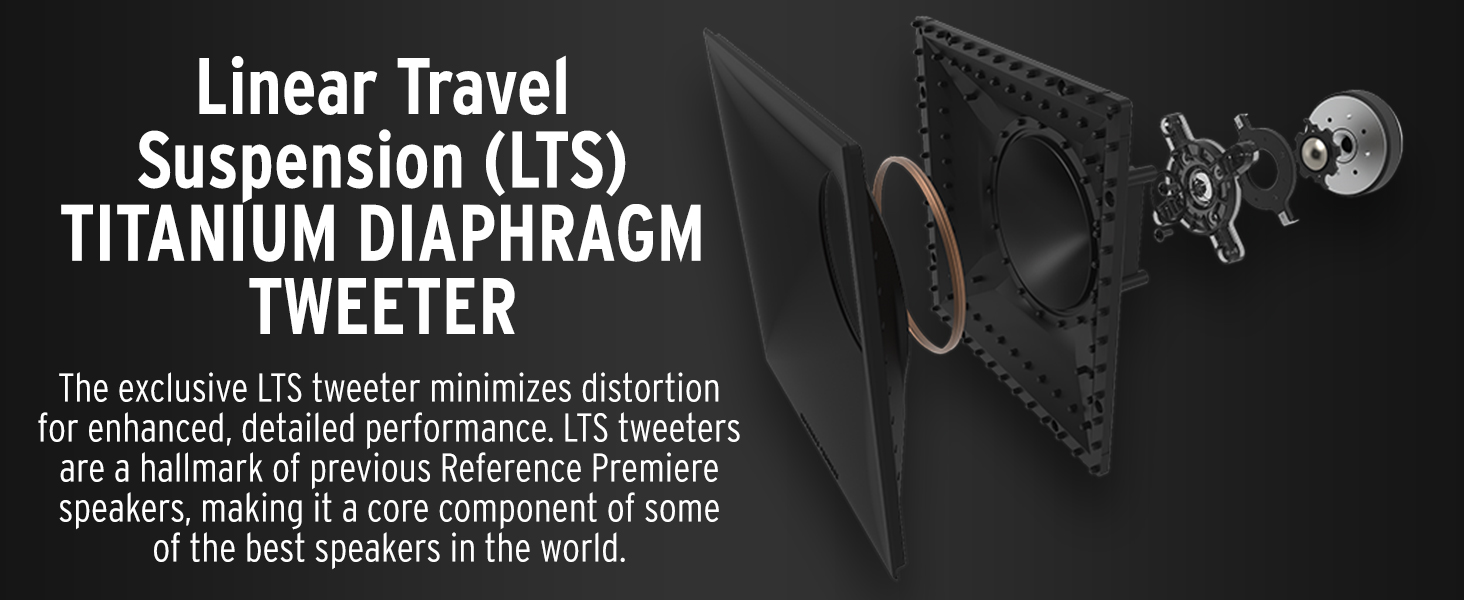
Image: Exploded diagram illustrating the components of the Linear Travel Suspension (LTS) Titanium Diaphragm Tweeter.
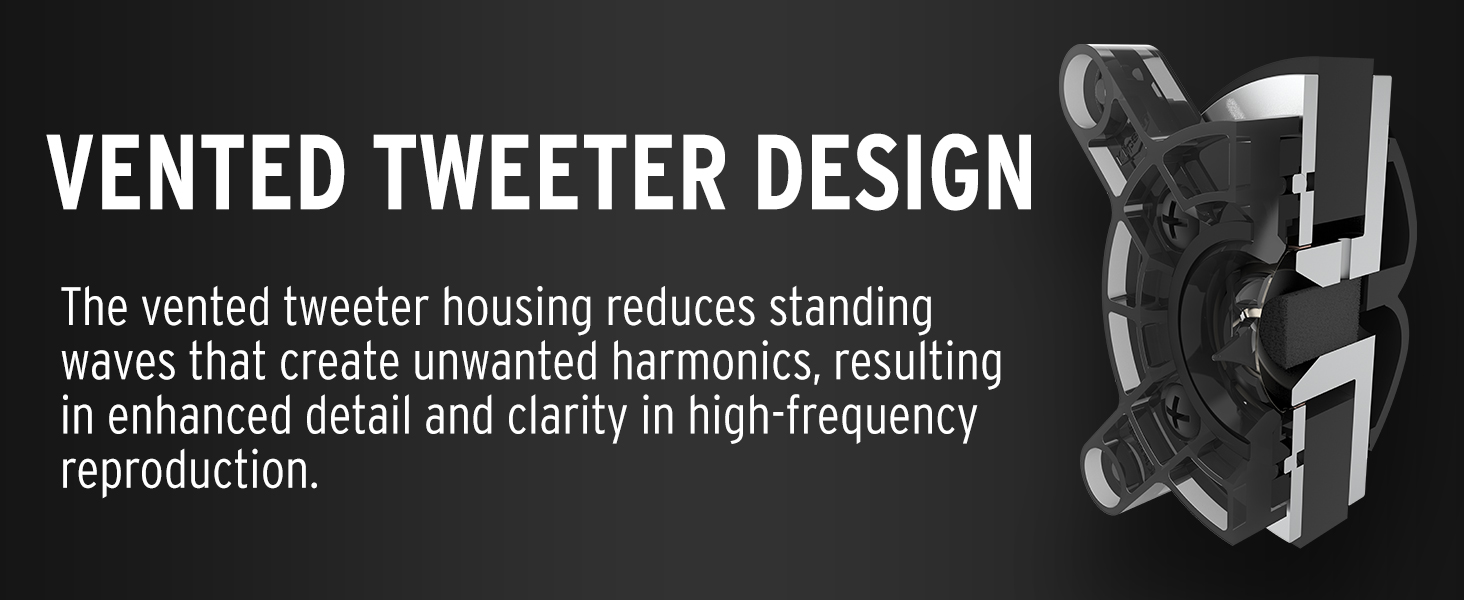
Image: Cross-section diagram detailing the vented tweeter housing, designed to minimize unwanted resonances.

Image: Close-up view of the copper-spun Cerametallic woofers, known for their rigidity and light weight.

Image: Detailed view of a rear-firing Tractrix port, designed to optimize airflow and bass response.
Maintenance
To maintain the appearance and performance of your speakers:
- Cleaning: Dust the cabinet with a soft, dry cloth. Avoid abrasive cleaners or solvents.
- Grilles: The magnetic grilles can be gently removed for cleaning. Use a soft brush or lint roller to remove dust.
- Avoid Moisture: Keep speakers away from excessive moisture or direct sunlight.
Troubleshooting
No Sound or Low Volume:
- Check all speaker wire connections at both the speaker and the amplifier/receiver. Ensure correct polarity (+ to + and - to -).
- Verify that the amplifier/receiver is powered on and the correct input source is selected.
- Confirm that the volume on your amplifier/receiver is turned up.
- If using bi-wiring/bi-amping, ensure all connections are secure and correct. If using standard wiring, ensure jumper wires are properly installed.
Distorted Sound:
- Reduce the volume on your amplifier/receiver. Overdriving the speakers can cause distortion.
- Check speaker wire connections for loose strands or short circuits.
- Ensure the amplifier/receiver is adequately powered for the speakers.
- Inspect speaker drivers for any visible damage.
Uneven Sound or Imaging:
- Verify speaker placement and ensure they are equidistant from the listening position.
- Check individual speaker connections for proper polarity.
- Ensure your amplifier/receiver's balance settings are centered.
Specifications
| Feature | Detail |
|---|---|
| Model Name | RP-6000F II |
| Mounting Type | Floor Standing |
| Speaker Type | Tower |
| Special Feature | Bi-Amping Capability |
| Recommended Uses | For Televisions |
| Compatible Devices | Audio Receiver, Amplifiers |
| Woofer Diameter | 6.5 Inches |
| Unit Count | 1.0 Count (Single Speaker) |
| Surround Sound Channel Configuration | 1.0 |
| Color | Walnut |
| Included Components | Speaker |
| Product Dimensions (DxWxH) | 17.57"D x 9.29"W x 39.6"H |
| Item Weight | 50 Pounds |
| Speaker Maximum Output Power | 400 Watts |
| Frequency Response | 20 Hz (Lower limit, actual range depends on design) |
| Connectivity Technology | Wired |
| Audio Output Mode | Surround |
| UPC | 743878046502 |

Image: Diagram showing the physical dimensions (height, width, depth) of the Klipsch RP-6000F II floorstanding speaker.
Warranty and Support
Your Klipsch RP-6000F II Floorstanding Speaker comes with a Limited Warranty. For specific terms and conditions, please refer to the warranty card included with your product or visit the official Klipsch website.
For technical support, service, or further inquiries, please contact Klipsch customer support. Contact information can typically be found on the Klipsch website or in your product documentation.
Manufacturer: Klipsch


