
Introduction
This manual provides detailed instructions for the Riloer DAB-P7 Lightweight Digital Radio. This portable device supports DAB/DAB+ audio for near CD-quality sound, FM stereo radio, Bluetooth connectivity, and TF card support for MP3/WMA playback. Designed for portability, it includes earphones and offers up to 8 hours of playback on a 3-4 hour charge. Please read this manual carefully before using the product to ensure proper operation and to maximize its lifespan.

Image: The Riloer DAB-P7 digital radio, demonstrating its compact and portable design when held in a hand.
Setup
1. Charging the Device
Before first use, fully charge the radio. Connect the provided Micro-USB charging cable to the charging port on the device and to a compatible USB power source (e.g., computer USB port, USB wall adapter).
- Charging Time: Approximately 3-4 hours for a full charge.
- Charging Voltage: Micro-USB DC 5V.
2. Connecting Earphones
The included earphones serve as both audio output and the antenna for radio reception. Insert the 3.5mm jack of the earphones into the headphone port on the device.

Image: The Riloer DAB-P7 digital radio with its white earphones connected, illustrating the headphone jack usage.
3. Inserting a TF Card (Optional)
To play music files from a TF card, gently insert a TF card (up to 32GB) into the designated slot. Ensure the card is inserted correctly to avoid damage.

Image: A detailed view of the top edge of the Riloer DAB-P7, highlighting the 'Charger' (Micro-USB port), 'Power ON/OFF' switch, and 'ANT Headphone' (3.5mm jack).
Operating Instructions
1. Power On/Off
Locate the Power ON/OFF switch on the side of the device. Slide the switch to the 'ON' position to power on the radio. Slide it to 'OFF' to power off.
2. Mode Selection
Press the 'M' (Mode) button to cycle through the available modes: DAB radio, FM radio, Bluetooth, and TF card playback.
3. Radio Operation (DAB/FM)
- Automatic Station Scan: In DAB or FM mode, press the 'S' (Scan) button to automatically search for and store available stations. The radio will stop scanning once all valid stations are found.
- Navigate Stations: Use the 'PREV' (left arrow) and 'NEXT' (right arrow) buttons to switch between stored stations.
4. Volume Control
Adjust the listening volume using the 'VOL+' (up arrow) and 'VOL-' (down arrow) buttons.
5. Bluetooth Operation
- Pairing: Switch the radio to Bluetooth mode. On your mobile device, search for Bluetooth devices and select 'DAB-P7' to pair.
- Music Playback: Once paired, you can play music from your mobile device through the radio. Use the 'PREV' and 'NEXT' buttons to skip tracks, and the central button for Play/Pause.
- Hands-Free Calling: The radio supports hands-free calls when connected via Bluetooth. Use the central button to answer or end calls.
6. TF Card Playback
- Music Formats: Supports MP3 and WMA formats.
- Control: Use the 'PREV' and 'NEXT' buttons to navigate between tracks. The central button functions as Play/Pause.
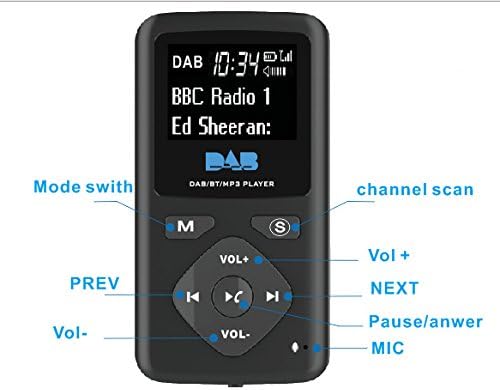
Image: The front panel of the Riloer DAB-P7 digital radio, clearly labeling the 'Mode switch' (M), 'channel scan' (S), 'Vol+', 'Vol-', 'PREV', 'NEXT', 'Pause/answer' button, and 'MIC'.
Maintenance
- Cleaning: Use a soft, dry cloth to clean the device. Do not use liquid cleaners, solvents, or abrasive materials, as these can damage the surface.
- Storage: Store the radio in a cool, dry place away from direct sunlight and extreme temperatures.
- Battery Care: The built-in lithium battery should be charged regularly, even if the device is not in frequent use, to maintain battery health. Avoid fully discharging the battery for extended periods.
- Water Exposure: This device is not waterproof. Avoid exposure to water or high humidity.
Troubleshooting
- No Power:
- Ensure the device is fully charged. Connect the Micro-USB cable and allow it to charge for a few minutes.
- Check that the Power ON/OFF switch is in the 'ON' position. - Poor Radio Reception:
- Ensure the earphones are properly connected, as the cable acts as the antenna.
- Try moving to an open area or adjusting the position of the earphone cable for better signal reception. - No Sound:
- Check the volume level using the 'VOL+' button.
- Ensure the earphones are securely plugged into the 3.5mm jack.
- Test with a different pair of 3.5mm earphones if available. - Bluetooth Pairing Issues:
- Ensure the radio is in Bluetooth mode.
- Make sure Bluetooth is enabled on your mobile device and it is within range.
- Try unpairing and re-pairing the device. - TF Card Not Playing:
- Ensure the TF card is inserted correctly.
- Verify that the music files on the card are in supported formats (MP3, WMA).
- Check that the TF card capacity does not exceed 32GB.
Specifications
| Model Number | DAB-P7 |
| DAB+ Standard | Eureka-147 |
| DAB+ Frequency | 174.928 MHz - 239.2 MHz (Band III) |
| FM Frequency | 87 MHz - 108 MHz |
| Bluetooth Version | Ver4.0 |
| TF Card Support | Max 32GB |
| Supported Music Formats | MP3, WMA |
| Audio Output | 3.5mm Headphone Jack |
| Antenna | Headphone Cable |
| Charging Voltage | Micro-USB DC 5V |
| Battery | Built-in 850mA Lithium Battery |
| Charging Time | 3-4 hours |
| Playback Time | Up to 8 hours |
| Dimensions | 8 x 4.5 x 1.5 cm (approx. 3.15 x 1.77 x 0.59 inches) |
| Weight | 45g (approx. 1.59 oz) |
Warranty and Support
For product support, warranty information, or any inquiries not covered in this manual, please refer to the seller's contact information on your purchase platform or visit the official Riloer brand store. Keep your proof of purchase for warranty claims.