
ANNLOV AM04H
ANNLOV AM04H 7" HDMI LCD Digital Microscope User Manual
Model: AM04H
1. Introduction
This manual provides detailed instructions for the setup, operation, and maintenance of your ANNLOV AM04H 7" HDMI LCD Digital Microscope. Please read this manual thoroughly before using the device to ensure proper function and to maximize your viewing experience. The ANNLOV AM04H is designed for detailed observation with its 7-inch IPS screen, 16MP camera, and versatile output options.

Figure 1: ANNLOV AM04H Digital Microscope Overview
Video 1: Overview of the ANNLOV AM04H HDMI LCD Digital Microscope, demonstrating its features and capabilities.
2. Package Contents
Verify that all items listed below are included in your package. If any items are missing or damaged, please contact customer support.
- Digital Microscope (1)
- User Manual (1)
- CD (1)
- Prepared Slides (12 pieces)
- Remote Control (1)
- USB Cable (1)
- HDMI Cable (1)
- Power Adapter (1)
- Micro SD Card (1)

Figure 2: Included Accessories and Components
3. Product Features
- 7-inch IPS Screen: Provides superior color performance and clear visibility from various viewing angles for a vibrant visual experience.
- 16MP Camera Sensor: Delivers sharp and realistic images with magnification capabilities from 10x to 1500x.
- Enhanced Stand Design: Features an 8.5-inch adjustable stand that allows for an unobstructed view of entire coins and increased operating space.
- HDMI & USB Output: Connects to larger screens (TVs, monitors, projectors) via HDMI or computers (Windows/Mac) via USB for expanded viewing, data sharing, and analysis.
- Remote Control: Includes functions for photo capture, video recording, and settings adjustments, enhancing stability during use.
- Illumination System: Equipped with 8 adjustable LED lights around the lens and 2 flexible side lights for comprehensive and adjustable illumination.
- Durable Construction: Features an aluminum alloy stand and base for increased strength and stability.

Figure 3: 7-inch IPS Screen with Wide Viewing Angle
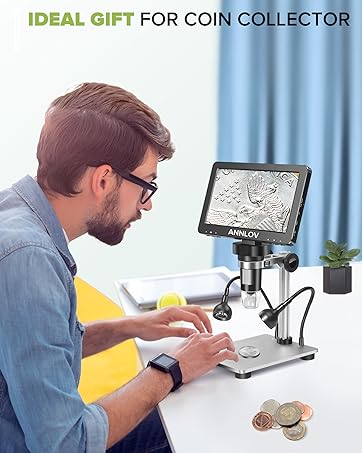
Figure 4: Upgraded Stand for Full Coin Observation
4. Setup Guide
4.1 Assembly
- Place the base on a stable, flat surface.
- Insert the vertical support rod into the designated slot on the base and secure it with the provided screw.
- Attach the microscope unit to the adjustable bracket on the support rod. Ensure it is securely fastened.
- Connect the flexible side lights to the base, if not pre-attached. Position them to provide optimal illumination for your viewing area.
4.2 Power Connection
- Connect the power adapter to the DC5V port on the microscope's screen unit.
- Plug the power adapter into a standard electrical outlet.
- The microscope contains a Lithium Polymer battery. Ensure it is fully charged before initial use for optimal performance.
4.3 Micro SD Card Installation
- Locate the TF card slot on the side of the screen unit.
- Insert the provided Micro SD card into the slot until it clicks into place. This card is necessary for saving photos and videos.
5. Operating Instructions
5.1 Powering On/Off
- To power on, press and hold the power button on the screen unit until the screen illuminates.
- To power off, press and hold the power button again until the screen shuts down.
5.2 Adjusting Magnification and Focus
- Place the object you wish to observe on the base plate.
- Adjust the height of the microscope unit using the knob on the vertical support rod to get a general view of the object.
- Rotate the focus wheel on the microscope lens to achieve a clear and sharp image on the screen.
- The magnification ranges from 10x to 1500x, depending on the distance between the lens and the object, and the focus adjustment.

Figure 5: Magnification Levels (10x to 1500x)
5.3 Illumination Control
- The 8 LED lights around the lens can be adjusted for brightness using controls on the microscope unit.
- The 2 flexible side lights can be positioned and adjusted for brightness to eliminate shadows and provide even illumination.
5.4 Using the Remote Control
The remote control allows for stable operation without touching the microscope, reducing vibrations during image capture.
- Photo Button: Press to capture a still image.
- Video Button: Press once to start video recording, press again to stop.
- Settings Button: Access the menu for various adjustments (e.g., resolution, exposure).
- Navigation Buttons: Use to navigate through menus and adjust settings.

Figure 6: Remote Control for Convenient Operation
5.5 HDMI and USB Output
- HDMI Output: Connect the microscope to an external monitor, TV, or projector using the provided HDMI cable. This allows for larger group viewing and detailed analysis.
- USB Output: Connect the microscope to a Windows or Mac computer using the provided USB cable. Install the necessary software from the included CD or download it from the ANNLOV website to view images and videos on your computer.

Figure 7: HDMI Output to External Display
6. Maintenance
- Cleaning the Lens and Screen: Use a soft, lint-free cloth specifically designed for optical surfaces to gently wipe the lens and screen. Avoid abrasive materials or harsh chemicals.
- General Cleaning: Wipe the body of the microscope with a dry or slightly damp cloth. Do not allow water or cleaning solutions to enter the device.
- Storage: Store the microscope in a clean, dry environment away from direct sunlight and extreme temperatures. When not in use for extended periods, ensure the battery is partially charged (around 50%) to prolong its lifespan.
- Battery Care: Avoid fully discharging the battery frequently. Recharge the battery when the low battery indicator appears.
7. Troubleshooting
| Problem | Possible Cause | Solution |
|---|---|---|
| No image on screen / Device won't power on. | Battery is depleted; Power cable not connected; Device is off. | Charge the battery; Ensure power cable is securely connected; Press and hold the power button to turn on. |
| Image is blurry or out of focus. | Incorrect focus adjustment; Object too far/close to lens. | Adjust the focus wheel; Adjust the height of the microscope unit. |
| Remote control not working. | Remote battery depleted; Obstruction between remote and microscope; Remote not paired (if applicable). | Replace remote battery; Ensure clear line of sight; Refer to the CD manual for pairing instructions if needed. |
| No image on external monitor via HDMI/USB. | Cable not connected properly; Incorrect input selected on external display; Driver not installed for USB. | Check cable connections; Select correct HDMI/USB input on monitor/TV; Install USB driver from CD for computer connection. |
| Poor image quality or color issues. | Insufficient lighting; Lens is dirty; Incorrect white balance settings. | Adjust LED lights and side lights; Clean the lens; Adjust white balance in settings menu. |
8. Specifications
- Product Dimensions: 3.5 x 9.8 x 9.3 inches
- Item Weight: 2.72 pounds (1.24 Kilograms)
- Model Number: AM04H
- Batteries: 1 Lithium Polymer battery required (included)
- Light Source Type: LED (8 main LEDs + 2 flexible side lights)
- Material: ABS, Metal
- Color: Black or Gray
- Real Angle of View: 30 Degrees
- Magnification Maximum: 1500x
- Voltage: 3.7 Volts (DC)
- Compatible Devices: Laptop, Television (via HDMI/USB)
- Objective Lens Description: Achromatic
- Screen Size: 7-inch IPS
- Image Sensor: 16MP
9. Warranty and Support
ANNLOV digital microscopes are manufactured under strict quality standards to ensure customer satisfaction.
- Technical Support: Enjoy 2-year technical support for your product.
- Customer Service: 24/7 customer service is available to assist with any questions or concerns.
For assistance, please refer to the contact information provided on the product packaging or the official ANNLOV website. Our goal is to provide satisfying solutions to all inquiries.
Related documentsAM04H


Ask a question about this manual
Ask about setup, troubleshooting, compatibility, parts, safety, or missing instructions. Manuals+ will review the question and use this page’s manual context to help answer it.