
Introduction
This manual provides detailed instructions for the installation, operation, and maintenance of your Alphasonik ALPHA1K Alpha Series 1000 Watts RMS Monoblock Car Amplifier. Please read this manual thoroughly before attempting installation or operation to ensure proper use and to prevent damage to the unit or your vehicle's electrical system. Keep this manual for future reference.

Figure 1: Alphasonik ALPHA1K Monoblock Car Amplifier, showing the main unit with its sleek design and 'ALPHA1K 1000 WATTS' branding.
Safety Information
Always observe the following safety precautions during installation and operation:
- Disconnect the vehicle's negative battery terminal before starting any electrical work.
- Ensure all wiring is properly routed and secured to prevent pinching or damage.
- Use appropriate gauge wiring for power and ground connections as specified in the installation section.
- Install the amplifier in a well-ventilated area to prevent overheating.
- Do not expose the amplifier to moisture or extreme temperatures.
- Seek professional assistance if you are unsure about any installation steps.
Package Contents
Verify that all items are present in the package:
- 1 x ALPHA1K 1000 Watt Full Range Class-D Amplifier
- 1 x Remote Bass Knob with Connector cable
- 1 x ANL FUSE HOLDER
- 1 x 80AMP ANL FUSE
- 1 x Operations Manual (this document)
- 1 x Mounting Hardware Set

Figure 2: Included accessories, featuring the ANL fuse holder, the remote bass knob, and its connecting cable.
Features
The Alphasonik ALPHA1K amplifier incorporates advanced features for optimal performance and durability:
- Power Output: 1 x 350W @ 4 Ohms, 1 x 500W @ 2 Ohms, 1 x 1000W @ 1 Ohm
- Protection Circuitry: 4-Way Protection (Thermal, Short Circuit, Overload, DC Offset)
- Heat Management: Extruded Aluminum Heat Sink
- Terminals: Nickel Plated Terminals for enhanced conductivity
- Input: Low Level Input
- Control: Remote Bass Knob Included
- Circuit Board: M-Spec Double-Sided Glass Epoxy
- Frequency Response: 15Hz-20kHz
- Crossovers: Low-Pass Crossover (50Hz - 20kHz), High-Pass Crossover (15Hz - 2kHz)
- Input Sensitivity: Variable (200mV - 6V)
- Bass Control: Bass Boost (0 - 12dB), Variable Bass EQ (35Hz - 70Hz)
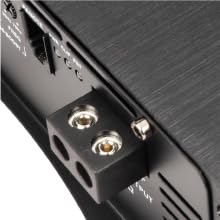
Figure 3: Detail of the amplifier's nickel-plated terminals, designed for secure and efficient power and speaker connections.
Setup and Installation
Mounting the Amplifier
Choose a secure, dry, and well-ventilated location for mounting the amplifier. Avoid mounting it directly on carpet or in enclosed spaces that restrict airflow. Use the provided mounting hardware to secure the amplifier firmly to a solid surface in your vehicle.
Wiring Connections
Refer to the diagrams below for proper wiring. Ensure all connections are tight and insulated.

Figure 4: Power input section of the amplifier, showing the +12V, REM (Remote), and GND (Ground) terminals.
- Power Connection (+12V): Connect a heavy-gauge power cable (minimum 8-gauge, recommended 4-gauge for 1000W) from the vehicle's positive battery terminal to the +12V terminal on the amplifier. Install the included ANL fuse holder with the 80A fuse as close to the battery as possible (within 18 inches).
- Ground Connection (GND): Connect a heavy-gauge ground cable (same gauge as power) from the GND terminal on the amplifier to a clean, unpainted metal surface on the vehicle chassis. Ensure a good electrical connection.
- Remote Turn-On (REM): Connect a remote turn-on wire (typically 18-gauge) from your head unit's remote output to the REM terminal on the amplifier. This wire turns the amplifier on and off with your head unit.
- RCA Input (INPUT): Connect RCA cables from your head unit's pre-amp output to the INPUT RCA jacks on the amplifier.
- Speaker Output (SPEAKER OUTPUT): Connect your subwoofer speaker wires to the SPEAKER OUTPUT terminals. Ensure correct polarity (+ to + and - to -). This amplifier is 1-Ohm stable.
- Remote Bass Knob: Connect the remote bass knob cable to the 'REMOTE' port on the amplifier.

Figure 5: Rear panel of the amplifier, showing the INPUT (RCA), OUTPUT (RCA), Crossover, Gain, Bass Boost, and Remote Bass Knob connection ports, along with status indicators.
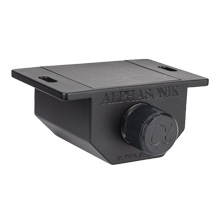
Figure 6: The remote bass knob, allowing convenient adjustment of bass levels from the driver's seat.
Operating Instructions
Initial Power-up and Settings
- After all connections are made, reconnect the vehicle's negative battery terminal.
- Turn on your head unit. The amplifier's PWR indicator should illuminate.
- Gain Adjustment (LEVEL): Start with the gain control at minimum. Play a familiar track at a moderate volume on your head unit. Slowly increase the amplifier's gain until you hear distortion, then back off slightly. This matches the amplifier's input sensitivity to your head unit's output.
- Crossover Settings (HIGH/LOW CROSSOVER):
- For subwoofers, set the crossover to LOW pass and adjust the frequency (50Hz - 20kHz) to filter out high frequencies, allowing only bass to pass through. A common starting point is 80-100Hz.
- For full-range speakers (if used with this amplifier, though it's a monoblock), set to HIGH pass and adjust the frequency (15Hz - 2kHz) to filter out low frequencies.
- Bass Boost (BASS BOOST): Use this control to enhance bass output. Start at 0dB and increase gradually if more bass is desired. Excessive boost can lead to distortion.
- Variable Bass EQ (FREQ): Adjust the frequency at which the bass boost is applied (35Hz - 70Hz) to fine-tune the bass response to your preference.
Status Indicators
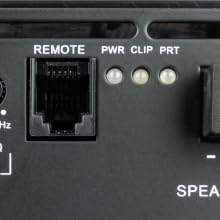
Figure 7: Close-up view of the amplifier's status indicators: PWR (Power), CLIP (Clipping), and PRT (Protection).
- PWR (Power): Illuminates green when the amplifier is powered on and operating normally.
- CLIP (Clipping): Illuminates red when the audio signal is clipping (distorting). Reduce the gain or head unit volume to prevent damage to speakers and amplifier.
- PRT (Protection): Illuminates red when the amplifier enters protection mode due to thermal overload, short circuit, or DC offset. Turn off the system, identify and resolve the issue, then restart.
Maintenance
The Alphasonik ALPHA1K amplifier requires minimal maintenance:
- Periodically check all wiring connections to ensure they are secure and free from corrosion.
- Keep the amplifier clean and free of dust and debris. Use a soft, dry cloth for cleaning.
- Ensure adequate ventilation around the amplifier to prevent overheating.
Troubleshooting
If you experience issues with your amplifier, refer to the following common problems and solutions:
| Problem | Possible Cause | Solution |
|---|---|---|
| No Power (PWR LED off) | Blown fuse, loose power/ground/remote wire, faulty wiring. | Check the ANL fuse near the battery. Verify all power, ground, and remote connections are secure and have continuity. |
| Amplifier in Protection Mode (PRT LED on) | Overheating, speaker short circuit, impedance too low, DC offset. | Allow amplifier to cool. Check speaker wiring for shorts. Ensure speaker impedance is 1 Ohm or higher. Consult a professional for DC offset issues. |
| No Sound Output | Loose RCA cables, incorrect gain setting, speaker wires disconnected, head unit issue. | Verify RCA connections. Adjust gain. Check speaker wire connections. Test head unit with another amplifier if possible. |
| Distorted Sound (CLIP LED on) | Gain set too high, input signal too strong, speaker impedance mismatch. | Reduce amplifier gain. Reduce head unit volume. Ensure speaker impedance is compatible. |
| Weak Bass Output | Incorrect crossover setting, low bass boost, phase issue, small enclosure. | Adjust low-pass crossover frequency. Increase bass boost. Check speaker phase. Ensure subwoofer enclosure is appropriate. |
Specifications
Detailed technical specifications for the Alphasonik ALPHA1K amplifier:
| Specification | Value |
|---|---|
| Model | ALPHA1K |
| Brand | Alphasonik |
| Output Power (RMS) | 1 x 350W @ 4 Ohms, 1 x 500W @ 2 Ohms, 1 x 1000W @ 1 Ohm |
| Number of Channels | 1 (Monoblock) |
| Frequency Response | 15Hz - 20kHz |
| Low-Pass Crossover | 50Hz - 20kHz |
| High-Pass Crossover | 15Hz - 2kHz |
| Variable Input Sensitivity | 200mV - 6V |
| Bass Boost | 0 - 12dB |
| Variable Bass EQ | 35Hz - 70Hz |
| Maximum Supply Voltage | 14 volts |
| Operating Temperature | 40 °F (4.4 °C) |
| Material Type | Aluminum |
| Item Dimensions (L x W x H) | 7.28 x 2.3 x 5.71 inches (185 x 58.5 x 145mm) |
| Specification Met | FCC |
| UPC | 850009208149 |
Warranty and Support
Alphasonik products are designed for reliability and performance. For specific warranty details, please refer to the warranty card included with your product or visit the official Alphasonik website. For technical support, product inquiries, or service, please contact Alphasonik customer service through their official channels.
Online Resources: For additional information and support, visit the Alphasonik Store on Amazon.


