
1. Introduction
Thank you for choosing the OHMAXX Smart Light Switch. This device allows you to control your lights remotely via a smartphone application, voice commands through smart assistants like Alexa and Google Assistant, and scheduled timers. This manual provides essential information for safe installation, setup, and operation of your smart switch.

Image 1.1: OHMAXX Smart Light Switch (2-pack) and its packaging, highlighting features like voice control, app control, timer, group control, 15A max rating, and safe material.
2. Important Safety Information
Please read and understand all instructions before installing or operating this device. Failure to follow these instructions may result in electric shock, fire, or property damage. Always consult a qualified electrician if you are unsure about any part of the installation process.
- Neutral Wire Required: This smart switch requires a neutral wire for operation. Ensure your electrical box has a neutral wire (typically white) before purchase and installation.
- 2.4GHz Wi-Fi Only: The switch connects only to 2.4GHz Wi-Fi networks. It is not compatible with 5GHz Wi-Fi.
- Single Pole Switch: This device is designed for single-pole applications only. It cannot be used as a 3-way switch or a dimmer switch.
- Power Off: Always turn off power at the circuit breaker before installation, removal, or maintenance.
- Indoor Use Only: This device is intended for indoor use in dry locations.
- Rated Current: Do not exceed the maximum current rating of 15 Amps.

Image 2.1: Visual warnings indicating the necessity of a neutral wire, 2.4GHz Wi-Fi, and that the switch is for single-pole use only, not 3-way or dimmer applications.
3. Package Contents
Verify that all components are present in your package:
- OHMAXX Smart Light Switch (quantity as per pack)
- Screwless Snap-On Wall Plate
- Wire Nuts
- Mounting Screws
- User Manual
4. Specifications
| Feature | Specification |
|---|---|
| Model Number | SWS5-2 |
| Brand | OHMAXX |
| Operating Voltage | 120 Volts |
| Current Rating | 15 Amps (Max) |
| Operation Mode | ON-OFF-ON |
| Switch Type | Push Button |
| Circuit Type | 1-way (Single Pole) |
| Connectivity | 2.4GHz Wi-Fi |
| Material | Plastic (Flammability UL94-V0) |
| Certifications | FCC, UL Certified |
| Product Dimensions | 11.99 x 6.99 x 3.81 cm |
| Weight | 320 g |

Image 4.1: Detailed dimensions of the smart light switch and a close-up of the back, showing wiring labels and certifications.

Image 4.2: Exploded view of the smart switch highlighting features like surge protection, fire protection (UL94-V0 flame retardant material), high-gain antenna for stable Wi-Fi, and durable ABS+PC material.
5. Installation
Tools You May Need: Screwdriver (Phillips and Flathead), Wire Strippers, Voltage Tester.
- Turn Off Power: Locate your circuit breaker panel and turn off the power to the light switch you are replacing. Verify the power is off using a voltage tester.
- Remove Old Switch: Unscrew and carefully remove the existing wall plate and light switch from the electrical box.
- Identify Wires: Identify the following wires in your electrical box:
- Neutral Wire (White): Often capped together, tucked into the powerline socket without connecting to anything. This is required for the smart switch.
- Live Wire (Black): The incoming power wire, often found by an electric pen.
- Load Wire (Red or Black): The wire going from the switch to the light fixture.
- Ground Wire (Green or Bare Copper): Connects to the electrical box or a ground screw. If no ground wire is present, leave it alone.
- Connect Smart Switch: Connect the wires from the OHMAXX Smart Light Switch to the corresponding wires in your electrical box using wire nuts:
- Connect the Neutral wire from the switch to the neutral wires in the box.
- Connect the Live wire from the switch to the live wire in the box.
- Connect the Load wire from the switch to the load wire in the box.
- Connect the Ground wire from the switch to the ground wire in the box.
- Mount Switch: Carefully tuck all wires into the electrical box. Secure the smart switch into the electrical box with the provided screws.
- Attach Wall Plate: Snap the screwless wall plate onto the smart switch.
- Restore Power: Return to your circuit breaker panel and turn the power back on. The indicator light on the smart switch should illuminate.

Image 5.1: Detailed wiring diagram showing connections for Neutral, Load, Live, and Ground wires for the smart switch. It illustrates how to identify each wire type.
6. App Setup and Wi-Fi Connection
The OHMAXX Smart Light Switch works with the Smart Life or Tuya Smart app. Follow these steps to connect your switch to your Wi-Fi network and smartphone.
- Download App: Download the "Smart Life" or "Tuya Smart" app from the App Store (iOS) or Google Play Store (Android).
- Register/Login: Open the app and register for a new account or log in with an existing one.
- Add Device: Tap the "+" icon or "Add Device" button in the app. Select "Electrical Switch" or "Wall Switch (Wi-Fi)" from the device list.
- Reset Device: Press and hold the button on the smart switch for approximately 5 seconds until the indicator light rapidly blinks. This indicates the switch is in pairing mode.
- Connect to 2.4GHz Wi-Fi: Ensure your smartphone is connected to a 2.4GHz Wi-Fi network. Enter your Wi-Fi network password in the app. The app will then search for and connect to the smart switch.
- Rename Device: Once connected, you can rename the switch (e.g., "Living Room Light") for easier control.
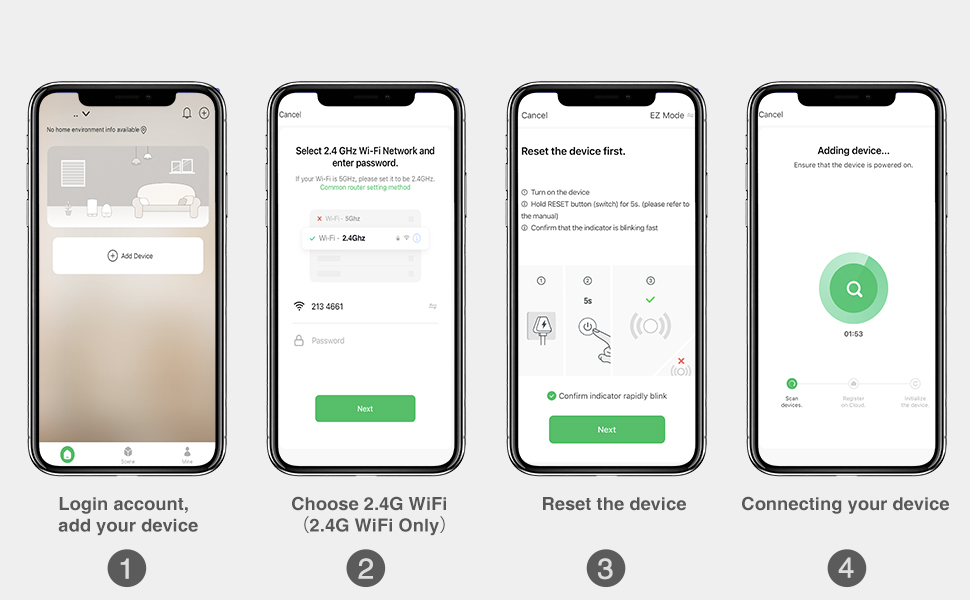
Image 6.1: Step-by-step screenshots from the Smart Life app demonstrating how to log in, add a device, select 2.4GHz Wi-Fi, reset the device, and connect it.
7. Operating Instructions
The OHMAXX Smart Light Switch offers multiple ways to control your lighting.
7.1 Manual Control
Press the physical button on the smart switch to manually turn the connected light ON or OFF.
7.2 App Remote Control
Use the Smart Life or Tuya Smart app on your smartphone to control the light from anywhere with an internet connection. Open the app, select your switch, and tap the ON/OFF icon.

Image 7.1: A person using a smartphone to remotely control a smart light switch installed on a wall, demonstrating app control functionality.

Image 7.2: A person in a car using the mobile app to control a smart light switch, illustrating the convenience of remote control from any location.
7.3 Voice Control
Integrate your smart switch with Amazon Alexa or Google Assistant for hands-free voice control. Follow the instructions within the Smart Life/Tuya Smart app to link your account with your preferred voice assistant.
- For Alexa: "Alexa, turn on [Switch Name]"
- For Google Assistant: "Hey Google, turn off [Switch Name]"

Image 7.3: A group of people in a living room, with a speech bubble indicating a voice command to a smart speaker, demonstrating the voice control feature.
7.4 Scheduling and Timers
Set schedules, countdowns, and timers within the Smart Life/Tuya Smart app to automate your lighting. You can program lights to turn on/off at specific times, or sync with sunrise/sunset.

Image 7.4: An outdoor light fixture shown in two states: off during sunrise and on during sunset, illustrating the scheduling feature for automated lighting.
7.5 Group Control and Away Mode
The app allows you to group multiple smart switches for simultaneous control. You can also activate an "Away Mode" to randomly turn lights on and off, simulating occupancy when you are away from home.

Image 7.5: A smart light switch displayed alongside a list of its multifunction capabilities, including 15A Max, Safe Material, App Control, Voice Control, Scheduling Timer, Group Control, Away Mode, and No Hub Required.
8. Troubleshooting
If you encounter issues with your OHMAXX Smart Light Switch, refer to the following common problems and solutions:
- Switch not turning on/off manually:
- Ensure power is restored at the circuit breaker.
- Check wiring connections for looseness or incorrect placement.
- Switch not connecting to Wi-Fi/App:
- Confirm your Wi-Fi network is 2.4GHz. The switch does not support 5GHz Wi-Fi.
- Ensure your smartphone is connected to the 2.4GHz Wi-Fi network during setup.
- Verify the Wi-Fi password entered in the app is correct.
- Make sure the switch is in pairing mode (indicator light rapidly blinking). If not, reset it by holding the button for 5 seconds.
- Move the switch closer to your Wi-Fi router to improve signal strength.
- Restart your Wi-Fi router.
- Voice control not working:
- Ensure the Smart Life/Tuya Smart app is correctly linked to your Alexa or Google Assistant account.
- Verify the device name used in voice commands matches the name set in the app.
- Check your internet connection.
- Light flickers or does not work correctly:
- Confirm that a neutral wire is properly connected. This is essential for stable operation.
- Ensure the switch is not being used in a 3-way or dimmer circuit, as it is designed for single-pole, ON/OFF functionality only.
If problems persist, please contact OHMAXX customer support for assistance.
9. Maintenance
The OHMAXX Smart Light Switch requires minimal maintenance.
- Cleaning: Wipe the switch and wall plate with a soft, dry cloth. Do not use harsh chemicals or abrasive cleaners.
- Firmware Updates: Periodically check the Smart Life/Tuya Smart app for available firmware updates to ensure optimal performance and security.
10. Warranty and Support
OHMAXX products are designed for reliability and performance. For warranty information and technical support, please refer to the documentation included with your purchase or visit the official OHMAXX website. If you have any questions or require assistance, please contact our customer service team.

