
1. Introduction
The MAD OWL MINI-192BP is a portable DMX512 controller designed for managing stage lighting. It features 192 DMX channels, capable of controlling up to 12 smart lights, each with 16 channels. This controller includes a built-in battery for extended operation, MIDI input, and various control modes such as sound activation and automatic operation. It is compatible with all stage lights utilizing a 3-pin DMX cable.
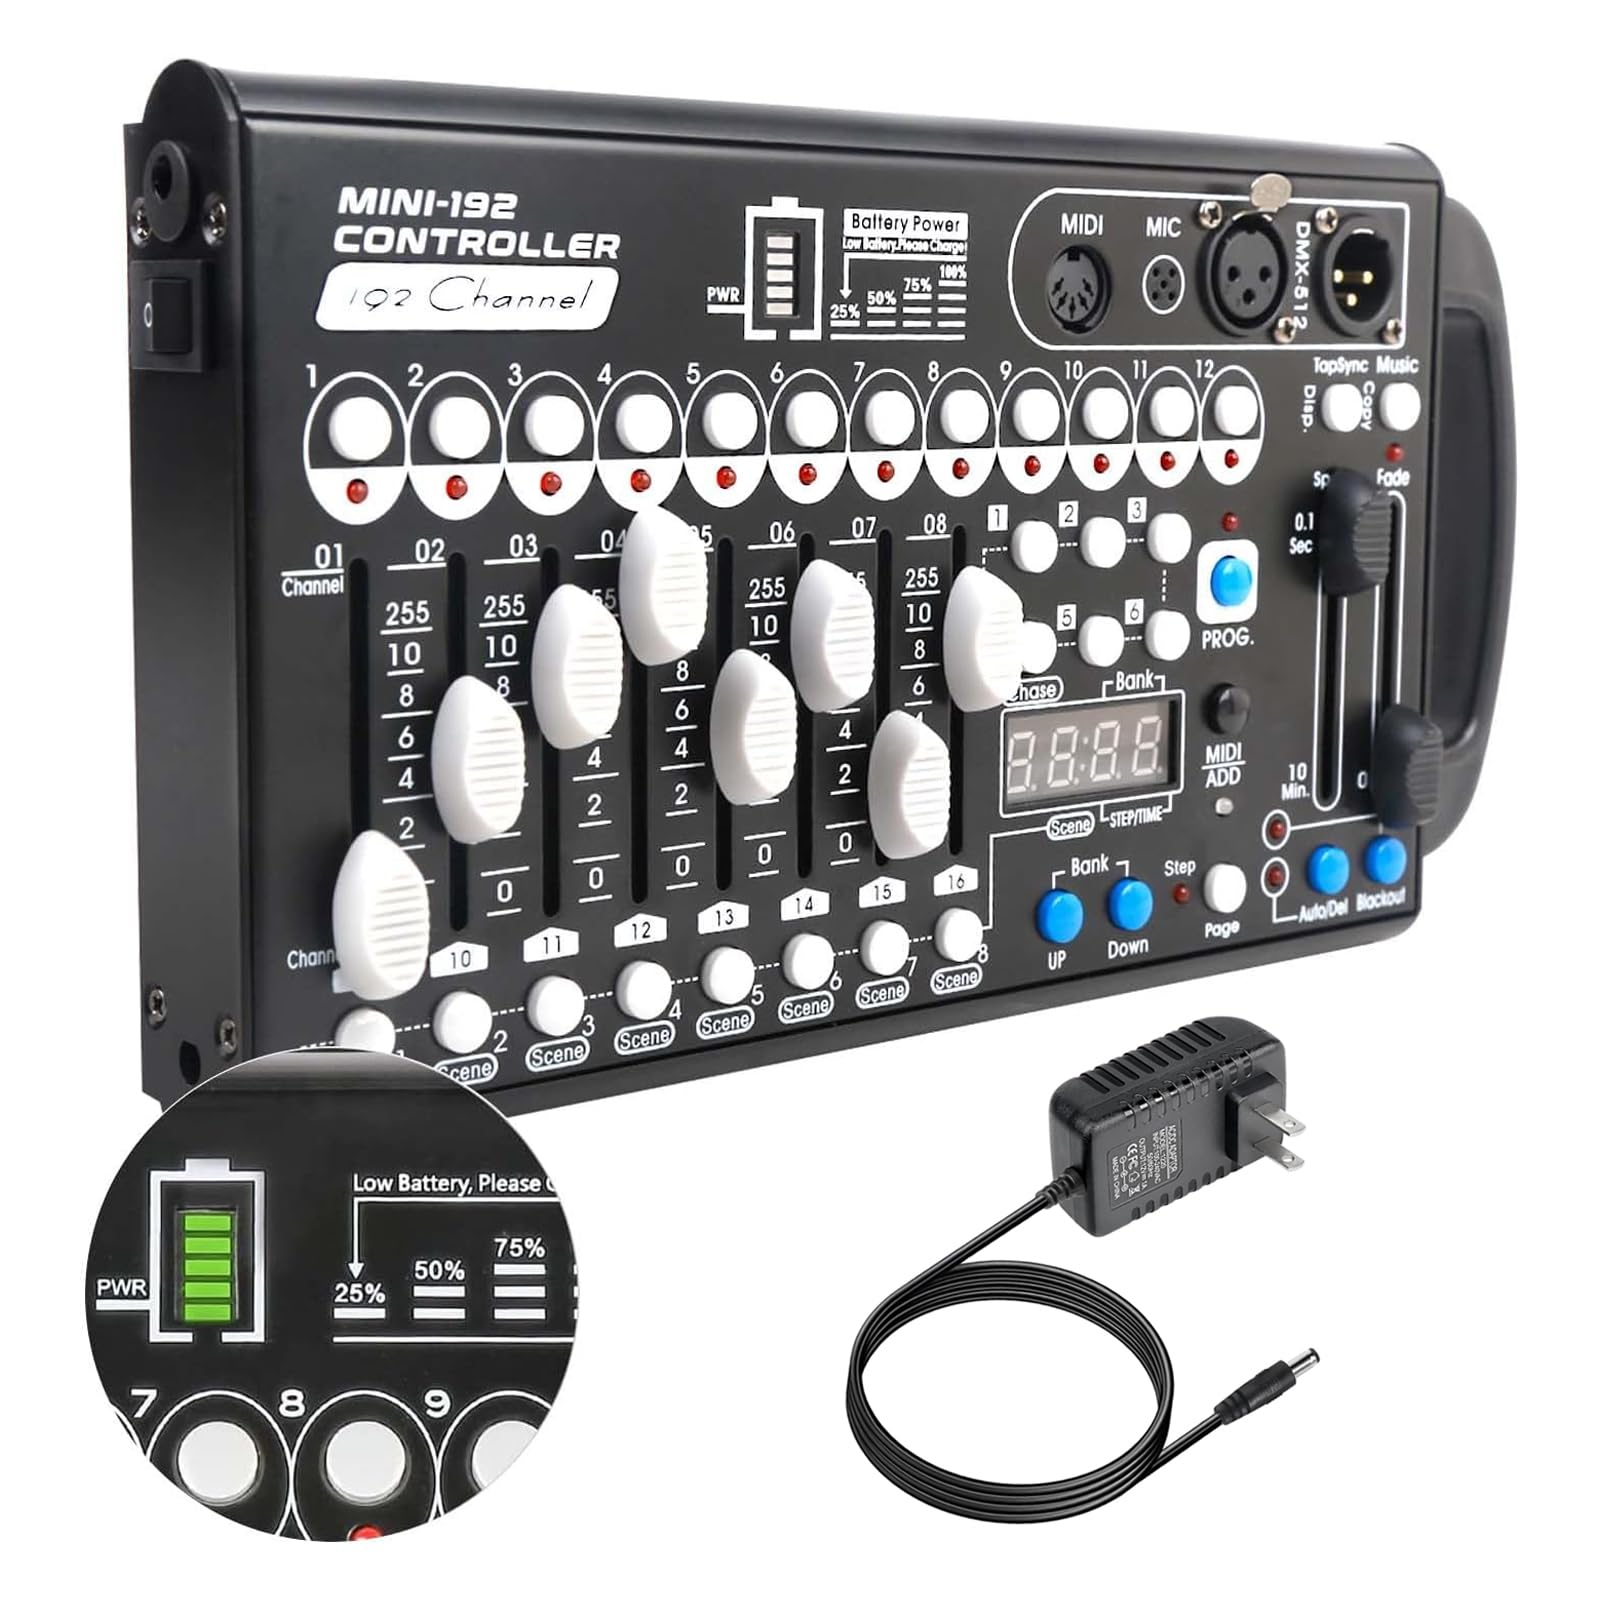
2. Setup
2.1 Unpacking and Inspection
Carefully remove the DMX controller from its packaging. Verify that all components are present and undamaged. The package should include the MINI-192BP controller and a power adapter.

2.2 Powering the Device
The MINI-192BP features a built-in battery for portable use and can also be powered via the included AC adapter.
- Initial Charge: Before first use, fully charge the controller using the provided power adapter. Connect the adapter to the DC input port on the controller and plug it into a standard electrical outlet.
- Battery Indicator: The controller features a battery level indicator to show the current charge status. A full charge provides up to 72 hours of operation.
- Power On/Off: Use the power switch located on the side of the unit to turn the controller on or off.

2.3 Connecting DMX Lights
The controller is compatible with all DMX512 stage lights that use a 3-pin XLR DMX cable.
- Ensure all DMX lights are powered off before connecting.
- Connect one end of a 3-pin DMX cable to the DMX OUT port on the controller.
- Connect the other end of the DMX cable to the DMX IN port of the first lighting fixture.
- For multiple fixtures, daisy-chain them by connecting the DMX OUT of the first fixture to the DMX IN of the second, and so on.
- Set the DMX address for each lighting fixture according to its manual. The controller can manage up to 12 fixtures, each with 16 channels.

2.4 MIDI Connection
The controller supports MIDI input for external control and synchronization.
- Connect a MIDI cable from your MIDI device (e.g., keyboard, sequencer) to the MIDI IN port on the DMX controller.
- Refer to the operating section for details on MIDI beat activation and control.
3. Operating Instructions
The MINI-192BP controller provides comprehensive control over your DMX lighting setup. Familiarize yourself with the control panel layout:

3.1 Basic Control Functions
- Channel Faders: Control individual DMX channels (1-16) for selected fixtures.
- Fixture Select Buttons: Select one of the 12 available fixtures to control.
- Bank Buttons (UP/DOWN): Navigate through the 30 banks of scenes.
- Scene Buttons: Trigger programmed scenes within the selected bank.
- Chase Buttons: Activate programmed chases.
- Speed/Fade Faders: Adjust the speed and fade time of chases and scenes.
- Blackout Button: Instantly turn off all DMX output.
3.2 Programming Scenes
The controller allows you to program 23 groups of 8 scenarios, totaling 240 scenarios.
- Select Fixture(s): Press the desired fixture select button(s).
- Adjust Channels: Use the channel faders to set the desired DMX values for each channel of the selected fixture(s).
- Enter Program Mode: Press the PROG. button. The display will indicate program mode.
- Select Bank: Use the Bank UP/DOWN buttons to choose a bank (1-30) where you want to save the scene.
- Select Scene: Press one of the 8 Scene buttons to assign the current lighting state to that scene number within the selected bank.
- Save Scene: Press the MIDI/ADD button to save the scene. The display may flash to confirm.
- Exit Program Mode: Press the PROG. button again.
3.3 Running Chases
The controller supports 6 sets of chases, allowing multiple chases to run simultaneously.
- Enter Chase Mode: Press the Chase button.
- Select Chase: Use the Chase UP/DOWN buttons to select a chase number.
- Add Scenes to Chase: While in Chase mode, select a bank and then press the desired scene buttons to add them to the chase sequence.
- Adjust Speed/Fade: Use the Speed and Fade faders to control the timing of the chase.
- Start Chase: Press the Auto/Del button to start the chase.
- Exit Chase Mode: Press the Chase button again.
3.4 Advanced Control Modes
- Sound Activation: The built-in microphone allows the lighting to react to ambient sound. Activate this mode using the Music button.
- MIDI Beat Activation: Synchronize lighting effects with external MIDI clock signals.
- Tap Synchronization: Manually tap a tempo to synchronize lighting effects.
- Automatic Operation: Run programmed scenes or chases automatically.

4. Maintenance
4.1 Cleaning
To maintain the controller's appearance and functionality:
- Ensure the device is powered off and disconnected from all power sources before cleaning.
- Use a soft, dry cloth to wipe down the exterior.
- For stubborn dirt, slightly dampen the cloth with water. Avoid using harsh chemicals, solvents, or abrasive cleaners.
- Do not allow liquids to enter the device.
4.2 Battery Care
To maximize battery life and performance:
- Avoid fully discharging the battery frequently.
- If storing the controller for an extended period, charge the battery to approximately 50-70% before storage.
- Recharge the battery every 3-6 months during storage to prevent deep discharge.
4.3 Storage
When not in use, store the controller in a cool, dry place, away from direct sunlight and extreme temperatures. Protect it from dust and moisture. The compact design allows for easy storage in a carrying bag.

5. Troubleshooting
This section addresses common issues you might encounter with your DMX controller.
| Problem | Possible Cause | Solution |
|---|---|---|
| Controller does not power on. | Battery is depleted or power adapter is not connected/faulty. | Connect the power adapter and allow the unit to charge. Ensure the power switch is in the 'ON' position. Verify the power adapter is working. |
| Lights are not responding to the controller. | Incorrect DMX cabling, incorrect DMX addresses on fixtures, fixtures not in DMX mode, or Blackout is active. | Check DMX cable connections. Verify DMX addresses on all fixtures match the controller's settings. Ensure fixtures are set to DMX mode. Deactivate Blackout mode on the controller. |
| Scenes or chases are not playing correctly. | Scenes not properly programmed or chase speed/fade settings are incorrect. | Review the scene programming steps. Adjust the Speed and Fade faders. Ensure the correct bank and scene are selected. |
| MIDI control is not working. | MIDI cable connection issue or incorrect MIDI settings. | Verify the MIDI cable is securely connected to the MIDI IN port. Ensure your external MIDI device is sending signals. Consult the MIDI device's manual for proper setup. |
6. Specifications
| Feature | Detail |
|---|---|
| Model Number | MINI-192BP |
| DMX Channels | 192 |
| Controllable Fixtures | Up to 12 smart lights (16 channels each) |
| Scenes/Scenarios | 23 groups of 8 scenarios (total 240 scenarios) |
| Chases | 6 sets, multiple chases can run simultaneously |
| Power Source | Built-in Battery, AC Adapter |
| Battery Life | Up to 72 hours (approximate) |
| Connectivity | 3-pin DMX XLR, MIDI IN |
| Special Features | Sound activation, MIDI beat activation, tap synchronization, automatic operation |
| Material | Aluminum |
| Dimensions (L x W x H) | 11.42" x 6.3" x 1.77" (288mm x 155mm x 32mm) |
| Weight | 1360g (approx. 3 lbs) |
| Wattage | 6 watts |
| Amperage | 0.5 A |

7. Warranty Information
This product is covered by a manufacturer's warranty against defects in materials and workmanship. The specific terms and duration of the warranty may vary by region and retailer. Please retain your proof of purchase for warranty claims. For detailed warranty information, refer to the documentation provided with your purchase or contact customer support.
8. Customer Support
If you encounter any issues not covered in this manual or require further assistance, please contact MAD OWL customer support. Contact information can typically be found on the product packaging, the official MAD OWL website, or through your retailer.