
RYOBI PBLID01B
RYOBI ONE+ HP 18V Brushless Cordless 1/4 in. Impact Driver (Tool Only) - PBLID01B User Manual
Model: PBLID01B
Introduction
This manual provides essential instructions for the safe operation, maintenance, and care of your RYOBI ONE+ HP 18V Brushless Cordless 1/4 in. Impact Driver, model PBLID01B. Please read this manual thoroughly before using the tool to ensure proper function and to prevent injury. Keep this manual for future reference.

Image: The RYOBI ONE+ HP 18V Brushless Cordless 1/4 in. Impact Driver, showcasing its compact design and signature green and black color scheme.
General Safety Information
Always follow basic safety precautions when using power tools to reduce the risk of fire, electric shock, and personal injury. Familiarize yourself with all safety warnings and instructions provided with the tool and any accessories.
- Work Area Safety: Keep your work area clean and well-lit. Cluttered or dark areas invite accidents.
- Electrical Safety: Do not expose power tools to rain or wet conditions. Water entering a power tool will increase the risk of electric shock.
- Personal Safety: Always wear eye protection. Use hearing protection when operating the tool for extended periods. Dress properly; avoid loose clothing or jewelry.
- Tool Use and Care: Do not force the power tool. Use the correct power tool for your application. Disconnect the battery pack from the power tool before making any adjustments, changing accessories, or storing power tools.
Product Overview and Components
The RYOBI ONE+ HP 18V Brushless Cordless 1/4 in. Impact Driver is designed for driving and removing fasteners. Understanding its components is crucial for safe and effective operation.
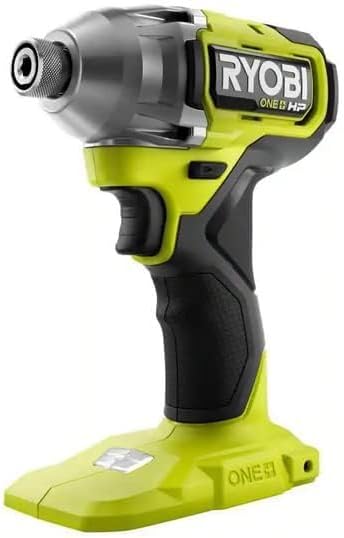
Image: A detailed diagram highlighting key components of the RYOBI ONE+ HP 18V Brushless Cordless 1/4 in. Impact Driver, including the die-cast gear case, one-handed bit release, on-board LED worklight, lanyard loop, and compatibility with ONE+ batteries.
- Die Cast Gear Case: Provides durability and protection for internal mechanisms.
- One-Handed Bit Release: Allows for quick and easy bit changes.
- On-Board LED Worklight: Illuminates the work area for improved visibility.
- Lanyard Loop: Provides an attachment point for a lanyard for added security.
- Battery Interface: Compatible with all RYOBI 18V ONE+ batteries (sold separately).
- Belt Hook/Clip Receptacle: Accepts optional belt hook and belt clip accessories for convenient carrying.
- Brushless Motor: Delivers enhanced power, efficiency, and longer tool life.
Setup
Battery Installation
- Ensure the impact driver is turned off.
- Align the ribs on the battery pack with the grooves in the tool's battery port.
- Slide the battery pack into the tool until it clicks securely into place.
- To remove, press the latch on the battery pack and pull it out.
Note: This product is sold as a tool-only unit. Battery and charger are sold separately and must be RYOBI ONE+ 18V compatible.
Bit Installation and Removal
- Ensure the battery pack is removed from the tool.
- Pull the one-handed bit release collar forward.
- Insert the 1/4 in. hex shank accessory (e.g., screwdriver bit) into the chuck.
- Release the collar. The bit should be securely held. Tug on the bit to ensure it is locked.
- To remove, pull the collar forward and pull the bit out.
Operating Instructions
Powering On/Off and Variable Speed
- To turn the tool on, depress the trigger switch.
- To turn the tool off, release the trigger switch.
- The tool features a variable speed trigger. Pressing the trigger further increases the speed and torque.
Driving and Removing Fasteners
- Select the appropriate bit for the fastener.
- Place the bit onto the fastener head.
- Apply firm, steady pressure to the tool, keeping it aligned with the fastener.
- Depress the trigger to start driving. The impact mechanism will engage as resistance increases.
- For removing fasteners, ensure the forward/reverse selector is in the reverse position.
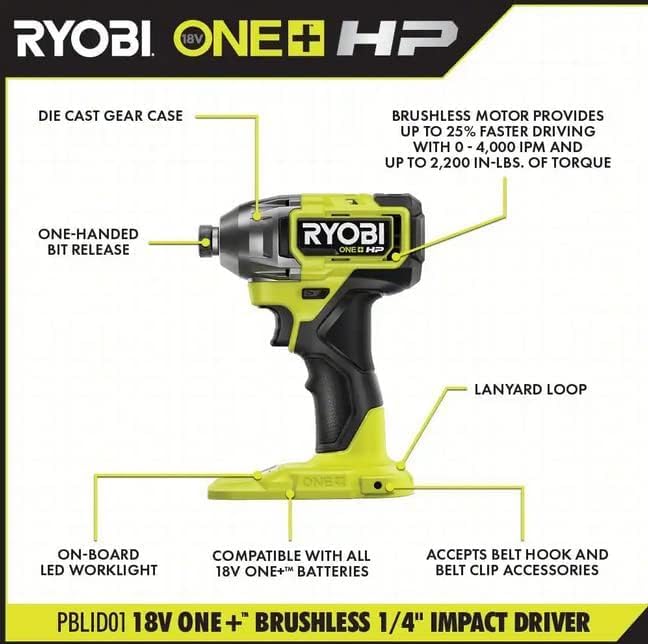
Image: A user demonstrating the RYOBI Impact Driver in action, driving a screw into a wooden surface, highlighting its application in woodworking tasks.
LED Worklight
The integrated LED worklight activates when the trigger is partially depressed, illuminating the work surface for better visibility in dimly lit areas.
Maintenance
Regular maintenance ensures optimal performance and extends the life of your impact driver. Always disconnect the battery before performing any maintenance.
- Cleaning: Use a clean, dry cloth to wipe dirt, dust, oil, grease, etc., from the tool. Do not use solvents or harsh chemicals.
- Inspection: Periodically inspect the tool for damaged parts. Check for misalignment or binding of moving parts, breakage of parts, and any other condition that may affect the tool's operation.
- Storage: Store the tool in a dry, secure location out of reach of children. Remove the battery pack before storing.
Troubleshooting
| Problem | Possible Cause | Solution |
|---|---|---|
| Tool does not start. | Battery not installed correctly or discharged. | Ensure battery is fully seated and charged. |
| Reduced power or performance. | Low battery charge; incorrect bit for application; tool overheating. | Recharge battery; use appropriate bit; allow tool to cool down. |
| Bit not holding securely. | Bit not fully inserted; chuck mechanism dirty or damaged. | Ensure bit is fully inserted and collar is released; clean chuck; if damaged, seek service. |
Specifications
| Feature | Specification |
|---|---|
| Model Number | PBLID01B |
| Voltage | 18 Volts |
| Chuck Size | 1/4 Inch Hex |
| Maximum Torque | 2200 Inch Pounds |
| Maximum Rotational Speed | 2900 RPM |
| Impacts Per Minute (IPM) | Up to 4000 IPM |
| Power Source | Battery Powered (RYOBI ONE+ 18V) |
| Item Weight | 2.31 Pounds |
| Product Dimensions | 9"L x 3"W x 8"H |
Warranty and Support
RYOBI provides a 3-Year Manufacturer's Warranty for this product. For detailed warranty information, including terms and conditions, please refer to the warranty card included with your purchase or visit the official RYOBI website. For technical support, replacement parts, or service inquiries, please contact RYOBI customer service.
Online Resources: For additional information, product registration, and service center locations, please visit www.ryobitools.com.
Related documentsPBLID01B


Ask a question about this manual
Ask about setup, troubleshooting, compatibility, parts, safety, or missing instructions. Manuals+ will review the question and use this page’s manual context to help answer it.