
JUSHENG EN8830-1
JUSHENG FM Radio Alarm Clock EN8830-1 User Manual
Model: EN8830-1
Introduction
Thank you for purchasing the JUSHENG FM Radio Alarm Clock, model EN8830-1. This device combines a digital alarm clock with an FM radio, a large LED display, and a convenient USB charging port. This manual provides detailed instructions for setup, operation, and maintenance to ensure optimal performance and longevity of your product.
Important Safety Information
- Read all instructions carefully before use.
- Do not expose the device to water or excessive humidity.
- Avoid placing the device near heat sources or in direct sunlight.
- Use only the specified power adapter (5V1A) to prevent damage.
- Keep out of reach of children.
- Do not attempt to disassemble or repair the unit yourself. Contact qualified service personnel.
Package Contents
- 1 x JUSHENG FM Radio Alarm Clock (EN8830-1)
- 1 x USB Data Cable
- 1 x Instruction Manual
Product Overview
Familiarize yourself with the buttons and ports on your alarm clock.
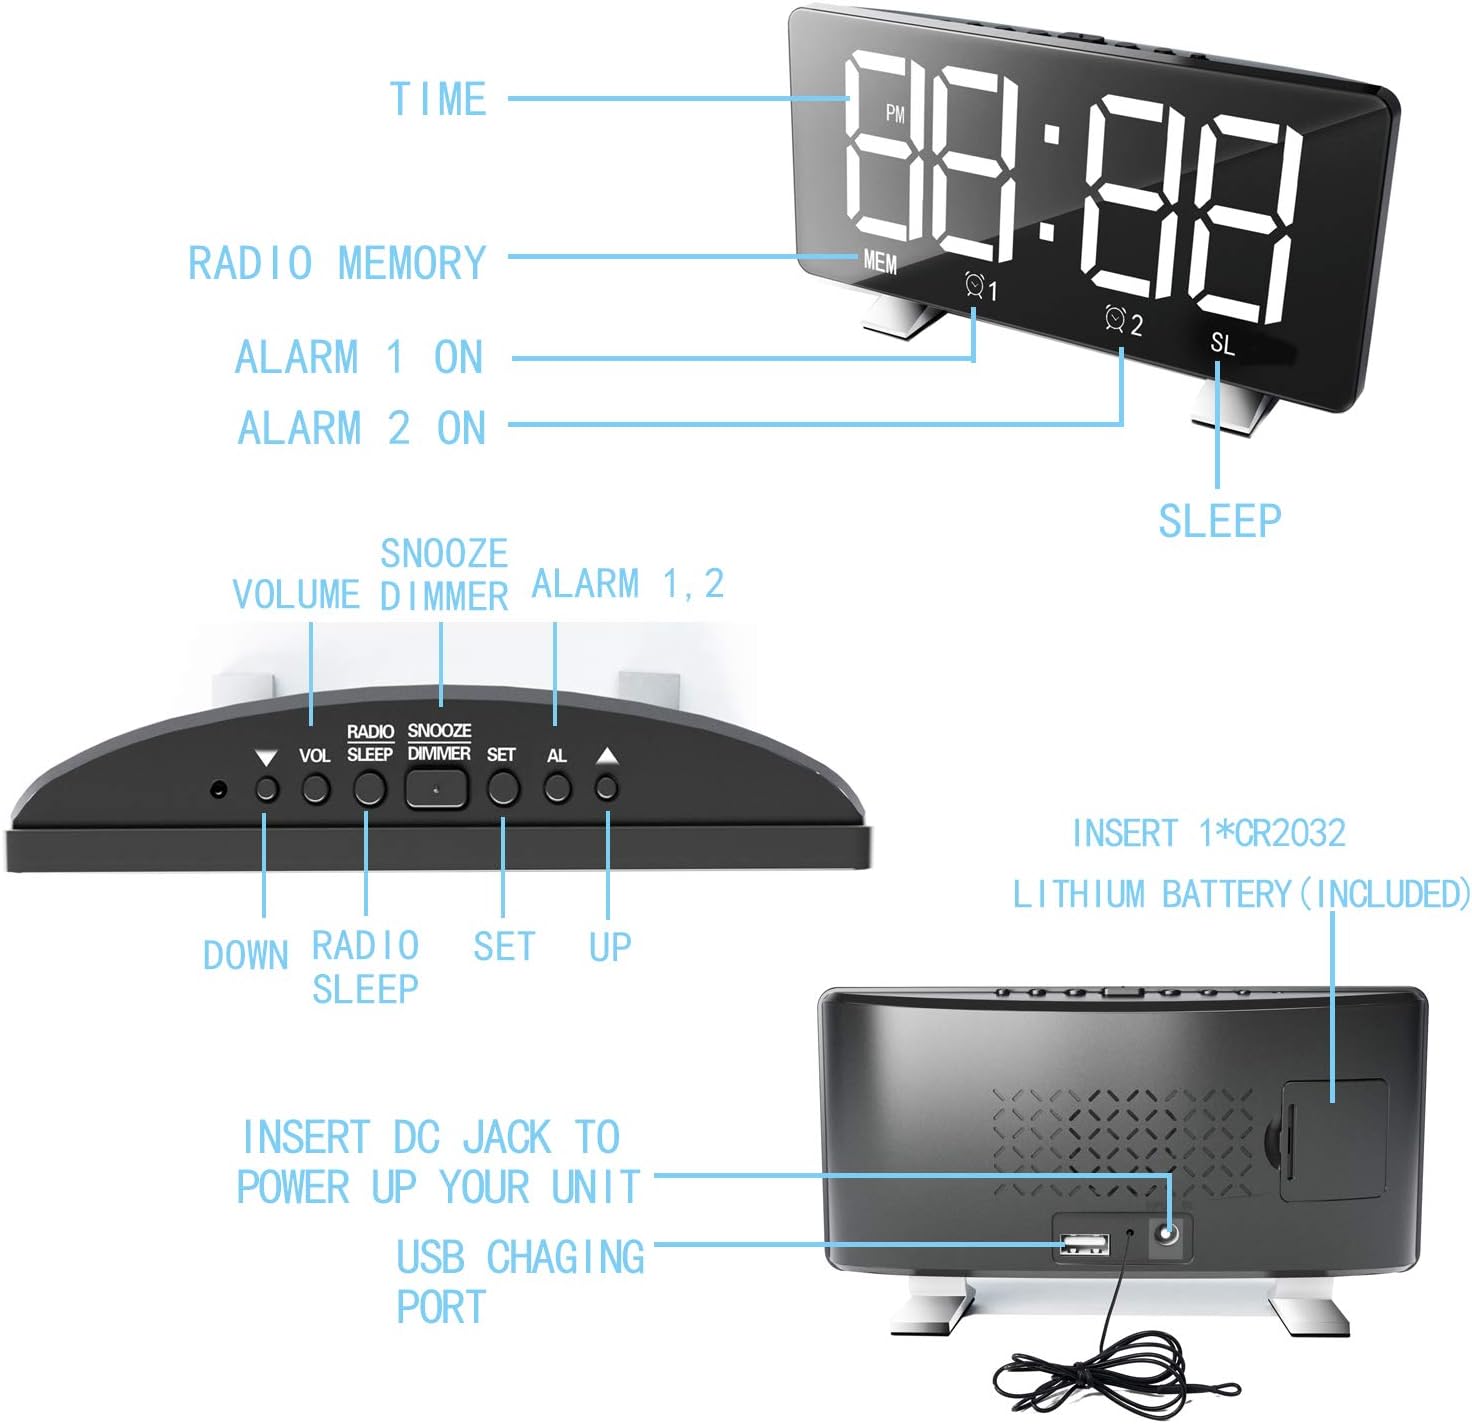
Figure 1: Top and Front Panel Controls
- TIME: Time setting button.
- RADIO MEMORY: FM radio memory function.
- ALARM 1 ON / ALARM 2 ON: Indicators for active alarms.
- SNOOZE / VOLUME / DIMMER: Multi-function button for snooze, volume adjustment, and display dimmer.
- ALARM 1, 2: Alarm setting buttons.
- DOWN / RADIO / SLEEP: Decrease value, activate radio, or set sleep timer.
- SET: Confirmation button for settings.
- UP: Increase value.

Figure 2: Rear Panel Ports
- DC JACK: Power input port (5V1A).
- USB CHARGING PORT: USB output for charging external devices.
- CR2032 LITHIUM BATTERY COMPARTMENT: For time memory function (battery included).
Setup
1. Power Connection
- Connect the provided USB data cable to the DC JACK port on the back of the alarm clock.
- Plug the other end of the USB cable into a 5V1A USB power adapter (not included) and then into a wall outlet.
- The LED display will light up, indicating the clock is powered on.
2. Time Memory Function (CR2032 Battery)
The clock includes a pre-installed CR2032 button battery to maintain time settings during a power outage. No user action is typically required for this function unless the battery needs replacement.
Operating Instructions
1. Setting the Time
- Press and hold the TIME button. The hour digits will start flashing.
- Use the UP or DOWN buttons to adjust the hour.
- Press TIME again to confirm the hour and move to minute setting. The minute digits will flash.
- Use the UP or DOWN buttons to adjust the minutes.
- Press TIME again to confirm the minutes and exit time setting mode.
12/24 Hour Format: While setting the time, press the SET button to toggle between 12-hour and 24-hour display formats. In 12-hour format, "PM" will be displayed for afternoon hours.
2. Setting Alarms (Dual Alarms)
The clock supports two independent alarms (Alarm 1 and Alarm 2).
- Press the ALARM 1 button once. The alarm hour digits will flash.
- Use UP or DOWN to set the desired alarm hour.
- Press ALARM 1 again to confirm the hour and set minutes. The alarm minute digits will flash.
- Use UP or DOWN to set the desired alarm minutes.
- Press ALARM 1 again to confirm the minutes and select the alarm sound source (radio or default beep). Use UP or DOWN to choose.
- Press ALARM 1 again to activate Alarm 1. The "ALARM 1 ON" indicator will light up.
- Repeat the process using the ALARM 2 button to set the second alarm.
To Deactivate an Alarm: Press the corresponding ALARM button until the "ALARM ON" indicator turns off.

Figure 3: Dual Alarm and Snooze Functionality
3. Snooze Function
When an alarm sounds, press the large SNOOZE/DIMMER button on top to temporarily silence the alarm. The alarm will sound again after the set snooze interval. The default snooze time is 9 minutes, adjustable from 5 to 60 minutes. To adjust snooze time, while the alarm is sounding, press and hold the SNOOZE/DIMMER button, then use UP or DOWN to set the desired snooze duration.
4. FM Radio Operation
- Turn On/Off: Press the RADIO button (part of DOWN/RADIO/SLEEP) to turn the FM radio on or off.
- Auto Scan and Save Stations: When the radio is on, press and hold the RADIO MEMORY button. The clock will automatically scan for available FM stations (76.0 MHz - 108.0 MHz) and save up to 15 channels.
- Manual Tuning: Briefly press UP or DOWN to fine-tune the frequency.
- Recall Saved Stations: Briefly press the RADIO MEMORY button to cycle through saved stations.
- Volume Adjustment: While the radio is playing, press the SNOOZE/DIMMER button briefly, then use UP or DOWN to adjust the volume.

Figure 4: FM Radio Features
5. Display Brightness Adjustment (Dimmer)
The display brightness can be adjusted manually or set to auto-dim.
- Manual Adjustment: Briefly press the SNOOZE/DIMMER button (when not in alarm or radio volume mode) to cycle through 4 levels of brightness (Bright, Medium, Dim, Off).
- Automatic Dimmer: The clock can be set to automatically adjust brightness based on ambient light. Refer to the product's specific settings for enabling this feature, if available, as the button description primarily indicates manual cycling.

Figure 5: Display Brightness Levels
6. Sleep Timer
The sleep timer allows the radio to play for a set duration before automatically turning off.
- While the radio is playing, press the SLEEP button (part of DOWN/RADIO/SLEEP).
- Repeatedly press SLEEP to cycle through available sleep timer durations (e.g., 5, 10, 15, 30, 60, 90 minutes, or OFF).
- The radio will automatically turn off after the selected time.
7. USB Charging Port
The alarm clock features a USB output port (5V1A) on the back for convenient charging of other devices, such as smartphones.
- Connect your device's USB charging cable to the USB CHARGING PORT on the back of the alarm clock.
- Ensure the alarm clock is powered on.
- Your device will begin charging.

Figure 6: USB Charging Functionality
Maintenance
- Cleaning: Wipe the surface of the clock with a soft, dry cloth. Do not use abrasive cleaners or solvents.
- Storage: If storing the device for an extended period, disconnect it from power.
- Battery Replacement: The CR2032 button battery for time memory typically lasts for several years. If the time settings are lost during a power outage, the battery may need replacement. Open the battery compartment on the back and replace with a new CR2032 battery, observing polarity.
Troubleshooting
| Problem | Possible Cause | Solution |
|---|---|---|
| Clock display is off. | No power connection. | Ensure the USB cable is securely connected to the clock and a 5V1A power adapter, and the adapter is plugged into a working outlet. |
| Alarm does not sound. | Alarm not activated or volume too low. | Check if the "ALARM ON" indicator is lit. Increase alarm volume. Ensure alarm time is correctly set. |
| FM radio reception is poor. | Weak signal or antenna position. | Adjust the position of the clock or the integrated antenna (if visible). Try auto-scanning again. |
| USB charging not working. | Clock not powered or cable issue. | Ensure the clock is powered on. Try a different USB cable or device to confirm the port functionality. |
| Time resets after power outage. | CR2032 backup battery depleted. | Replace the CR2032 button battery in the battery compartment. |
Specifications
- Model: EN8830-1
- Display: 6-inch Large LED Screen
- Time Format: 12/24 Hour selectable
- Alarms: Dual Alarms
- Snooze Function: 5-60 minutes adjustable (default 9 minutes)
- FM Radio: Frequency Range 76.0 MHz - 108.0 MHz, 15 preset channels
- Brightness: 4 levels manual adjustment, Automatic Dimmer Design
- USB Charging Output: 5V1A
- Power Input: 5V1A DC
- Time Memory: Built-in CR2032 button battery
- Product Dimensions: 6.8 x 3.6 x 1.5 inches (17.2 x 9 cm)
- Item Weight: 14.1 ounces
- Material: ABS
Warranty and Support
For warranty information or technical support, please refer to the documentation provided at the time of purchase or contact your retailer. Keep your purchase receipt as proof of purchase.
Ask a question about this manual
Ask about setup, troubleshooting, compatibility, parts, safety, or missing instructions. Manuals+ will review the question and use this page’s manual context to help answer it.