
1. Introduction
This manual provides detailed instructions for the installation, operation, and maintenance of your BIGTREETECH Octopus V1.1 32-bit Control Board and TFT35 E3 V3.0.1 Touch Screen. This powerful combination is designed to enhance the performance and user experience of 3D printers, supporting advanced firmware like Klipper and Marlin, and offering extensive connectivity options for various DIY projects.
2. Package Contents
Verify that all items listed below are included in your package:
- BTT Octopus V1.1 Control Board
- TFT35 E3 V3.0.1 Touch Screen
- 8x TMC2209 V1.3 Stepper Motor Drivers
3. Product Overview
3.1 BIGTREETECH Octopus V1.1 Control Board
The Octopus V1.1 control board features a 32-bit ARM-level Cortex-M4 series STM32F446ZET6 chip, operating at up to 180MHz. It supports up to 8 stepper motors and is compatible with highly modular open-source firmware such as Klipper and Marlin, significantly improving overall motherboard performance.
- Super Performance Chip: Equipped with a powerful 32-bit ARM Cortex-M4 MCU for high-speed processing.
- 8 Stepper Driver Support: Designed to accommodate up to 8 stepper motor drivers, offering flexibility for complex 3D printer configurations.
- Type-C MCU Power: The Type-C interface can power the motherboard, simplifying firmware programming. Note: This interface does not support powering external devices.
- Extensive Interfaces: Includes support for CAN BUS, thermistor input protection, 6 endstop switches, 2 filament detection interfaces, and 4 hotend heaters, providing ample expansion possibilities for DIY projects.


Official product video showcasing the BIGTREETECH Octopus V1.1 Control Board features and design.
3.2 TFT35 E3 V3.0.1 Touch Screen Display
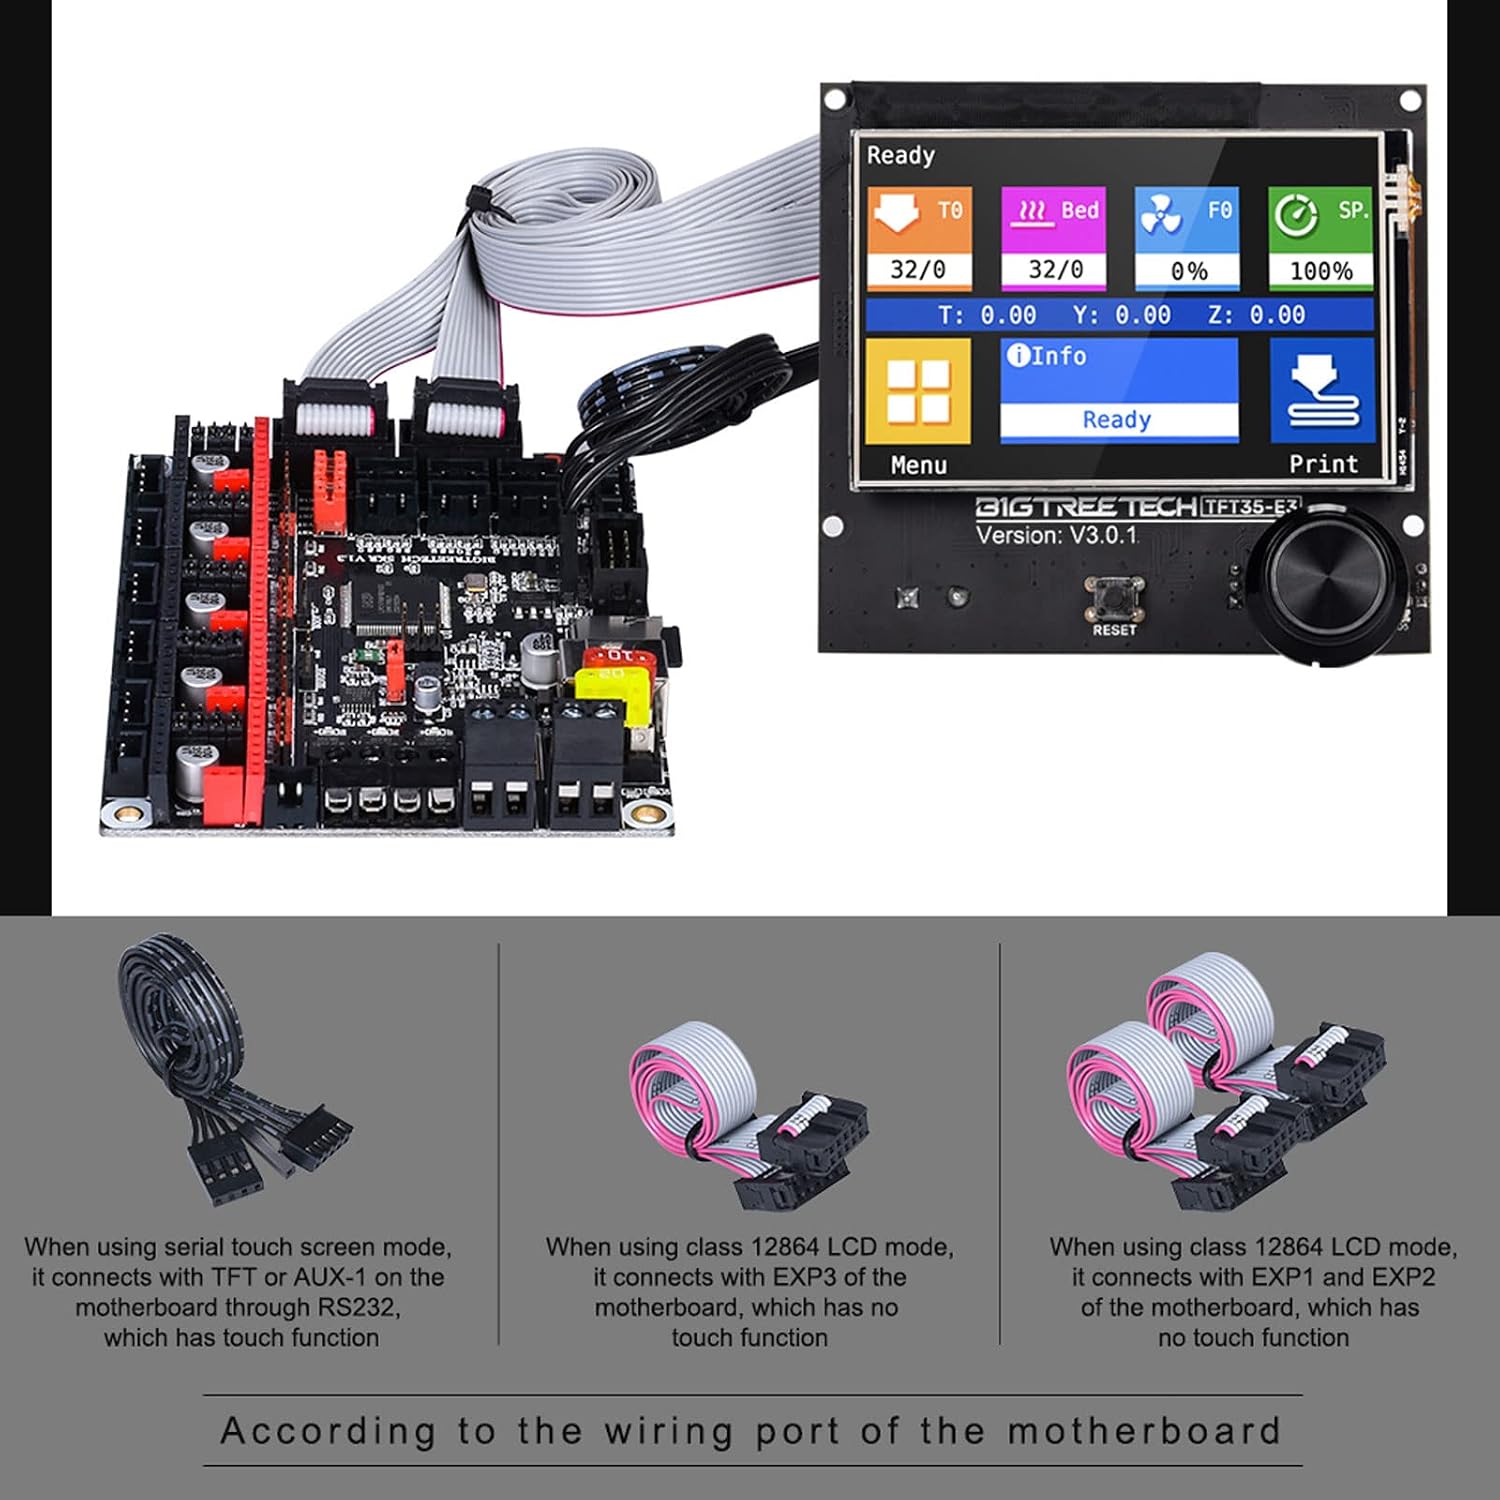
The TFT35 E3 V3.0.1 touch screen offers high compatibility and user-friendly interaction. It supports two distinct working modes: UART serial screen mode and 12864 screen mode.
- Multi-function Display: Provides a versatile interface for controlling your 3D printer.
- Dual Operating Modes: Switch between UART serial touch screen mode and traditional 12864 LCD mode.
- Expandable Connectivity: Features a reserved WIFI port for external WIFI modules and supports convenient firmware updates via SD card.

Official product video demonstrating the features and installation of the TFT35 E3 V3.0.1 Touch Screen.
3.3 TMC2209 V1.3 Stepper Motor Drivers
The TMC2209 V1.3 stepper motor drivers are engineered for ultra-quiet operation and precise motion control, making them ideal for 3D printing applications.
- Ultra-quiet Operation: Utilizes SpreadCycle technology for high-precision cycle-by-cycle current control, resulting in quiet and smooth motor movement.
- Enhanced Heat Dissipation: Features a large area thermal pad to effectively reduce driver temperature during operation, ensuring stability and longevity.
- Reliable Performance: Designed to prevent motor vibration and step loss, supporting both STEP/DIR and UART modes for versatile integration.


4. Setup Instructions
This section outlines the general steps for installing the TFT35 E3 V3.0.1 Touch Screen. Specific steps may vary slightly depending on your 3D printer model.
- Power Off Printer: Ensure your 3D printer is completely powered off and unplugged from the power source before beginning installation.
- Remove Existing Display: Carefully unscrew and detach the existing display from your 3D printer. Disconnect any ribbon cables.
- Disassemble Old Display (if necessary): If your old display is integrated into a bracket, you may need to remove the display board from the bracket.
- Mount New Display: Secure the TFT35 E3 V3.0.1 Touch Screen board into the printer's display bracket using the provided screws.
- Connect Cables:
- For SKR MINI E3 V1.2 motherboards, connect the display using the EXP3 port.
- For other standard motherboards, connect the display using the EXP1 and EXP2 ports.
- Connect the serial touch screen cable (RS232) to the TFT or AUX-1 port on the motherboard.
- Reassemble and Mount: Reattach the display assembly to your 3D printer.
- Firmware Update: If necessary, update the firmware for both the Octopus V1.1 board and the TFT35 E3 V3.0.1 screen using an SD card. Download the latest firmware from the official BIGTREETECH GitHub repository.
Refer to the video below for a visual guide on the installation process:
Video demonstrating the installation of the TFT35 E3 V3.0.1 Touch Screen on a 3D printer, including cable connections.
5. Operating Instructions
Once installed and powered on, the TFT35 E3 V3.0.1 Touch Screen offers intuitive control over your 3D printer. The display supports both Marlin mode (traditional LCD interface) and Touch mode (graphical touch interface).
- Power On: Turn on your 3D printer. The display will boot up.
- Select Mode: You can switch between Marlin mode and Touch mode directly from the display interface. Touch mode offers a more graphical and interactive experience.
- Navigation: Use the rotary encoder (in Marlin mode) or touch gestures (in Touch mode) to navigate through menus and select options.
- Basic Controls: Access common functions such as:
- Heat: Adjust nozzle and bed temperatures.
- Move: Manually move the X, Y, and Z axes.
- Home: Auto-home all axes.
- Extrude: Load or unload filament.
- Print: Select and start prints from an inserted SD card or U disk.
- Settings: Configure various printer parameters and display settings.
- Printing from Storage: Insert an SD card or U disk into the designated slot on the display. Navigate to the 'Print' menu, select your storage device, and choose the desired G-code file to begin printing.
The video in the Setup section also provides a brief demonstration of the display's operational modes and menu navigation.
6. Maintenance
Proper maintenance ensures the longevity and optimal performance of your BIGTREETECH components.
- Keep Clean: Regularly clean the control board and touch screen with a soft, dry cloth. Avoid using liquids or abrasive cleaners.
- Check Connections: Periodically inspect all cable connections to ensure they are secure and free from damage. Loose connections can lead to erratic behavior.
- Firmware Updates: Keep your firmware updated to the latest version to benefit from bug fixes, performance improvements, and new features. Always follow official update procedures.
- Environmental Conditions: Operate the components within recommended temperature and humidity ranges to prevent damage.
- Driver Heatsinks: Ensure stepper motor driver heatsinks are clean and properly seated to maintain effective heat dissipation.
7. Troubleshooting
If you encounter issues, consider the following troubleshooting steps:
- No Power/Display:
- Verify all power connections to the motherboard and display.
- Ensure the printer's power supply is functioning correctly.
- Display Not Responding:
- Check the ribbon cable connections between the display and the motherboard.
- Ensure the correct display mode (UART or 12864) is selected if applicable.
- Re-flash the display firmware.
- Motor Issues (Skipping Steps, Noise):
- Verify stepper motor driver installation and orientation.
- Check Vref settings for the stepper drivers (refer to driver documentation).
- Ensure heatsinks are properly attached and cooling is adequate.
- Inspect motor wiring for loose connections or damage.
- Printing Errors:
- Ensure G-code files are correctly formatted and compatible with your firmware.
- Check filament loading and nozzle for clogs.
- Verify bed leveling and adhesion.
- Firmware Related Issues:
- Double-check your firmware configuration settings.
- Ensure the correct firmware version is installed for your hardware.
- Consult the BIGTREETECH GitHub repository for detailed firmware guides and community support.
For further assistance, refer to the official BIGTREETECH documentation and community forums.
8. Specifications
| Feature | Specification |
|---|---|
| Operating Temperature | 20 Degrees Celsius |
| Manufacturer | BIGTREETECH |
| Package Dimensions | 8.43 x 5.12 x 3.23 inches |
| Item Weight | 15.5 ounces |
| Item Model Number | 1060000524 |
| Date First Available | February 7, 2022 |
| Color | Black |
| Brand | BIQU |
| Voltage | 24 Volts |
| Material | PCB |
| Display Type | TFT or LCD |
9. Warranty and Support
For warranty information, please refer to the terms and conditions provided by your retailer or contact BIGTREETECH directly. Technical support and additional resources, including detailed documentation and firmware files, can be found on the official BIGTREETECH GitHub page:
https://github.com/bigtreetech
Always ensure you are using official resources for support and downloads to guarantee compatibility and reliability.


