
1. Introduction
The UNI-T UT89XE is a professional True RMS digital multimeter designed for accurate electrical measurements. It features a 6000-count display and is capable of measuring AC/DC voltage up to 1000V and AC/DC current up to 20A. This device includes a dual-range Non-Contact Voltage (NCV) test for quick identification of live and neutral wires, indicated by light intensity.
Key features include audible/visual alarms, a capacitor charging indicator, ergonomic design, double injection molding for durability, and 1-meter drop protection. It also incorporates a flashlight and auto backlight for improved visibility in various working conditions. The UT89XE is suitable for electricians, hobbyists, and technicians requiring reliable testing, measuring, and inspecting capabilities.
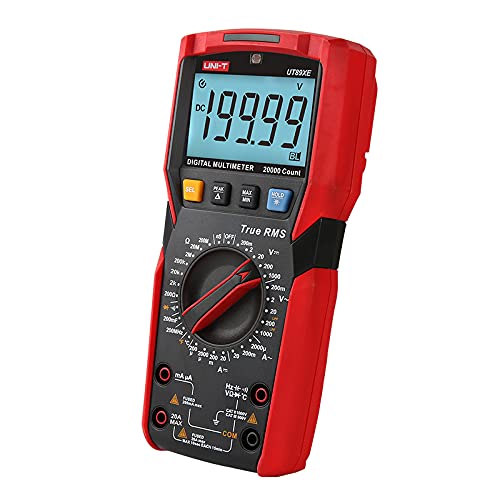
Image 1.1: The UNI-T UT89XE Digital Multimeter with its integrated kickstand.
2. Setup
2.1 Unpacking and Inspection
Upon receiving your UNI-T UT89XE Digital Multimeter, carefully unpack all components and inspect them for any signs of damage.
2.2 Included Components
The standard package for the UT89XE includes:
- Batteries (pre-installed or separate)
- Test leads (red and black)
- K-type temperature probe
- English instruction manual

Image 2.1: Packaging of the UNI-T UT89XE Digital Multimeter.
2.3 Battery Installation
If batteries are not pre-installed, open the battery compartment cover on the back of the multimeter. Insert the batteries according to the polarity markings (+ and -). Securely close the battery compartment.
2.4 Connecting Test Leads
For most measurements, connect the black test lead to the "COM" (common) input jack and the red test lead to the "VΩmA" input jack. For high current measurements (up to 20A), connect the red test lead to the "20A" input jack. Ensure connections are firm.
3. Operating Instructions
The UT89XE features a rotary dial for function selection and buttons for additional modes and features.
3.1 Power On/Off
Turn the rotary dial from the "OFF" position to any desired measurement function to power on the multimeter. To power off, turn the dial back to "OFF". The multimeter also features an auto power-off function to conserve battery life.
3.2 Basic Measurements
- Voltage Measurement (AC/DC): Select the "V~" for AC voltage or "V-" for DC voltage on the rotary dial. Connect the test leads in parallel to the circuit or component being measured.
- Current Measurement (AC/DC): Select the "A~" for AC current or "A-" for DC current. For currents up to 600mA, use the "mA" jack. For currents up to 20A, use the "20A" jack. Connect the multimeter in series with the circuit.
- Resistance Measurement (Ω): Select the "Ω" function. Ensure the circuit is de-energized before measuring resistance. Connect the test leads across the component.
- Capacitance Measurement (F): Select the "F" function. Ensure capacitors are discharged before measurement. Connect the test leads across the capacitor terminals. The capacitor charging indicator will show the status.
- Temperature Measurement (°C/°F): Select the "°C/°F" function. Connect the K-type temperature probe to the appropriate input jacks.
- Frequency (Hz) / Duty Cycle: Select the "Hz%" function.
- Diode Test / Continuity: Select the diode/continuity function. Use for checking diodes or circuit continuity (audible alarm for continuity).
- Non-Contact Voltage (NCV): Select the NCV function. Hold the top of the multimeter near a live wire. The intensity of the light and audible alarm will indicate the presence and strength of the AC voltage.
- LED Test (UT89XD only): This model supports LED testing. Select the LED test function and connect the LED to the appropriate terminals.

Image 3.1: Measuring AC voltage in an electrical panel using the UT89XE multimeter.

Image 3.2: Measuring resistance on a circuit board with the UT89XE multimeter.
3.3 Advanced Functions
- HOLD Button: Press to freeze the current display reading. Press again to release.
- SELECT Button: Used to switch between different functions within a single rotary dial position (e.g., AC/DC, Diode/Continuity).
- Flashlight & Auto Backlight: The multimeter includes a built-in flashlight and an auto backlight feature for improved visibility in low-light conditions.
Video 3.1: An overview demonstrating various functions and features of the UNI-T UT89XE Digital Multimeter.
4. Maintenance
4.1 Cleaning
Regularly clean the multimeter casing with a soft, damp cloth. Do not use abrasive cleaners or solvents. Ensure the device is powered off and disconnected from any circuits before cleaning.
4.2 Battery Replacement
When the low battery indicator appears on the display, replace the batteries promptly to ensure accurate readings. Power off the multimeter, open the battery compartment, replace the old batteries with new ones of the correct type and polarity, and securely close the compartment.
4.3 Fuse Replacement
If the current measurement function fails, the fuse may need replacement. Refer to the specifications for the correct fuse type and rating. Fuse replacement should only be performed by qualified personnel.
4.4 Storage
Store the multimeter in a cool, dry place away from direct sunlight and extreme temperatures. If storing for extended periods, remove the batteries to prevent leakage.
5. Troubleshooting
This section provides solutions to common issues you might encounter with your UT89XE Digital Multimeter.
- No Display / Faint Display:
- Check battery level. Replace batteries if low.
- Ensure batteries are installed with correct polarity.
- If the issue persists, contact customer support.
- Incorrect Readings:
- Verify the correct function is selected on the rotary dial.
- Ensure test leads are properly connected to the correct input jacks.
- Check for damaged test leads. Replace if necessary.
- Ensure the circuit is de-energized for resistance and capacitance measurements.
- For current measurements, ensure the multimeter is connected in series and the correct current jack is used.
- Current Measurement Not Working:
- Check if the fuse for the current range is blown. Replace if needed (by qualified personnel).
- Ensure the red test lead is connected to the appropriate current input jack (mA or 20A).
- NCV Not Detecting Voltage:
- Ensure the NCV function is selected.
- Confirm the presence of AC voltage in the area with a known live source.
If you encounter problems not listed here or if the suggested solutions do not resolve the issue, please contact UNI-T customer support.
6. Specifications
The following table outlines the key technical specifications for the UNI-T UT89XE Digital Multimeter.

Image 6.1: Detailed specifications for the UT89X series, including the UT89XE model.
| Feature | Specification |
|---|---|
| Brand | UNI-T |
| Model | UT89XE |
| Measurement Type | Multimeter |
| True RMS | Yes |
| Display Count | 6000 |
| DC Voltage (V) | 1000V |
| AC Voltage (V) | 1000V |
| DC Current (A) | 20A |
| AC Current (A) | 20A |
| Resistance (Ω) | 60MΩ |
| Capacitance (F) | 100mF |
| Frequency (Hz) | 10MHz |
| Temperature (°C/°F) | -40°C ~ 1000°C / -40°F ~ 1832°F |
| NCV | Dual range |
| Flashlight | Yes |
| Auto Backlight | Yes |
| Drop Protection | 1m |
| Safety Rating | CAT III 1000V, CAT II 600V |
| Power Source | Battery Powered |
| Item Weight | 1 kg |
| Dimensions | 9.84 x 9.06 x 9.84 inches (approximate packaging dimensions) |
7. Warranty and Support
7.1 Warranty Information
For specific warranty terms and conditions, please refer to the warranty card included with your product or contact the authorized UNI-T distributor or seller from whom you purchased the device. Warranty coverage typically addresses manufacturing defects.
7.2 Customer Support
If you require technical assistance, have questions about product operation, or need to report a defect, please contact UNI-T customer support or your local distributor. Contact information can usually be found on the UNI-T official website or in the product packaging.
Important: Do not attempt to repair the multimeter yourself, as this may void the warranty and pose safety risks.


