
Introduction
The ELEGOO Mega R3 2560 Project Starter Kit is designed for beginners and enthusiasts interested in learning electronics and programming with the Arduino IDE. This kit provides a comprehensive set of components, including the Mega R3 development board, various sensors, LEDs, resistors, and more, enabling users to build and experiment with a wide range of projects.
The kit includes a CD with 16 detailed tutorials, offering project introductions and code examples to guide you through the learning process. It serves as an excellent platform for understanding fundamental electronic principles and microcontroller programming.

Image: Overview of the ELEGOO Mega R3 2560 Project Starter Kit components neatly organized within its clear plastic storage box.
Kit Contents
Before starting, please verify that all components listed below are present in your kit. Refer to the included CD for a detailed inventory and visual guide.

Image: A visual representation of various components included in the kit, such as LEDs, resistors, sensors, and the Mega 2560 board.
| Component | Quantity |
|---|---|
| MEGA R3 Controller Board | 1 |
| USB Cable | 1 |
| LCD1602 screen | 1 |
| Power Supply Module | 1 |
| Breadboard | 1 |
| Jumper Wires (65 pcs) | 1 set |
| 3V Motor | 1 |
| Relay | 1 |
| Fan | 1 |
| 9V Battery & DC Connector | 1 set |
| Thermistor | 1 |
| PN2222 Transistor | 1 |
| 1N4007 Diode | 1 |
| IC 74HC595 | 1 |
| Active Buzzer | 1 |
| Passive Buzzer | 1 |
| Tilt Switch | 1 |
| Photoresistor | 1 |
| LEDs (Yellow, Blue, Green, Red, White) | 5 each |
| RGB LED | 2 |
| Potentiometer | 1 |
| Buttons (small) | 5 |
| Resistors (various values) | 10 each |
| Female-to-male Dupont Wire | 10 |
Setup Guide
- Install Arduino IDE: Download and install the latest version of the Arduino IDE from the official Arduino website (www.arduino.cc/en/software). Follow the installation instructions provided on their site.
- Connect the Mega R3 Board: Use the provided USB cable to connect your ELEGOO Mega R3 2560 board to your computer. The board should power on, indicated by an LED.
- Install Drivers: Your operating system may automatically install the necessary drivers. If not, refer to the tutorials on the included CD or the ELEGOO website for manual driver installation instructions.
- Access Tutorials: Insert the included CD into your computer's CD-ROM drive. The CD contains 16 detailed PDF tutorials with project guides and sample code. These tutorials are essential for learning how to use the kit components.
- Verify Board and Port: In the Arduino IDE, go to Tools > Board and select "Arduino Mega or Mega 2560". Then, go to Tools > Port and select the serial port corresponding to your connected Mega R3 board.

Image: Detailed view of the ELEGOO Mega R3 2560 board, highlighting its USB connection and power input.
Operating Instructions
The ELEGOO Mega R3 2560 Project Starter Kit is operated by writing and uploading code (sketches) to the Mega R3 board using the Arduino IDE. Each tutorial on the included CD provides step-by-step instructions for building circuits and programming the board.
Basic Project Workflow:
- Review Tutorial: Select a project from the provided CD tutorials. Read through the project description, component list, and circuit diagram carefully.
- Assemble Circuit: Using the breadboard and jumper wires, connect the components as shown in the circuit diagram. Ensure all connections are secure and correctly oriented (e.g., LED polarity, sensor pins).
- Load Code: Open the corresponding sample code (sketch) in the Arduino IDE.
- Verify Code: Click the "Verify" button (checkmark icon) in the Arduino IDE to check for any syntax errors in the code.
- Upload Code: Click the "Upload" button (right arrow icon) to compile and upload the code to your Mega R3 board. The RX/TX LEDs on the board will flash during the upload process.
- Observe Results: Once uploaded, the circuit should perform according to the program. Observe the behavior of LEDs, motors, or LCD displays.

Image: Example circuit featuring a 4-digit 7-segment display connected to the Mega R3 board on a breadboard.
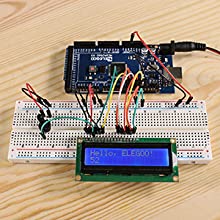
Image: Example circuit demonstrating an LCD1602 display showing text, wired to the Mega R3 board.

Image: Example circuit with a series of colored LEDs connected to the Mega R3 board, illustrating digital output control.

Image: Example circuit showing a small fan connected to a power module and controlled by the Mega R3 board.
Maintenance
- Storage: Store all components in the provided plastic box when not in use to prevent loss or damage. Keep the kit in a dry, cool environment away from direct sunlight.
- Handling: Handle electronic components with care. Avoid bending pins excessively or applying undue force.
- Cleaning: If necessary, gently clean the Mega R3 board and other components with a soft, dry cloth. Avoid using liquids or abrasive cleaners.
- Power Safety: Always disconnect power before making or changing circuit connections. Ensure correct voltage and current are applied to components to prevent damage.
Troubleshooting
- Board Not Connecting to Computer:
- Ensure the USB cable is securely connected to both the Mega R3 board and your computer.
- Try a different USB port on your computer.
- Verify that the correct drivers are installed. Refer to the setup guide or the ELEGOO website for driver installation.
- Check if the correct board and serial port are selected in the Arduino IDE (Tools > Board and Tools > Port).
- If using a USB hub, try connecting directly to a computer port.
- Code Not Uploading:
- Check for compilation errors in the Arduino IDE output window. Resolve any errors before attempting to upload again.
- Ensure the correct board and port are selected.
- Disconnect any components from pins 0 and 1 (RX/TX) on the Mega R3 board during upload, as these pins are used for serial communication.
- Circuit Not Working as Expected:
- Double-check all wiring against the circuit diagram in the tutorial. Pay close attention to polarity for components like LEDs and diodes.
- Verify that components are correctly inserted into the breadboard and making good contact.
- Ensure the power supply is adequate and correctly connected.
- Review your code for logical errors or typos.
- Missing Components:
- Refer to the complete component list on the included CD or the product page. If any items are missing, contact ELEGOO customer support.
Specifications
- Product Dimensions: 7.3 x 3.54 x 1.77 inches
- Item Weight: 15.8 ounces
- Model Number: EL-KIT-009
- CPU Model: ARM Cortex A-9
- Connectivity Technology: USB
- Manufacturer: ELEGOO
Warranty and Support
ELEGOO products are designed for quality and reliability. While specific warranty details are not provided in this manual, ELEGOO typically offers support for product defects and missing components.
For technical assistance, questions regarding kit components, or support for any issues encountered, please contact ELEGOO customer service. You can find contact information on the ELEGOO official website or through the email addresses provided on the product packaging (e.g., service@elegoo.com for European and Asian customers, euservice@elegoo.com for US customers).
Please have your product model number (EL-KIT-009) and purchase details ready when contacting support.