
Hyper Tough AQ90012J
Hyper Tough 4-Volt Rechargeable Staple Gun User Manual
Model: AQ90012J
Important Safety Instructions
Always read and understand all safety warnings and instructions before operating this tool. Failure to follow the warnings and instructions may result in electric shock, fire, and/or serious injury.
- Work Area Safety: Keep your work area clean and well-lit. Cluttered or dark areas invite accidents.
- Electrical Safety: Do not expose power tools to rain or wet conditions. Water entering a power tool will increase the risk of electric shock.
- Personal Safety: Always wear eye protection. Use hearing protection when operating for extended periods. Dress properly; avoid loose clothing or jewelry.
- Tool Use and Care: Do not force the power tool. Use the correct power tool for your application. Disconnect the battery pack from the power tool before making any adjustments, changing accessories, or storing power tools.
- Battery Pack Use and Care: Recharge only with the charger specified by the manufacturer. Do not use a battery pack or tool that is damaged or modified.
- Service: Have your power tool serviced by a qualified repair person using only identical replacement parts.
Product Overview
The Hyper Tough 4-Volt Rechargeable Staple Gun (Model AQ90012J) is a versatile and portable tool designed for light-duty fastening tasks. Its compact design and cordless operation make it ideal for various DIY projects around the home.
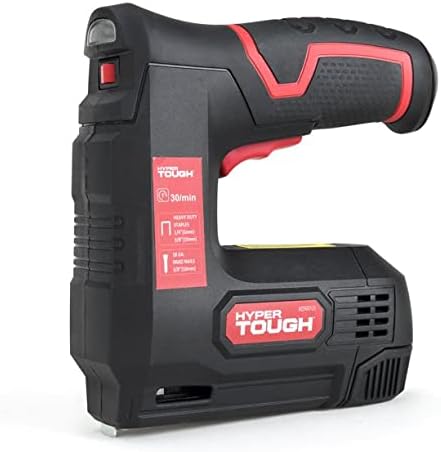
Image: Front view of the Hyper Tough 4-Volt Rechargeable Staple Gun, showcasing its black and red design.
Components
- Trigger: Activates the stapling mechanism.
- Magazine Release: Button or lever to open the staple magazine.
- Staple Magazine: Holds staples and nails.
- Power Switch: Turns the tool on/off.
- LED Work Light: Illuminates the work area.
- Battery Indicator: Shows battery charge level.
- USB Charging Port: For recharging the internal battery.
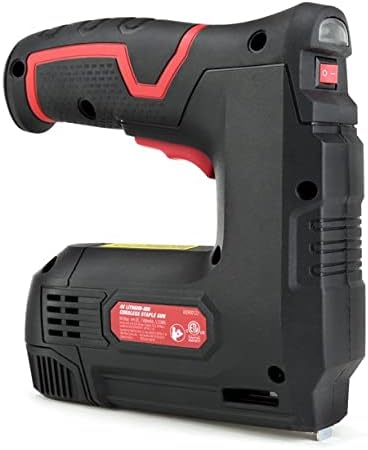
Image: Side view of the staple gun, highlighting the power switch and ergonomic grip.
Specifications
| Feature | Detail |
|---|---|
| Model Number | AQ90012J |
| Rated Voltage | 4V Max |
| Battery Capacity | 1,500mAh Lithium-ion |
| Magazine Capacity | 50 Pieces |
| Compatible Fasteners | Crown Staples (8mm) & T47 Nails (10mm) |
| Max Depth | 10 mm |
| Item Weight | 2.05 pounds (approx. 0.93 kg) |
| Dimensions (L x W x H) | 2.56 x 8.86 x 9.84 Inches |
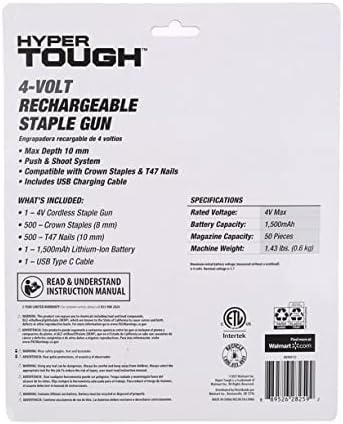
Image: Packaging backside displaying detailed product specifications and contents.
Setup
1. Initial Charging
Before first use, fully charge the staple gun's internal 4V lithium-ion battery. Use the provided USB charging cable.
- Connect the small end of the USB charging cable to the charging port on the staple gun.
- Connect the other end of the USB cable to a standard USB power adapter (not included) or a computer USB port.
- The battery indicator light will show charging status (e.g., red for charging, green for fully charged).
- Allow approximately 2-3 hours for a full charge.
2. Loading Staples/Nails
The staple gun uses an easy-access bottom-load magazine.
- Ensure the power switch is in the OFF position.
- Locate the magazine release latch at the bottom of the tool.
- Press the latch and pull out the magazine tray.
- Insert a strip of compatible Crown Staples (8mm) or T47 Nails (10mm) into the magazine tray, ensuring they are facing the correct direction (points forward).
- Slide the magazine tray back into the tool until it clicks securely into place.
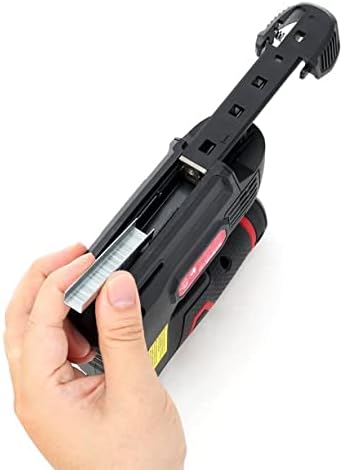
Image: A hand demonstrating the process of loading staples into the bottom-load magazine of the staple gun.
Operating Instructions
1. Powering On
Move the power switch to the ON position. The LED work light may illuminate, indicating the tool is ready for use.
2. Firing Staples/Nails
The staple gun features a 'Push & Shoot' system for controlled fastening.
- Place the nose of the staple gun firmly against the workpiece where you want to fasten. Ensure the tool is perpendicular to the surface for best results.
- Apply firm, even pressure to the tool against the surface. This action engages the safety mechanism.
- Press the trigger to fire a staple or nail.
- Release the trigger and lift the tool from the workpiece.

Image: A hand operating the staple gun, pressing it firmly against a wooden board to fasten a staple.
3. Best Practices
- Always test on a scrap piece of material first to ensure proper depth and function.
- Do not attempt to staple metal surfaces. This tool is designed for wood, leather, cardboard, and foils.
- Avoid rapid firing, as this can lead to jams or inconsistent fastening. Allow the tool to reset between shots.
Maintenance
1. Cleaning
Regular cleaning helps maintain the tool's performance and extends its lifespan.
- Disconnect the tool from any charging source and ensure it is powered off.
- Use a clean, damp cloth to wipe down the exterior of the tool. Do not use harsh chemicals or abrasive cleaners.
- Periodically clear any dust or debris from the staple magazine and firing mechanism using a soft brush or compressed air.
2. Storage
Store the staple gun in a dry, secure location away from direct sunlight and extreme temperatures.
- Ensure the tool is fully charged before long-term storage to preserve battery health.
- Remove any staples or nails from the magazine before storing to prevent accidental discharge or damage.
Troubleshooting
| Problem | Possible Cause | Solution |
|---|---|---|
| Tool does not fire | Battery is low or dead | Charge the battery fully. |
| Power switch is OFF | Turn the power switch to ON. | |
| Nose of tool not pressed firmly against workpiece | Ensure the tool is pressed firmly against the surface to engage the safety mechanism. | |
| Staples/Nails jam | Incorrect fastener size or type | Use only compatible Crown Staples (8mm) or T47 Nails (10mm). |
| Magazine is overloaded or improperly loaded | Remove fasteners and reload the magazine correctly, ensuring not to overload. | |
| Debris in the firing mechanism | Clear any debris from the magazine and firing area. | |
| Fasteners do not sink fully | Insufficient pressure on the tool | Apply more firm and consistent pressure to the tool against the workpiece. |
| Workpiece material is too hard | This tool is not designed for very hard materials like metal. Ensure material is suitable. |
Warranty Information
Hyper Tough products are manufactured to high-quality standards and are warranted against defects in materials and workmanship. Please refer to the product packaging or the official Hyper Tough website for specific warranty terms and conditions, including the duration and coverage details for your AQ90012J model.
Customer Support
For further assistance, technical support, or to inquire about replacement parts, please contact Hyper Tough customer service. You can typically find contact information on the product packaging or by visiting the official Hyper Tough website.
Website: www.walmart.com/brand/hyper-tough (as Hyper Tough is a Walmart brand)
Please have your model number (AQ90012J) and purchase date ready when contacting support.
Ask a question about this manual
Ask about setup, troubleshooting, compatibility, parts, safety, or missing instructions. Manuals+ will review the question and use this page’s manual context to help answer it.