1. Product Overview
The elemage Solar Security Camera (Model ZS-GX1S) is a wireless outdoor surveillance solution designed for comprehensive home security. It features 2K resolution, 360-degree pan-tilt-zoom (PTZ) capabilities, motion detection with siren and spotlight alarms, color night vision, and two-way audio communication. Powered by a solar panel and a rechargeable battery, it offers continuous operation with IP65 weatherproof rating for outdoor durability.

Figure 1.1: The elemage Solar Security Camera (Model ZS-GX1S) with its accompanying solar panel and a smartphone displaying the camera's live feed. This image illustrates the complete product setup, highlighting its wireless nature and solar charging capability.
2. Package Contents
- elemage Solar Security Camera (Model ZS-GX1S)
- Solar Panel with 3m charging cable
- Mounting Bracket
- Mounting Screws and Wall Anchors
- USB Charging Cable
- User Manual (this document)

Figure 2.1: A visual representation of all items included in the elemage Solar Security Camera package, including the camera unit, solar panel, mounting hardware, and cables.
3. Setup Guide
3.1 Initial Charging
Before initial use, fully charge the camera's built-in rechargeable battery using the provided USB cable. The charging LED indicator on the camera will turn red while charging and blue when fully charged. This ensures optimal performance and battery life.
3.2 App Installation and Account Creation
- Download and install the "CloudEdge" app from your smartphone's app store (iOS or Android).
- Open the app and follow the on-screen instructions to create a new account or log in if you already have one.

Figure 3.1: Visual guide for downloading and installing the "CloudEdge" application, which is essential for operating the camera.
3.3 Camera Pairing with App
- Ensure your smartphone is connected to a 2.4 GHz Wi-Fi network. The camera does not support 5 GHz Wi-Fi during the initial pairing process.
- Open the CloudEdge app and tap the "+" icon to add a new device.
- Select the appropriate camera type (e.g., "Solar Camera" or "Outdoor PTZ Camera").
- Follow the app's instructions to reset the camera (usually by pressing a reset button until an audible prompt is heard).
- The app will display a QR code. Position your camera's lens approximately 15-20 cm (6-8 inches) in front of your phone's screen until you hear a confirmation sound from the camera.
- Once connected, the camera's LED indicator will change, and you can name your camera and complete the setup.

Figure 3.2: Illustrates the camera pairing process, showing a smartphone displaying a QR code for the camera to scan, facilitating quick and easy connection.
3.4 Mounting the Camera and Solar Panel
Choose a location with optimal sunlight exposure for the solar panel and a clear view for the camera. Use the provided mounting bracket, screws, and wall anchors to securely install the camera and solar panel. Ensure the solar panel is positioned to receive direct sunlight throughout the day for continuous charging. The 3-meter cable allows for flexible placement of the solar panel relative to the camera.
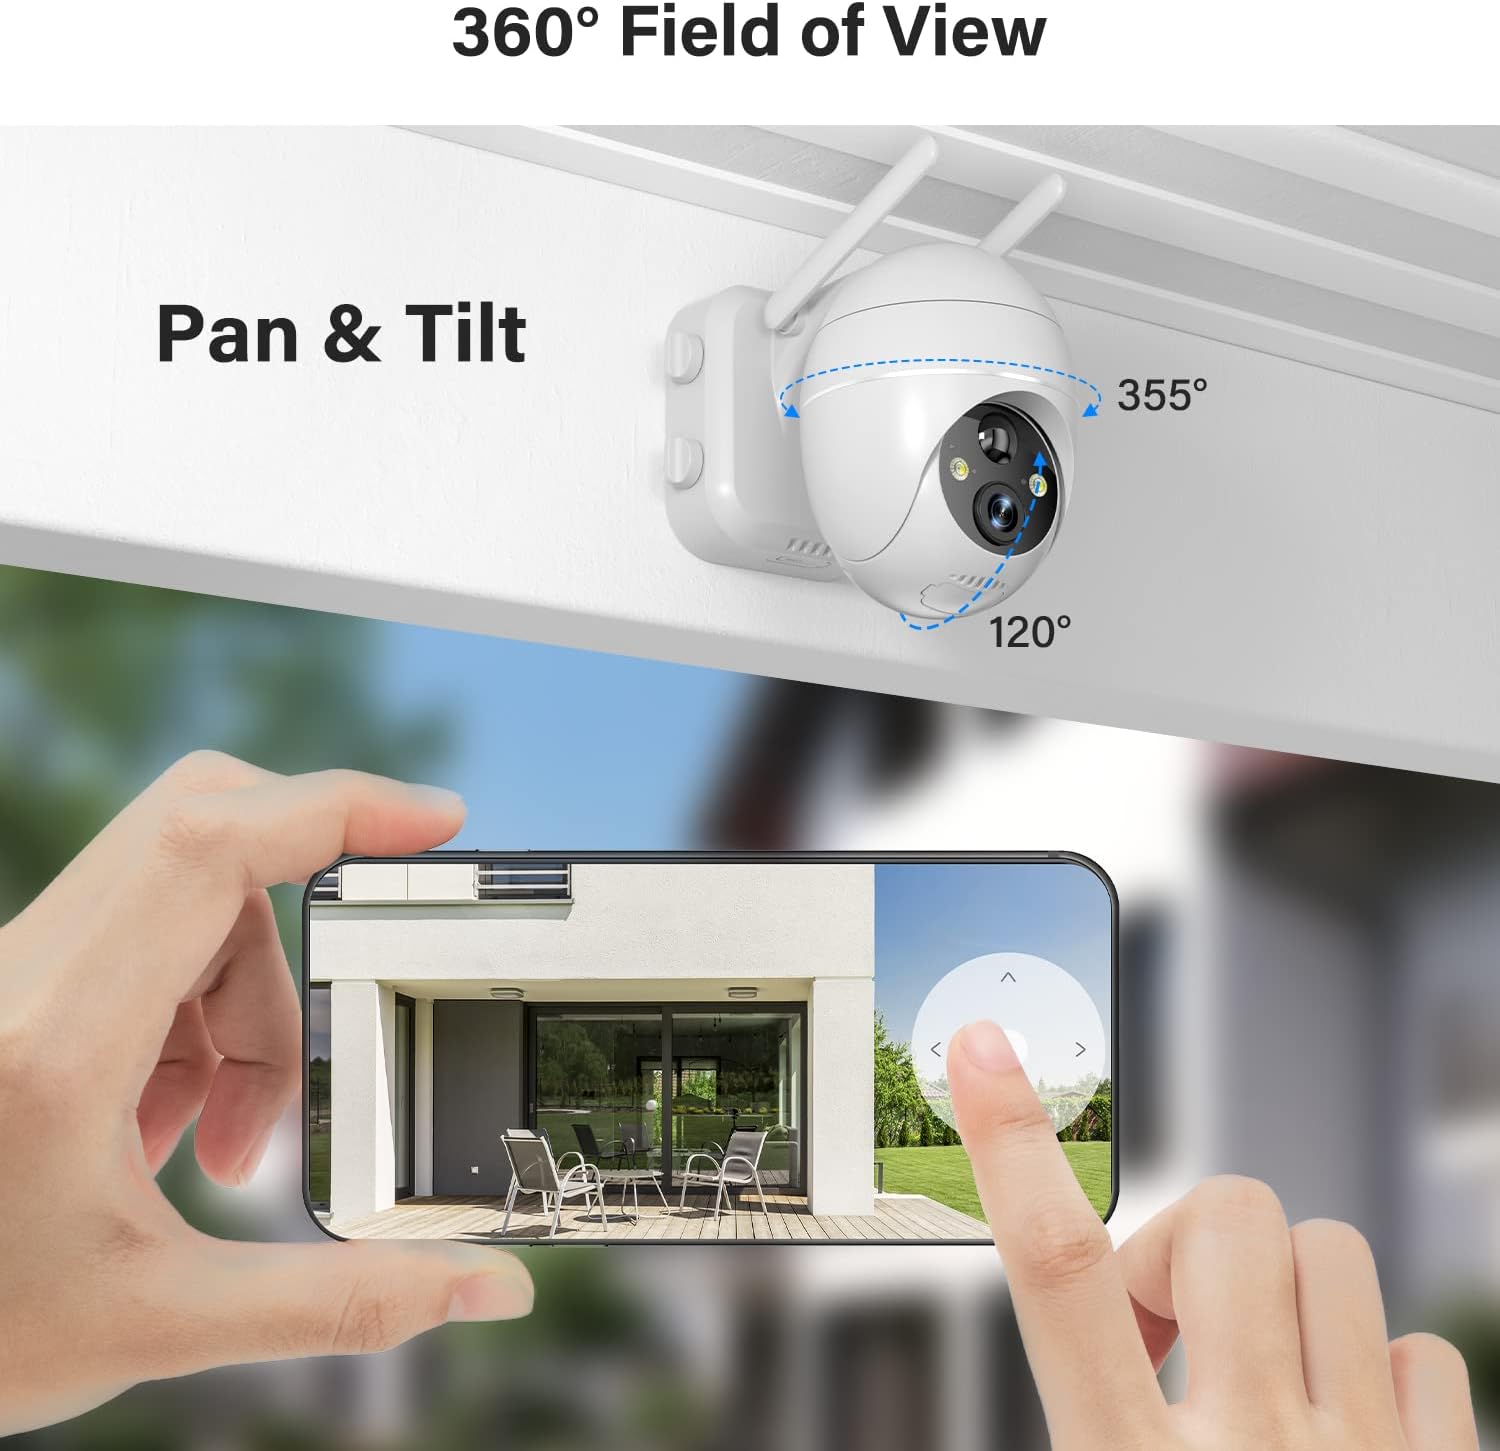
Figure 3.3: Depicts the outdoor installation of the elemage solar security camera, showcasing its pan-tilt capabilities and the separate solar panel for continuous power.

Figure 3.4: Shows the solar panel connected to the camera, illustrating how it provides continuous power to the device, ensuring 365-day non-stop protection.
4. Operating Instructions
4.1 Live View and PTZ Control
Open the CloudEdge app and select your camera to access the live view. Use the on-screen controls to pan (355° horizontally) and tilt (120° vertically) the camera, allowing you to monitor a wide area. Digital zoom is also available by pinching the screen.
Figure 4.1: Demonstrates the 360-degree field of view and pan-tilt functionality of the camera, controlled remotely via the smartphone application.
4.2 Motion Detection and Alarms
The camera features advanced smart AI motion detection. When motion is detected, a notification will be pushed to your phone via the app. You can configure sound and light alarms to activate simultaneously or separately. The spotlight and siren can deter intruders.

Figure 4.2: Illustrates the motion-activated spotlight and siren features, which provide visual and audible warnings upon detection of activity.

Figure 4.3: Displays a smartphone screen with alert notifications and options for screenshot and playback, triggered by the smart PIR motion sensor.
4.3 Two-Way Audio
Utilize the two-way audio function to communicate directly with individuals near the camera. This feature is accessible through the live view interface in the CloudEdge app.
Figure 4.4: Highlights the two-way audio capability, showing a person interacting with a delivery driver through the camera's built-in microphone and speaker.
4.4 Night Vision
The camera provides 2K FHD color night vision, ensuring clear images and videos even in low-light conditions. The intelligent night vision automatically adjusts based on ambient light.
4.5 Storage Options
Recordings can be saved to a local Micro SD card (not included, up to 128GB supported) or to the optional cloud storage service (subscription may be required). Ensure the Micro SD card is inserted correctly into the designated slot, typically located under a weatherproof cover on the camera body.
5. Maintenance
- Cleaning: Regularly wipe the camera lens and solar panel with a soft, damp cloth to ensure clear vision and efficient solar charging. Avoid abrasive cleaners.
- Battery Check: Monitor the battery level via the CloudEdge app. While the solar panel provides continuous power, occasional manual charging via USB may be necessary during prolonged periods of low sunlight.
- Firmware Updates: Check the CloudEdge app periodically for firmware updates to ensure your camera has the latest features and security enhancements.
- Weather Protection: Although IP65 weatherproof, ensure the micro USB port cover is securely closed to prevent water ingress, especially after manual charging.
6. Troubleshooting
| Problem | Possible Cause / Solution |
|---|---|
| Camera not connecting to Wi-Fi. | Ensure your Wi-Fi is 2.4 GHz. Check Wi-Fi signal strength at the camera's location. Reset the camera and try pairing again. |
| Battery not charging via solar panel. | Ensure the solar panel is in direct sunlight and free from obstructions. Check the connection cable between the solar panel and the camera. Clean the solar panel surface. |
| Poor image quality. | Clean the camera lens. Ensure sufficient lighting for optimal night vision. Check your internet connection speed. |
| Motion alerts not received. | Check app notification settings on your phone. Adjust motion detection sensitivity in the app. Ensure the camera is online. |
| Two-way audio not working. | Check microphone and speaker permissions for the app on your phone. Ensure volume levels are adequate. |
7. Specifications
- Model: ZS-GX1S
- Resolution: 2K FHD (3 MP effective still/webcam resolution)
- Pan/Tilt: 355° Horizontal, 120° Vertical
- Power Source: Solar Powered, Rechargeable Battery (1 Lithium Ion battery included)
- Connectivity: 2.4 GHz Wi-Fi (IEEE 802.11b/g/n)
- Night Vision: Color Night Vision, Low light technology: Night Color
- Motion Detection: PIR Motion Detection with Sound and Light Alarms
- Audio: Two-Way Talk (Built-in Microphone and Speaker)
- Weatherproof Rating: IP65
- Storage: Supports Micro SD Card (up to 128GB, not included), Cloud Storage (optional)
- Dimensions: 5.91 x 3.74 x 5.12 inches
- Weight: 2.16 pounds (980 Grams)
- Color: White
- Material: Metal
8. Warranty and Support
elemage provides customer support for their products. For warranty information, technical assistance, or further inquiries, please refer to the contact details provided on the product packaging or visit the official elemage website. Keep your purchase receipt for warranty claims.
For additional resources and frequently asked questions, you may visit the elemage Brand Store on Amazon.
9. Official Product Videos
No official product videos from the seller were found in the provided data. The available videos are from customer reviews and are not included as per instructions.


