1. Introduction
This manual provides detailed instructions for the installation, operation, and maintenance of your Facmogu 9-Band Car Audio Equalizer. This device is designed to enhance your in-car audio experience by offering precise control over sound frequencies, ensuring a clear and powerful signal to your amplifiers and speakers. Please read this manual thoroughly before use to ensure proper functionality and safety.

Image 1.1: Facmogu 9-Band Car Audio Equalizer Overview
2. Safety Information
- Ensure the vehicle's battery is disconnected before installation to prevent electrical shorts.
- Always use appropriate wiring gauges and fuses as recommended.
- Do not expose the equalizer to moisture or extreme temperatures.
- Consult a professional car audio installer if you are unsure about any installation steps.
- Securely mount the equalizer to prevent movement during vehicle operation.
3. Package Contents
Verify that all items are present in the package:
- 1 x Facmogu 9-Band Car Audio Equalizer
- 1 x Power Wiring Harness
- 2 x Mounting Brackets
- 4 x Mounting Screws
- 1 x User Manual
4. Product Overview
4.1 Front Panel Controls
- Volume Fader: Adjusts the overall output volume.
- Input Select (CD/AUX): Switches between CD and AUX input sources.
- Subwoofer Volume: Controls the output level of the subwoofer channel.
- Subwoofer Frequency: Adjusts the crossover frequency for the subwoofer output (30Hz to 120Hz).
- Fader (Front/Rear): Balances the audio output between front and rear channels.
- 9-Band Equalization Knobs: Individual controls for 50Hz, 100Hz, 250Hz, 500Hz, 1kHz, 2kHz, 4kHz, 8kHz, and 16kHz frequencies, adjustable from -12dB to +12dB.
4.2 Rear Panel Connections
- CD Input (RCA): Stereo RCA input for CD player or main audio source.
- AUX Input (RCA): Stereo RCA input for auxiliary audio sources.
- Front Output (RCA): Stereo RCA output for front speakers.
- Rear Output (RCA): Stereo RCA output for rear speakers.
- Sub Output (RCA): Stereo RCA output for subwoofer amplifier.
- Power Terminal (REM, +12V, GND): Connections for remote turn-on, 12V power, and ground.

Image 4.1: Front and Rear Panel Layout with Controls and Connections
The equalizer features a durable metal shell and high-quality rotary knobs with white light illumination for enhanced visibility and operation.

Image 4.2: Detailed view of adjustment knobs and interfaces.
5. Setup
5.1 Mounting
Use the provided mounting brackets and screws to secure the equalizer in a suitable location within your vehicle. Ensure the location allows for proper ventilation and easy access to controls and connections. Avoid mounting near heat sources or in direct sunlight.

Image 5.1: Product dimensions and mounting hardware.
5.2 Wiring Connections
- Power (REM, +12V, GND): Connect the +12V terminal to a constant 12V power source (fused). Connect the GND terminal to a solid chassis ground point. Connect the REM (Remote) terminal to your head unit's remote turn-on output.
- Input Connections: Connect your head unit's RCA outputs to either the CD Input or AUX Input on the equalizer. Use the input select switch on the front panel to choose your active source.
- Output Connections: Connect the Front, Rear, and Subwoofer RCA outputs from the equalizer to the corresponding inputs on your amplifiers. The equalizer provides 6-channel output (Front L/R, Rear L/R, Subwoofer L/R).

Image 5.2: Example of 6-channel output connections to amplifiers.
5.3 Initial Settings
- Before powering on, set all equalization knobs to the center (0dB) position.
- Set the Subwoofer Volume and Fader controls to their center positions.
- Ensure your head unit's volume is at a low level.
6. Operating Instructions
6.1 Power On/Off
The equalizer will power on automatically when your head unit is turned on, via the remote turn-on connection.
6.2 Input Selection
Use the Input Select switch on the front panel to toggle between the CD and AUX input sources.
6.3 Volume Control
Adjust the Volume Fader knob to control the overall output level of your audio system. Start with a low volume and gradually increase to a comfortable listening level.
6.4 Fader Control
The Fader (Front/Rear) knob allows you to balance the sound distribution between your front and rear speakers. Turn it towards 'F' for more front sound or 'R' for more rear sound.
6.5 Subwoofer Control
- Subwoofer Volume: Adjust this knob to set the desired bass level from your subwoofer.
- Subwoofer Frequency: Use this knob to select the low-pass crossover frequency for the subwoofer output, ranging from 30Hz to 120Hz. This ensures only low frequencies are sent to your subwoofer.
6.6 9-Band Equalization
The equalizer features 9 adjustable frequency bands, allowing you to fine-tune your audio output. Each knob can boost or cut its respective frequency by up to 12dB.
- 50Hz & 100Hz: Controls the deep bass frequencies.
- 250Hz & 500Hz: Adjusts the mid-bass and lower midrange.
- 1kHz & 2kHz: Controls the vocal and instrument clarity in the midrange.
- 4kHz & 8kHz: Manages the upper midrange and lower treble, affecting brightness.
- 16kHz: Adjusts the high-frequency treble, impacting crispness and airiness.
Adjust these bands to compensate for vehicle acoustics, speaker characteristics, and personal listening preferences. Small adjustments can make a significant difference.
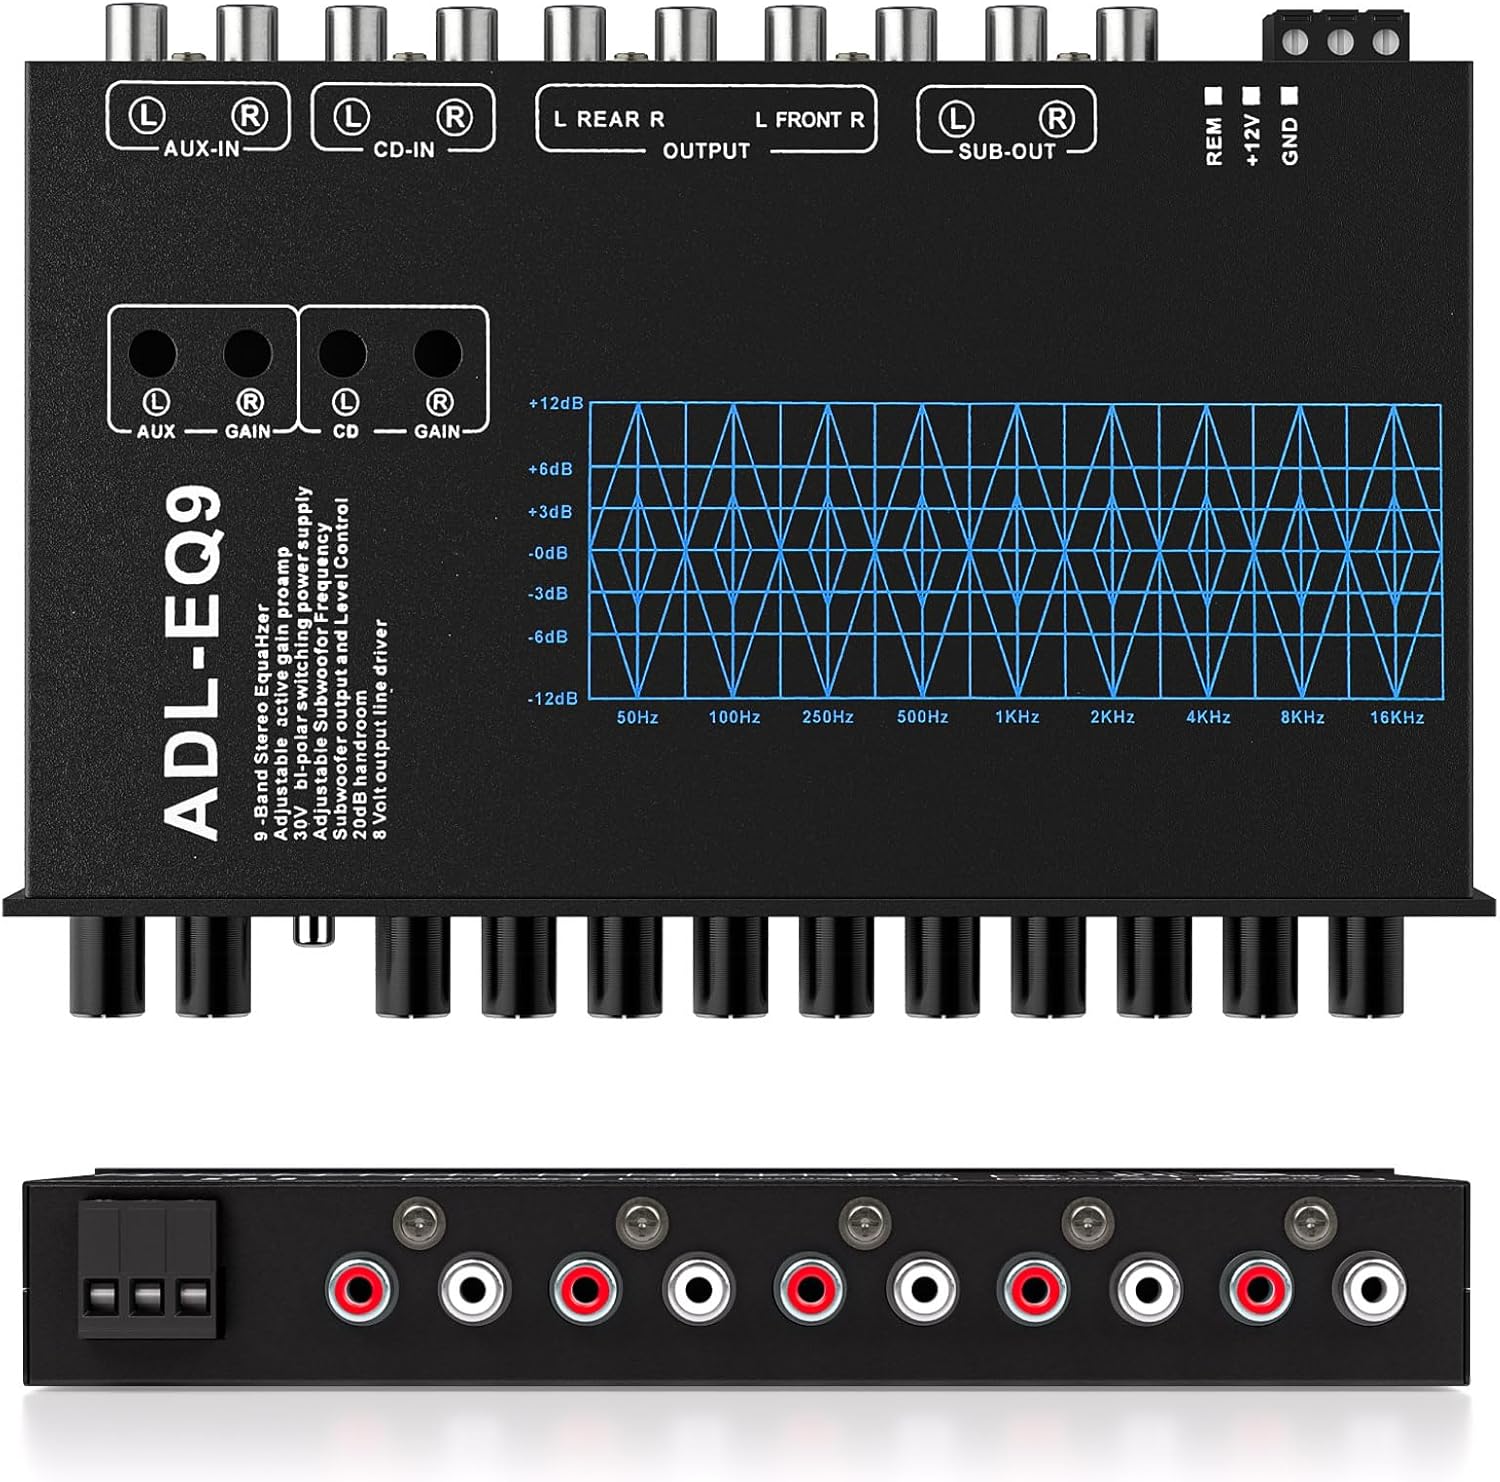
Image 6.1: Visual representation of the 9 balanced frequency bands.
6.7 8V RMS Line Driver
The equalizer includes an 8V RMS line driver, which provides a strong, clean signal to your amplifiers. This high output voltage helps to maximize the performance of your audio system and minimize noise, especially over long cable runs.
7. Maintenance
- Cleaning: Use a soft, dry cloth to clean the exterior of the equalizer. Do not use harsh chemicals or abrasive cleaners.
- Connections: Periodically check all wiring connections to ensure they are secure and free from corrosion.
- Ventilation: Ensure the equalizer's ventilation openings are not blocked to prevent overheating.
8. Troubleshooting
| Problem | Possible Cause | Solution |
|---|---|---|
| No Power | Blown fuse, incorrect wiring, no remote signal. | Check vehicle fuse, verify +12V, GND, and REM connections. Replace fuse if necessary. |
| No Sound | Incorrect input/output connections, input source not selected, amplifier off. | Verify RCA connections, ensure correct input (CD/AUX) is selected, check amplifier status. |
| Distorted Sound | Input signal too high, EQ settings too extreme, poor ground connection. | Reduce head unit volume, reset EQ knobs to 0dB, check ground wire for secure connection. |
| Engine Noise/Whine | Ground loop, poor power wiring. | Ensure all components are grounded to a single point. Check power and ground wire integrity. Consider a ground loop isolator if the issue persists. |
9. Specifications
- Model Number: M21037-MG-US
- Equalization Bands: 9 (50Hz, 100Hz, 250Hz, 500Hz, 1kHz, 2kHz, 4kHz, 8kHz, 16kHz)
- Boost/Cut: -12dB to +12dB per band
- Input Channels: 2 (CD, AUX)
- Output Channels: 6 (Front L/R, Rear L/R, Sub L/R)
- Subwoofer Frequency Adjustment: 30Hz - 120Hz
- Line Driver Output: 8V RMS
- Power Supply: DC 12 Volts (9V-16V operating range)
- Item Weight: 1.39 pounds
- Package Dimensions: 10.08 x 8.31 x 1.3 inches
10. Warranty and Support
This Facmogu product comes with a 1-Year Warranty from the date of purchase. This warranty covers manufacturing defects and malfunctions under normal use.
For technical support, warranty claims, or any questions regarding your equalizer, please contact Facmogu customer service through the retailer where the product was purchased. Please have your model number (M21037-MG-US) and proof of purchase ready when contacting support.


