1. Introduction
Thank you for choosing the AUSDOM ANC8 Bluetooth 5.0 Active Noise Cancelling Over-Ear Headphones. These headphones are designed to provide a superior audio experience with advanced noise cancellation, comfortable wear, and long-lasting battery life. This manual will guide you through the setup, operation, and maintenance of your new headphones.

Image: The AUSDOM ANC8 Over-Ear Headphones in their sleek design.
2. What's in the Box
Please check the package contents to ensure all items are present:
- ANC8 Bluetooth Headphones
- Carrying Case
- 3.5mm Aux cable
- USB Charging Cable
- User Manual

Image: A visual representation of all items included in the AUSDOM ANC8 headphone package.
3. Product Overview
3.1. Controls and Ports
Familiarize yourself with the buttons and ports on your headphones:
- Power Button: Used to power on/off the headphones, play/pause music, and answer/end calls.
- Volume Up/Next Track Button (+): Press to increase volume, press and hold to skip to the next track.
- Volume Down/Previous Track Button (-): Press to decrease volume, press and hold to go to the previous track.
- ANC (Active Noise Cancelling) Switch: Activates or deactivates the noise cancelling function.
- 3.5mm Audio Jack: For wired connection using the included Aux cable.
- Micro USB Charging Port: For charging the headphones.
- Microphone: Built-in for hands-free calls.

Image: A detailed view of the headphone's earcups, highlighting the external and internal microphones used for Active Noise Cancellation.
3.2. Design Features
- Foldable and Stretchable Design: Allows for easy storage and adjustment for various head sizes.
- Soft Protein Earpads: Designed for comfort during extended listening sessions.
- Adjustable Headband: Ensures a secure and comfortable fit.
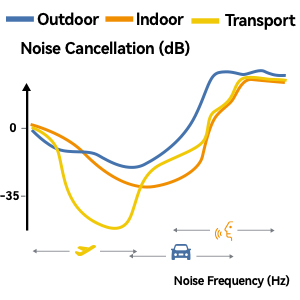
Image: The foldable and stretchable design of the AUSDOM ANC8 headphones, illustrating their portability and adjustable fit.
4. Setup
4.1. Charging the Headphones
- Connect the Micro USB charging cable to the charging port on the headphones.
- Connect the other end of the cable to a USB power source (e.g., computer USB port, USB wall adapter).
- The LED indicator will show charging status (refer to user manual for specific LED behavior).
- A full charge takes approximately 1 hour.

Image: The AUSDOM ANC8 headphones connected to a charging cable, demonstrating the quick charge technology.
4.2. Powering On/Off
- Power On: Press and hold the Power button until the LED indicator lights up.
- Power Off: Press and hold the Power button until the LED indicator turns off.
4.3. Bluetooth Pairing
- Ensure the headphones are powered off.
- Press and hold the Power button for approximately 5-7 seconds until the LED indicator blinks blue and red alternately. This indicates pairing mode.
- On your device (smartphone, tablet, computer), enable Bluetooth and search for available devices.
- Select "AUSDOM ANC8" from the list of available devices.
- Once paired, the LED indicator will blink blue slowly.
Video: A demonstration of the AUSDOM ANC8 Over-Ear Wireless Bluetooth Headphones, including their features and usage.
5. Operating Instructions
5.1. Active Noise Cancellation (ANC)
The ANC8 headphones feature advanced feedforward and feedback ANC technology to reduce up to 90% of unwanted low-frequency background noise.
- Activate ANC: Slide the ANC switch to the ON position. The ANC indicator light will illuminate.
- Deactivate ANC: Slide the ANC switch to the OFF position.
Image: An illustration demonstrating how Active Noise Cancellation works using internal and external microphones to block out ambient sound.
5.2. Music Playback
- Play/Pause: Press the Power button once.
- Next Track: Press and hold the Volume Up (+) button.
- Previous Track: Press and hold the Volume Down (-) button.
- Volume Control: Press the Volume Up (+) or Volume Down (-) buttons to adjust volume.
5.3. Phone Calls
The integrated CVC 8.0 noise-canceling microphones ensure clear calls.
- Answer Call: Press the Power button once.
- End Call: Press the Power button once during a call.
- Reject Call: Press and hold the Power button for 2 seconds.
- Redial Last Number: Double-press the Power button.

Image: The CVC 8.0 logo, indicating advanced call noise reduction technology.
5.4. Wired Mode
When the battery is low or if you prefer a wired connection, use the included 3.5mm audio cable.
- Connect one end of the 3.5mm audio cable to the headphone's audio jack.
- Connect the other end to your audio source's 3.5mm port.
- In wired mode, the microphone functions may not be available depending on your device.
6. Maintenance
- Keep the headphones dry. Do not expose them to extreme temperatures.
- Clean the earpads and headband with a soft, damp cloth. Avoid using harsh chemicals.
- Store the headphones in the provided carrying case when not in use to protect them from dust and damage.
- Avoid dropping or subjecting the headphones to strong impacts.
7. Troubleshooting
| Problem | Solution |
|---|---|
| Headphones won't turn on. | Ensure the headphones are fully charged. Connect to a power source and try again. |
| Cannot pair via Bluetooth. |
|
| No sound or low volume. |
|
| ANC not working effectively. | Ensure the ANC switch is in the ON position. ANC is most effective against low-frequency, constant noise. |
| Microphone not working in wired mode. | Microphone functionality may be limited or unavailable in wired mode depending on the device and cable used. Use Bluetooth for full microphone functionality. |
8. Specifications
| Feature | Detail |
|---|---|
| Model Name | E7 Glossy Black |
| Connectivity Technology | Wired, Wireless (Bluetooth 5.0) |
| Wireless Communication Technology | Bluetooth |
| Noise Control | Active Noise Cancellation |
| Ear Placement | Over Ear |
| Form Factor | Over Ear |
| Frequency Response | 20000 Hz |
| Sensitivity | 95 dB |
| Headphones Jack | 3.5 mm Jack |
| Charging Time | 1 Hours |
| Playtime (Standard Music Mode) | Up to 35 hours |
| Playtime (ANC Mode) | Up to 30 hours |
| Battery Type | 1 Lithium Ion battery (included) |
| Control Type | Media Control |
| Control Method | Touch (buttons) |
| Item Weight | 1.27 pounds |
| Manufacturer | Ausdom |
9. Warranty & Support
For warranty information and technical support, please refer to the official AUSDOM website or contact their customer service directly. Keep your purchase receipt for warranty claims.
- Official Website: www.ausdom.com
- Customer Support Email: support@ausdom.com
Note: Warranty terms and conditions may vary by region. Please consult the official AUSDOM website or your local retailer for specific details.


