
Product Overview
The LawnMaster CLMF4817E 48V MAX* Brushless Mower is a cordless electric lawn mower designed for efficient lawn maintenance. It operates on two 24V MAX* 4.0Ah lithium-ion batteries, providing cordless freedom and powerful performance for tackling various yard conditions. This manual provides essential information for the safe and effective operation, maintenance, and troubleshooting of your LawnMaster mower.

Figure 1: LawnMaster CLMF4817E 48V MAX* Brushless Mower, including the mower unit, two 24V MAX* 4.0Ah batteries, and a dual charger.
Key Components
Familiarize yourself with the main parts of your LawnMaster CLMF4817E mower for proper assembly and operation.
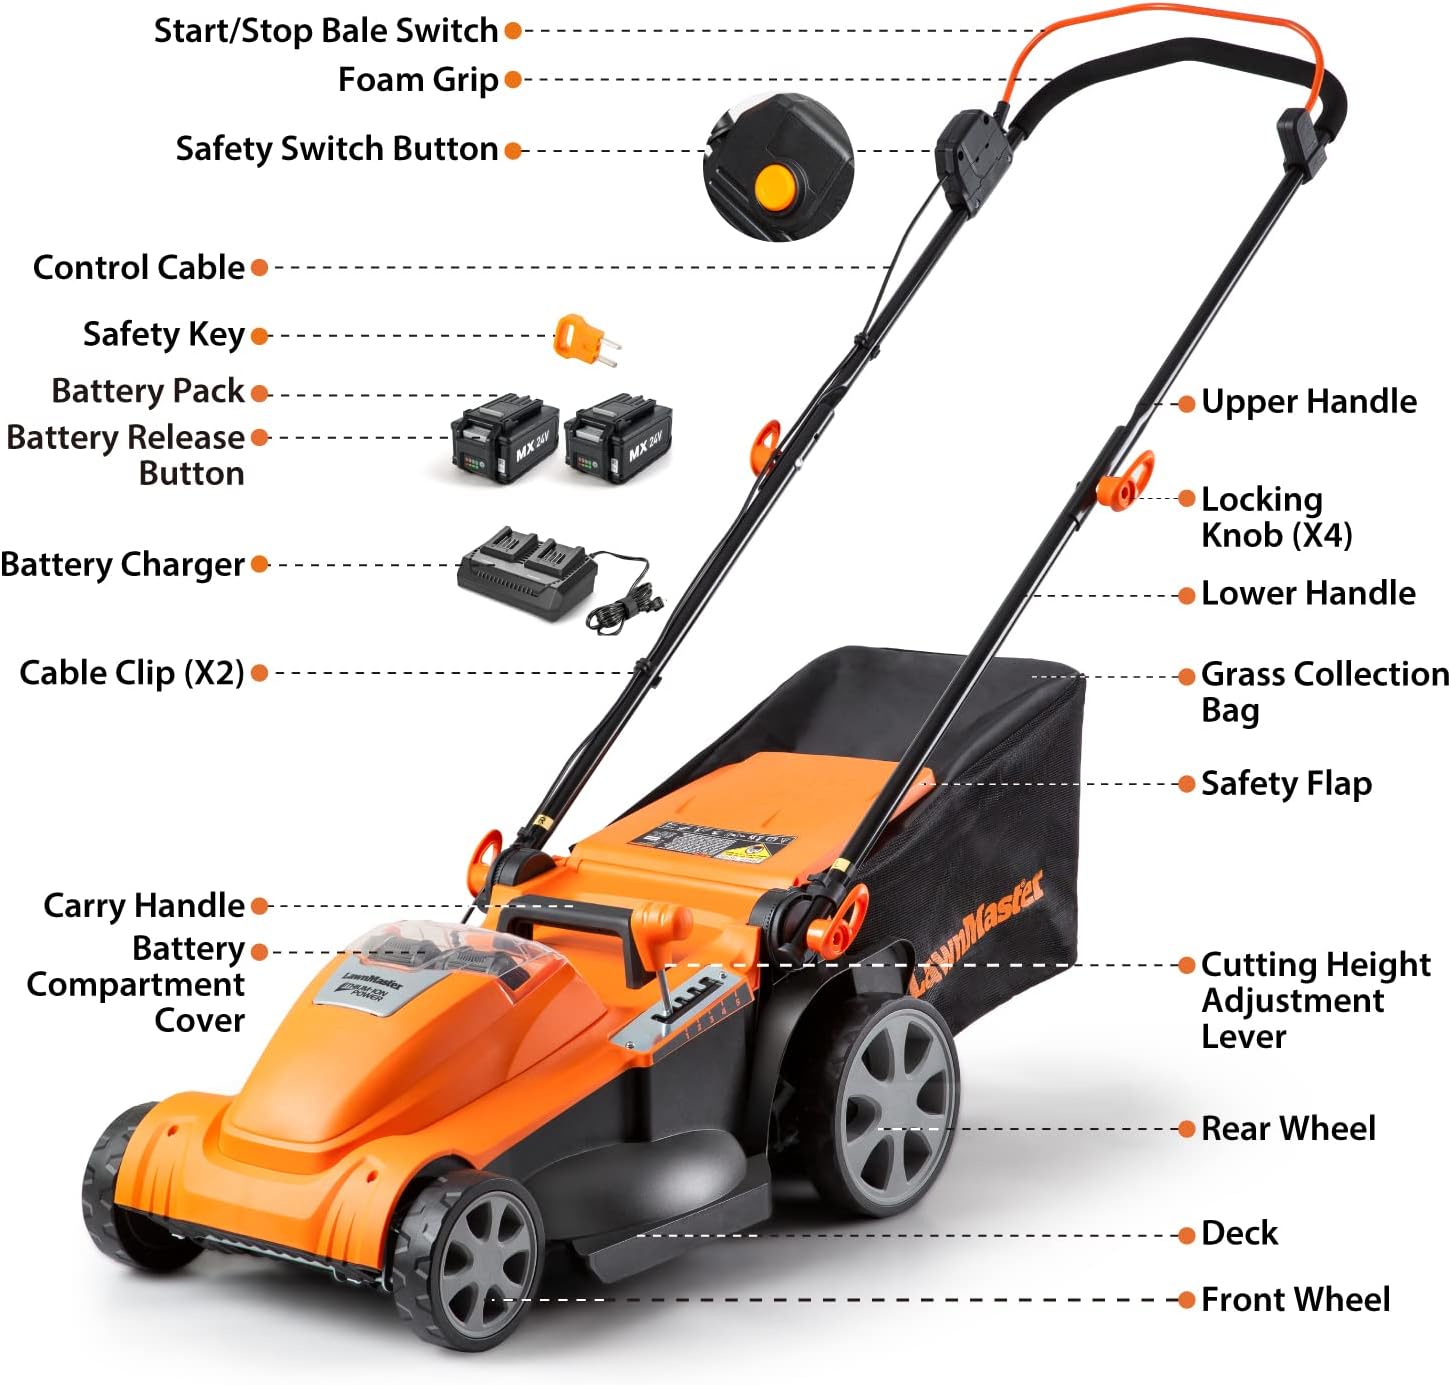
Figure 2: Detailed diagram illustrating the various components of the LawnMaster CLMF4817E mower, including the handle, safety switch, battery compartment, cutting height adjustment lever, grass collection bag, and wheels.
- Upper Handle: Main handle for pushing and steering the mower.
- Lower Handle: Connects the upper handle to the mower deck.
- Start/Stop Bale Switch: Engages and disengages the motor.
- Safety Switch Button: Must be pressed before engaging the bale switch.
- Locking Knobs (X4): Used to secure the handle sections during assembly.
- Carry Handle: For lifting and transporting the mower.
- Battery Compartment Cover: Protects the battery slots.
- Battery Pack: Two 24V MAX* 4.0Ah lithium-ion batteries power the unit.
- Battery Release Button: Used to remove batteries from the compartment.
- Battery Charger: Dual charger for recharging the batteries.
- Safety Key: Must be inserted for the mower to operate.
- Control Cable: Connects the handle controls to the motor.
- Cable Clip (X2): Secures the control cable to the handle.
- Grass Collection Bag: Collects grass clippings during mowing.
- Safety Flap: Covers the rear discharge opening.
- Cutting Height Adjustment Lever: Adjusts the blade height.
- Rear Wheel: Larger wheels for enhanced mobility.
- Front Wheel: Smaller wheels for maneuverability.
- Deck: The main body of the mower housing the blade.
Setup and Initial Use
1. Assembly
- Handle Assembly: Attach the lower handle to the mower deck using the provided locking knobs. Then, attach the upper handle to the lower handle, securing it with the remaining locking knobs. Ensure all knobs are tightened securely.
- Grass Collection Bag Assembly: Assemble the grass collection bag according to the instructions provided in the packaging. This typically involves attaching the fabric bag to a frame.
- Attach Grass Collection Bag: Lift the safety flap at the rear of the mower and hook the assembled grass collection bag onto the mower deck. Ensure it is seated firmly.

Figure 3: Visual guide for assembling the grass collection bag, showing the frame, bag attachment, and placement on the mower.
2. Battery Charging and Installation
- Charge Batteries: Before first use, fully charge both 24V MAX* 4.0Ah lithium-ion batteries using the dual-battery charger. Connect the charger to a standard power outlet and insert the batteries. The charger's indicator lights will show the charging status.
- Install Batteries: Open the battery compartment cover on the mower. Insert both fully charged batteries into their respective slots until they click into place. Close the battery compartment cover securely.
- Insert Safety Key: Locate the safety key slot, typically near the battery compartment. Insert the safety key fully. The mower will not operate without the safety key inserted.

Figure 4: Image showing the two 24V 4.0Ah batteries being placed into the battery compartment of the mower, ready for operation.
Operating Instructions
1. Adjusting Cutting Height
The LawnMaster CLMF4817E offers 5 cutting positions, allowing you to customize the grass height from 1.4 inches to 3 inches (3.56 cm to 7.62 cm). To adjust the cutting height:
- Ensure the mower is turned off and the safety key is removed.
- Locate the cutting height adjustment lever on the side of the mower deck.
- Pull the lever outwards and move it to the desired height setting. The settings are typically numbered 1 through 5.
- Release the lever to lock it into position. Ensure all wheels are at the same height setting.
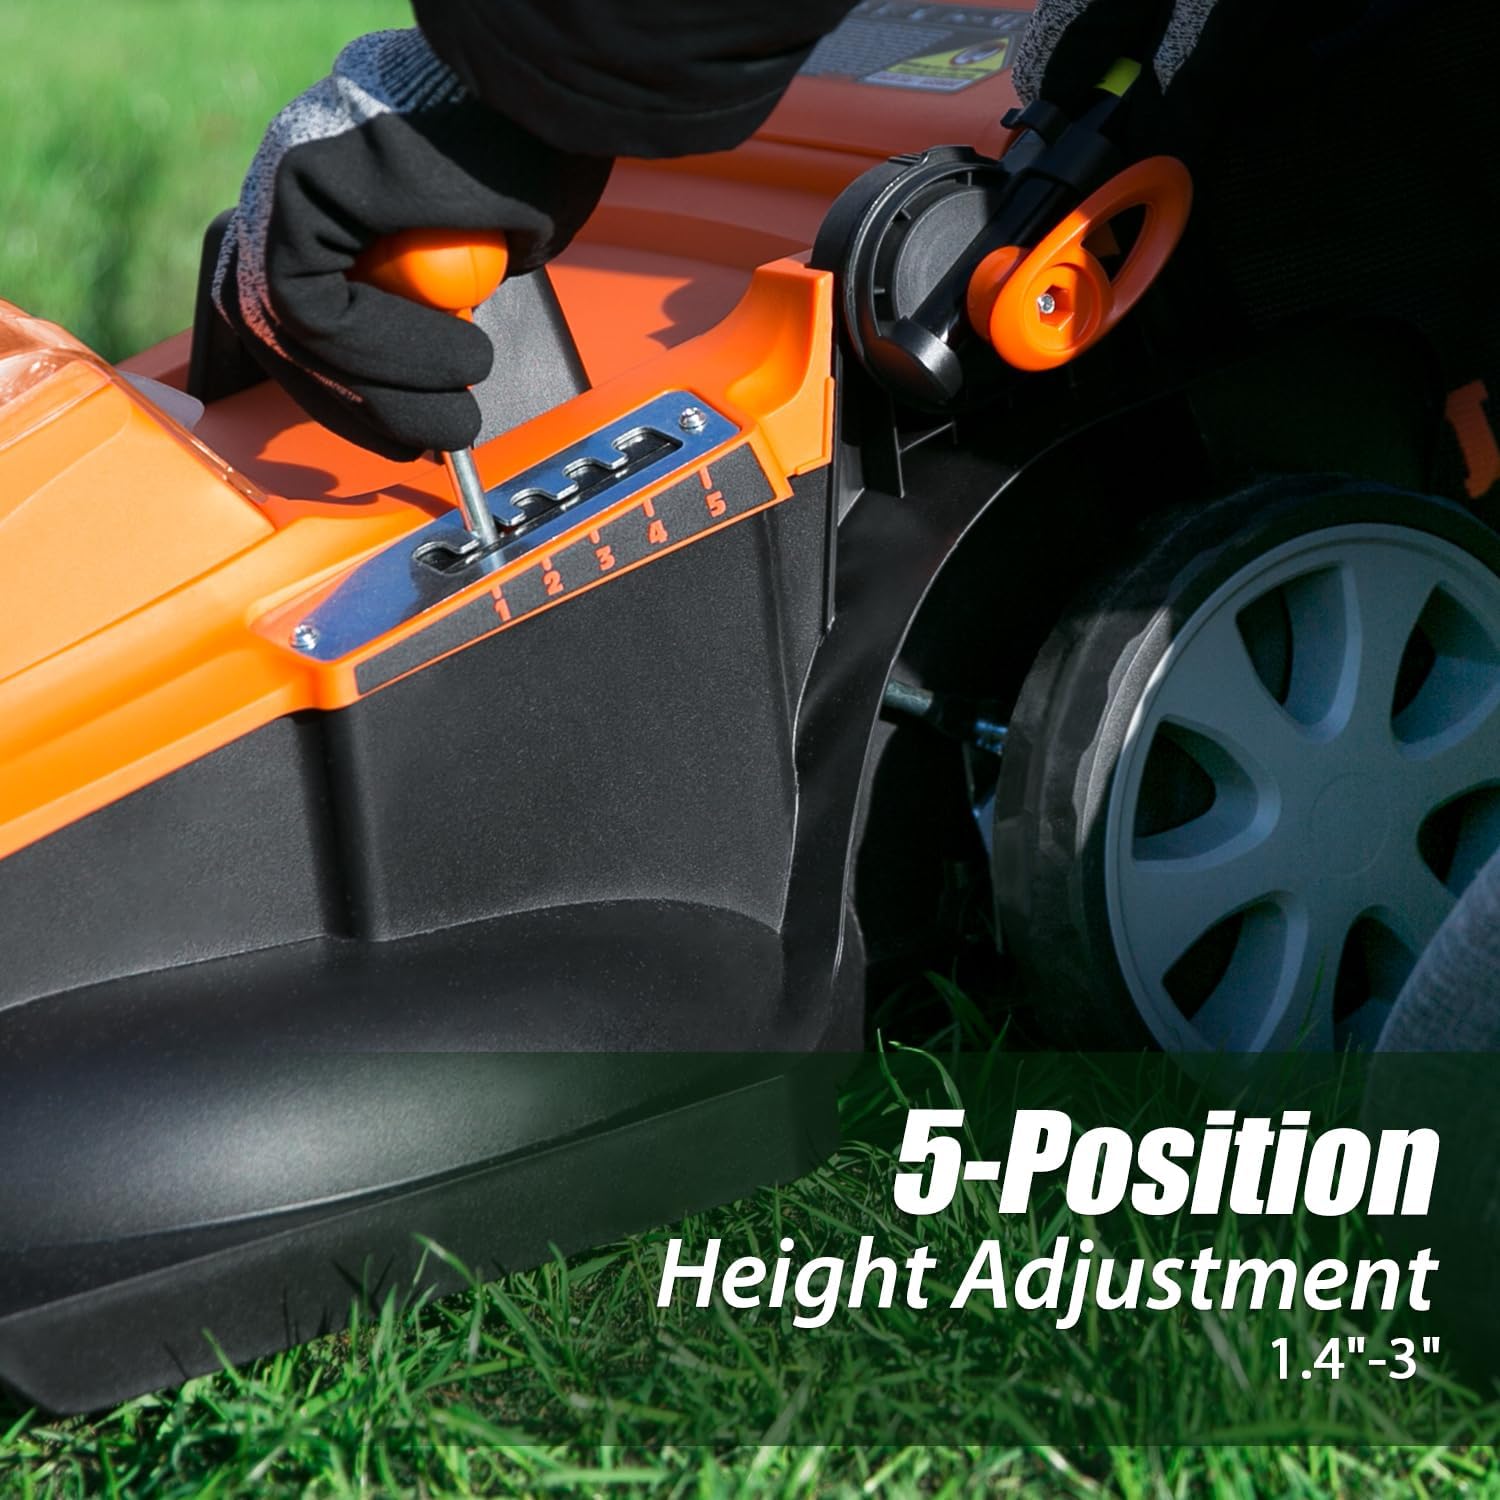
Figure 5: The cutting height adjustment lever, showing the numbered settings for precise control over grass length.
2. Starting and Stopping the Mower
- Ensure batteries are installed and the safety key is inserted.
- Press and hold the safety switch button.
- While holding the safety switch button, pull the start/stop bale switch towards the handle. The mower will start.
- Release the safety switch button, but continue to hold the bale switch to keep the mower running.
- To stop the mower, release the start/stop bale switch. The blade will stop rotating.
3. Mowing Techniques
- For optimal cutting performance, mow when the grass is dry.
- Overlap each cutting pass slightly to ensure even coverage.
- Avoid overloading the mower by taking smaller passes in very thick or tall grass. The iPOWER TECHNOLOGY DISPLAY helps manage power for efficiency.
- The 16-inch cutting width and 7.8-inch rear wheels provide enhanced mobility for easy navigation around the lawn.
- The 13-gallon grass collection bag efficiently collects clippings, reducing the need for frequent emptying. It can also pick up leaves, contributing to a cleaner yard.
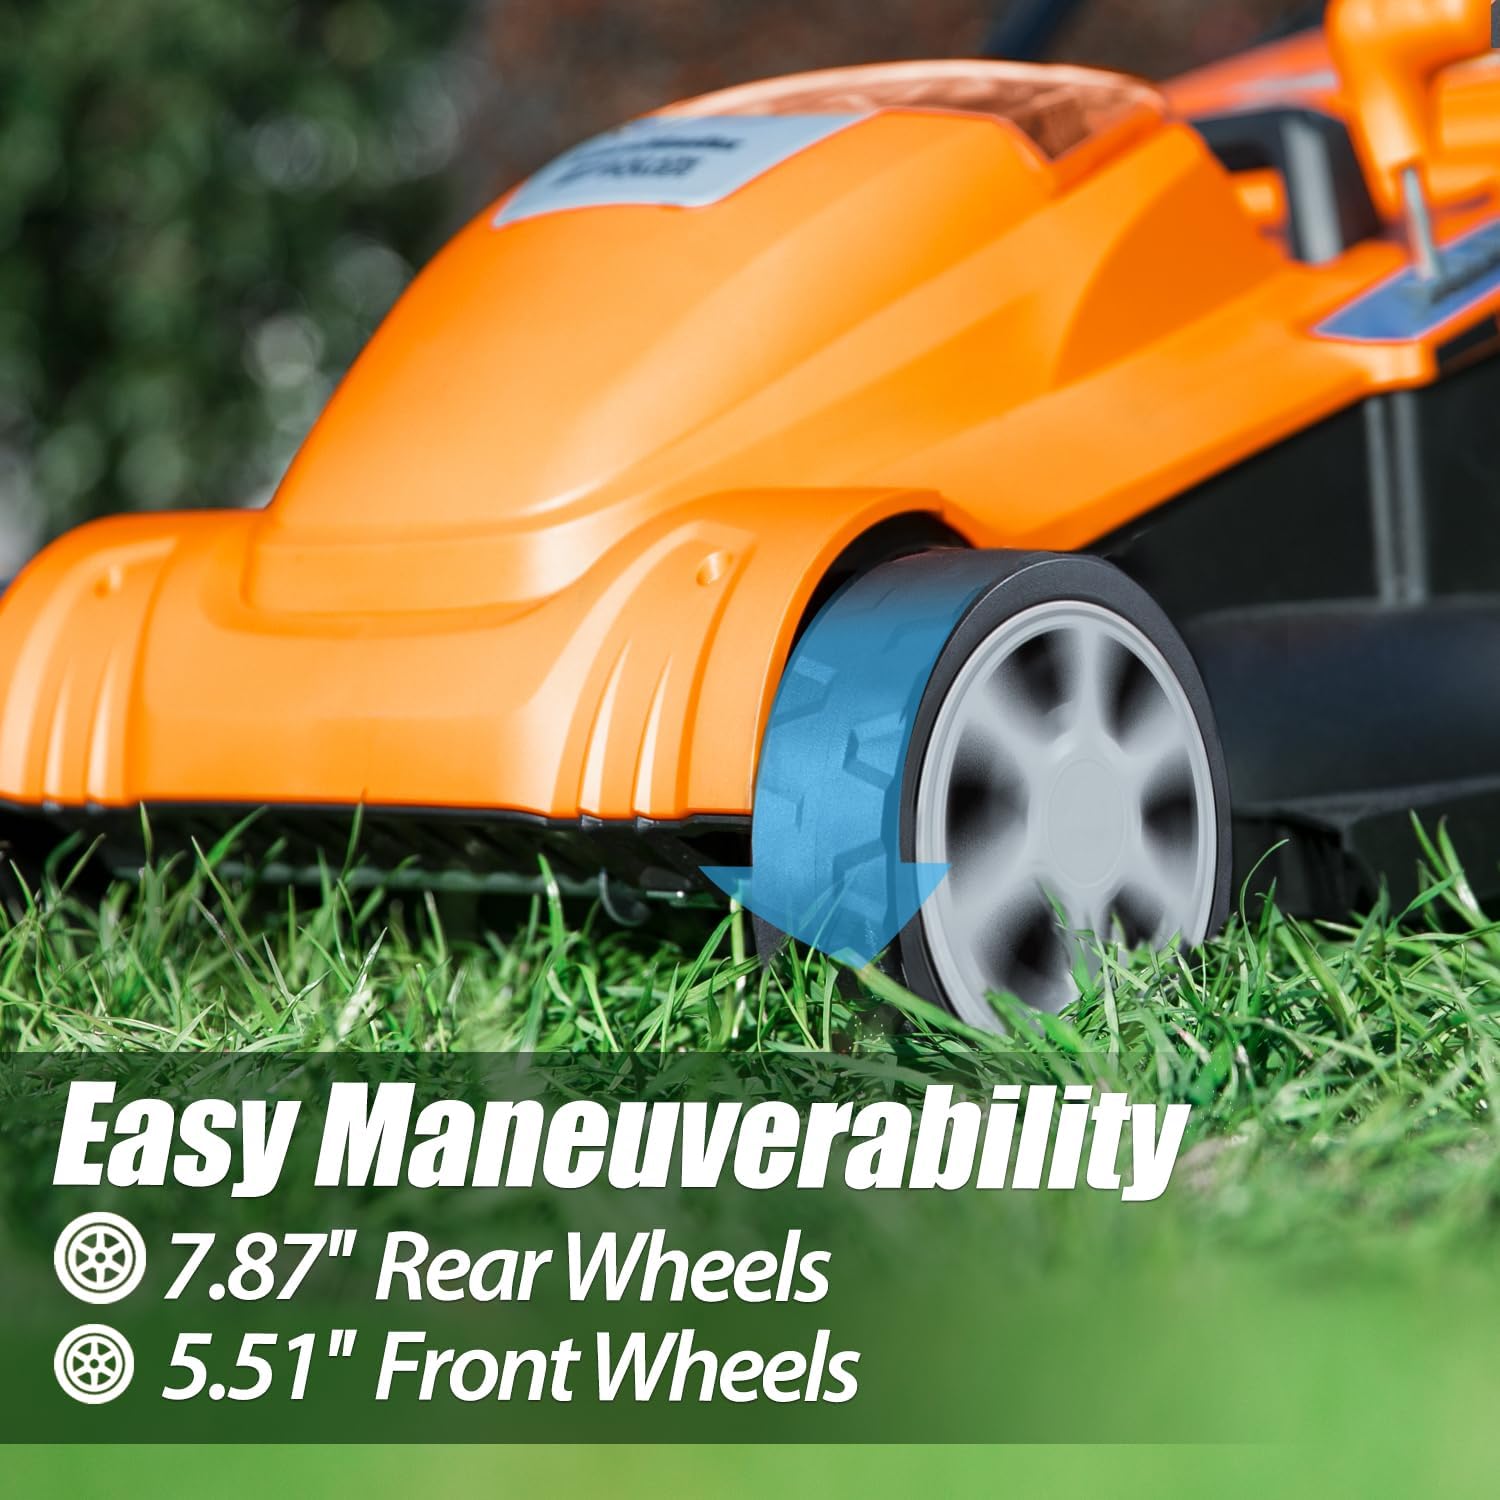
Figure 6: The mower's design highlighting its large rear wheels, which contribute to easy maneuverability across various lawn terrains.

Figure 7: The spacious grass collection bag, designed to hold a significant volume of clippings, minimizing interruptions during mowing.

Figure 8: The mower's ability to collect leaves while mowing, providing a convenient way to keep the yard tidy without additional raking.
Maintenance
Regular maintenance ensures the longevity and optimal performance of your LawnMaster mower. Always ensure the mower is off, batteries are removed, and the safety key is disengaged before performing any maintenance.
1. Cleaning
- Mower Deck: After each use, clean the underside of the mower deck to remove grass clippings and debris. This prevents buildup that can affect cutting performance.
- Grass Collection Bag: Empty and clean the grass collection bag regularly. A clogged bag reduces collection efficiency.
- Exterior: Wipe down the exterior of the mower with a damp cloth. Do not use harsh chemicals or abrasive cleaners.
2. Storage
The LawnMaster CLMF4817E features fold-down push handles for ultra-compact stowing, making storage simple.
- Remove batteries from the mower before storing.
- Clean the mower thoroughly before long-term storage.
- Fold down the handles for compact storage.
- Store the mower in a dry, secure location, away from direct sunlight and extreme temperatures.
Troubleshooting
| Problem | Possible Cause | Solution |
|---|---|---|
| Mower does not start |
|
|
| Poor cutting performance |
|
|
| Reduced battery runtime |
|
|
Specifications
| Feature | Detail |
|---|---|
| Brand | LawnMaster |
| Model Number | CLMF4817E |
| Power Source | Battery Powered (2 x 24V MAX* 4.0Ah Lithium Ion) |
| Motor Type | Brushless |
| RPM | 3,100 RPM |
| Cutting Width | 16 Inches (40.64 cm) |
| Cutting Height Positions | 5 positions |
| Adjustable Cutting Height Range | 1.4 inches - 3 inches (3.56 cm - 7.62 cm) |
| Grass Bag Capacity | 13 Gallons (approx. 49.2 Liters) |
| Item Weight | 29.8 Pounds (13.52 kg) |
| Product Dimensions (DxWxH) | 29.56"D x 18.03"W x 13.07"H (75.08 x 45.80 x 33.20 cm) |
| Rear Wheel Size | 7.8 Inches |
| Front Wheel Size | 5.51 Inches |
| Manufacturer | Cleva |
Warranty and Support
For detailed warranty information, please refer to the warranty card included with your product packaging or visit the official LawnMaster website. For technical support or service inquiries, please contact LawnMaster customer service directly.
A PDF version of the user manual is also available for download: LawnMaster CLMF4817E User Manual (PDF).


