
Acoustic Audio by Goldwood 2.1 Channel Sound Bar with Wired Subwoofer
Model: AASB1102W
Introduction
Thank you for purchasing the Acoustic Audio by Goldwood 2.1 Channel Sound Bar with Wired Subwoofer. This system is designed to enhance your audio experience for television, movies, music, and more. Please read this manual carefully before operating the device to ensure proper use and to maximize its performance.
Safety Information
- Do not expose the unit to rain, moisture, or extreme temperatures.
- Ensure proper ventilation around the sound bar and subwoofer.
- Do not open the casing. Refer all servicing to qualified personnel.
- Use only the power cord provided.
- Keep the remote control batteries out of reach of children.
Package Contents
Verify that all items listed below are included in your package:
- Sound Bar
- Wired Subwoofer
- 5-foot HDMI Cable
- Digital Optical Cable
- 3.5mm Aux Cable
- Mounting Hardware
- Power Cord
- Remote Control

Image: Contents of the product package, including the soundbar, subwoofer, remote, and connection cables.
Product Overview
Sound Bar Front View

Image: Front view of the sound bar, featuring a sleek black design with a metal mesh grille.
Sound Bar Rear View (Connections)

Image: Rear view of the sound bar, highlighting the various input ports including AUX IN, OPTICAL IN, and TV (ARC).
Wired Subwoofer

Image: Side view of the wired subwoofer, showing its compact design and bass port.
Setup
1. Placement
- Sound Bar: Place the sound bar on a flat surface directly in front of your TV, or mount it on the wall below your TV. Ensure it is not obstructed.
- Subwoofer: Position the wired subwoofer on the floor near the sound bar. Its compact size allows for flexible placement.
2. Connections
Choose one of the following connection methods to link your sound bar to your audio source (TV, PC, etc.):
- HDMI ARC: Connect one end of the HDMI cable to the TV (ARC) port on the sound bar and the other end to the HDMI ARC port on your TV. This allows for audio return channel functionality.
- Optical: Connect one end of the digital optical cable to the OPTICAL IN port on the sound bar and the other end to the optical output port on your TV or audio source.
- AUX: Connect one end of the 3.5mm Aux cable to the AUX IN port on the sound bar and the other end to the 3.5mm audio output jack on your TV, PC, or other device.
- Bluetooth: For wireless connection, refer to the Bluetooth pairing instructions in the Operating section.
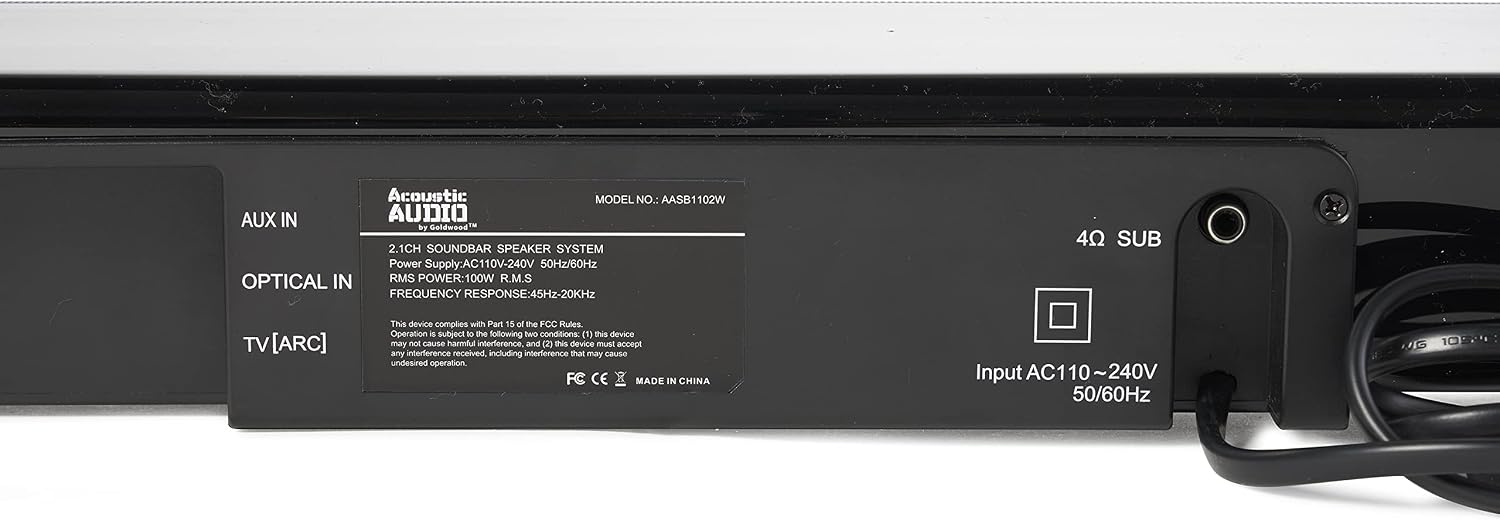
Image: Detailed view of the sound bar's rear panel, showing AUX IN, OPTICAL IN, and TV (ARC) ports, along with the subwoofer output and power input.
3. Power Connection
Connect the power cord to the sound bar's power input and then plug it into a standard electrical outlet.
4. Wall Mounting (Optional)
Use the included mounting hardware to securely attach the sound bar to a wall. Ensure the wall can support the weight of the sound bar and follow all safety guidelines for installation.
Operating Instructions
1. Power On/Off
Press the power button on the sound bar or the remote control to turn the unit on or off.
2. Input Selection
Press the 'Input' or 'Source' button on the remote control or sound bar to cycle through available input modes: HDMI (ARC), Optical, AUX, and Bluetooth. The selected input will be displayed on the sound bar's front panel.

Image: The sound bar's front display showing the active input mode, in this case, 'Bluetooth'.
3. Bluetooth Pairing
- Switch the sound bar to Bluetooth mode. The display will show 'BT' and may flash, indicating it's ready for pairing.
- On your mobile device (phone, tablet, PC), enable Bluetooth and search for available devices.
- Select 'AASB1102W' from the list. Once paired, the sound bar will indicate a successful connection.

Image: A graphic representation of the Bluetooth logo, indicating wireless connectivity.
4. Volume Control
Use the Volume Up (+) and Volume Down (-) buttons on the remote control or sound bar to adjust the master volume.
5. Bass and Treble Adjustment
Use the dedicated bass and treble controls on the remote to fine-tune the audio output to your preference.

Image: A graphic of a volume knob, symbolizing adjustable bass and treble settings.
6. Listening Modes
The sound bar features three preset listening modes: Movie, Music, and Dialogue. Press the corresponding button on the remote control to select the mode best suited for your content.

Image: A graphic of multiple speaker icons, representing the different listening modes available.
7. Remote Control

Image: The sound bar positioned next to its remote control, showing the compact design of both units.
The remote control provides full functionality for the sound bar, including power, input selection, volume, bass/treble adjustment, and listening modes. Ensure batteries are correctly inserted.
Maintenance
- Cleaning: Use a soft, dry cloth to clean the surfaces of the sound bar and subwoofer. Do not use liquid cleaners or abrasive materials.
- Storage: If storing the unit for an extended period, disconnect it from power and store it in a cool, dry place.
Troubleshooting
| Problem | Possible Cause | Solution |
|---|---|---|
| No power | Power cord not connected; Power outlet not active | Ensure power cord is securely connected; Try a different power outlet |
| No sound | Incorrect input selected; Volume too low; Cables not connected properly | Select correct input source; Increase volume; Check all cable connections |
| Bluetooth not connecting | Sound bar not in pairing mode; Device Bluetooth off; Device too far | Ensure sound bar is in BT mode; Enable Bluetooth on your device; Move device closer to sound bar |
| Remote control not working | Batteries depleted or incorrectly inserted; Obstruction between remote and sound bar | Replace batteries; Ensure clear line of sight to sound bar sensor |
Specifications
| Feature | Detail |
|---|---|
| Model Name | AASB1102W |
| Speaker Type | Soundbar, Subwoofer, Surround Sound |
| Special Feature | Bass Boost |
| Recommended Uses | For Smartphones or Tablets, For Surround Sound, Television |
| Compatible Devices | Personal Computer, Television |
| Surround Sound Channel Configuration | 2.1 |
| Product Dimensions (Soundbar) | 3.5"D x 35.5"W x 3"H |
| Item Weight | 16 Pounds (total system) |
| Control Method | Remote |
| Wireless Communication Technology | Bluetooth 5.0 |
| Speaker Size | 36.25 Inches (Soundbar length) |
| Power Source | Corded Electric |
| Woofer Diameter | 6 Inches |
| Water Resistance Level | Not Water Resistant |
| Bluetooth Range | 10 Meters |
| Subwoofer Connectivity Technology | Wired |
| Speaker Maximum Output Power | 200 Watts |
| Connectivity Technology | Auxiliary, Optical, USB (Note: USB for service/firmware, not audio playback) |
| Audio Output Mode | Surround |
| Mounting Type | Bar Mount |
Warranty Information
This product comes with a 30-day VMInnovations warranty. Please refer to your purchase documentation or contact VMInnovations for specific terms and conditions regarding warranty claims.
Customer Support
For further assistance, technical support, or warranty inquiries, please contact Acoustic Audio by Goldwood customer service or visit their official website. You can also refer to the brand store on Amazon for additional product information: Acoustic Audio by Goldwood Store.