
Cooler Master MLX-D24M-A25PZ-R1
Cooler Master MasterLiquid Atmos 240 CPU Liquid Cooler User Manual
Model: MLX-D24M-A25PZ-R1
1. Introduction
The Cooler Master MasterLiquid Atmos 240 is an advanced all-in-one (AIO) liquid cooling system designed to provide efficient thermal management for your CPU. This manual provides essential information for the proper installation, operation, and maintenance of your MasterLiquid Atmos 240 cooler, ensuring optimal performance and longevity.

Figure 1.1: MasterLiquid Atmos 240 CPU Liquid Cooler. This image shows the complete liquid cooler unit, featuring the radiator with two RGB fans and the illuminated pump block.
2. Key Features
- Dual Chamber Pump: An in-house designed pump refined for enhanced cooling synergy, featuring increased water pressure and optimized flow to the CPU hot spot. The pump block top cover is transparent, removable, and customizable with 3D-printed parts.
- SickleFlow Edge Fans: Pre-installed 120 mm SF Edge fans utilize Loop Dynamic Bearing (LDB) for quiet operation (27.2 dBA) and improved durability (>160,000 MTTF). These fans are installed with low-profile screws for better small case compatibility.
- Optimal Cooling Performance: The aluminum radiator (277 x 119.6 x 27.2 mm) and PWM fans deliver effective cooling with high airflow (70.7 CFM, 2500 RPM) and air pressure (3.61 mmH2O). Tube clips are included for cable management.
- ARGB Gen 2 RGB Lighting: The pump and fan ARGB LEDs allow for custom lighting effects. These can be synchronized with RGB-certified motherboards or controlled manually via the included controller, MasterCTRL, or MasterPlus software. MasterCTRL offers an intuitive user interface for device and design control.
- Broad Compatibility: Designed for easy and seamless installation with simplified CPU bracket designs and separate packaging. Supports Intel LGA sockets (1700/1200/1151/1150/1155/1156) and AMD sockets (AM5/AM4).
3. Package Contents
Before beginning installation, please verify that all components are present and undamaged. The package should contain the following items:
- MasterLiquid Atmos 240 Radiator with pre-installed SickleFlow Edge Fans
- CPU Pump/Cold Plate Unit with pre-attached tubing
- Intel Mounting Brackets and Hardware (LGA 1700/1200/115x)
- AMD Mounting Brackets and Hardware (AM5/AM4)
- ARGB Gen 2 Controller and Cables
- Fan PWM Cables
- Thermal Paste
- User Manual (this document)
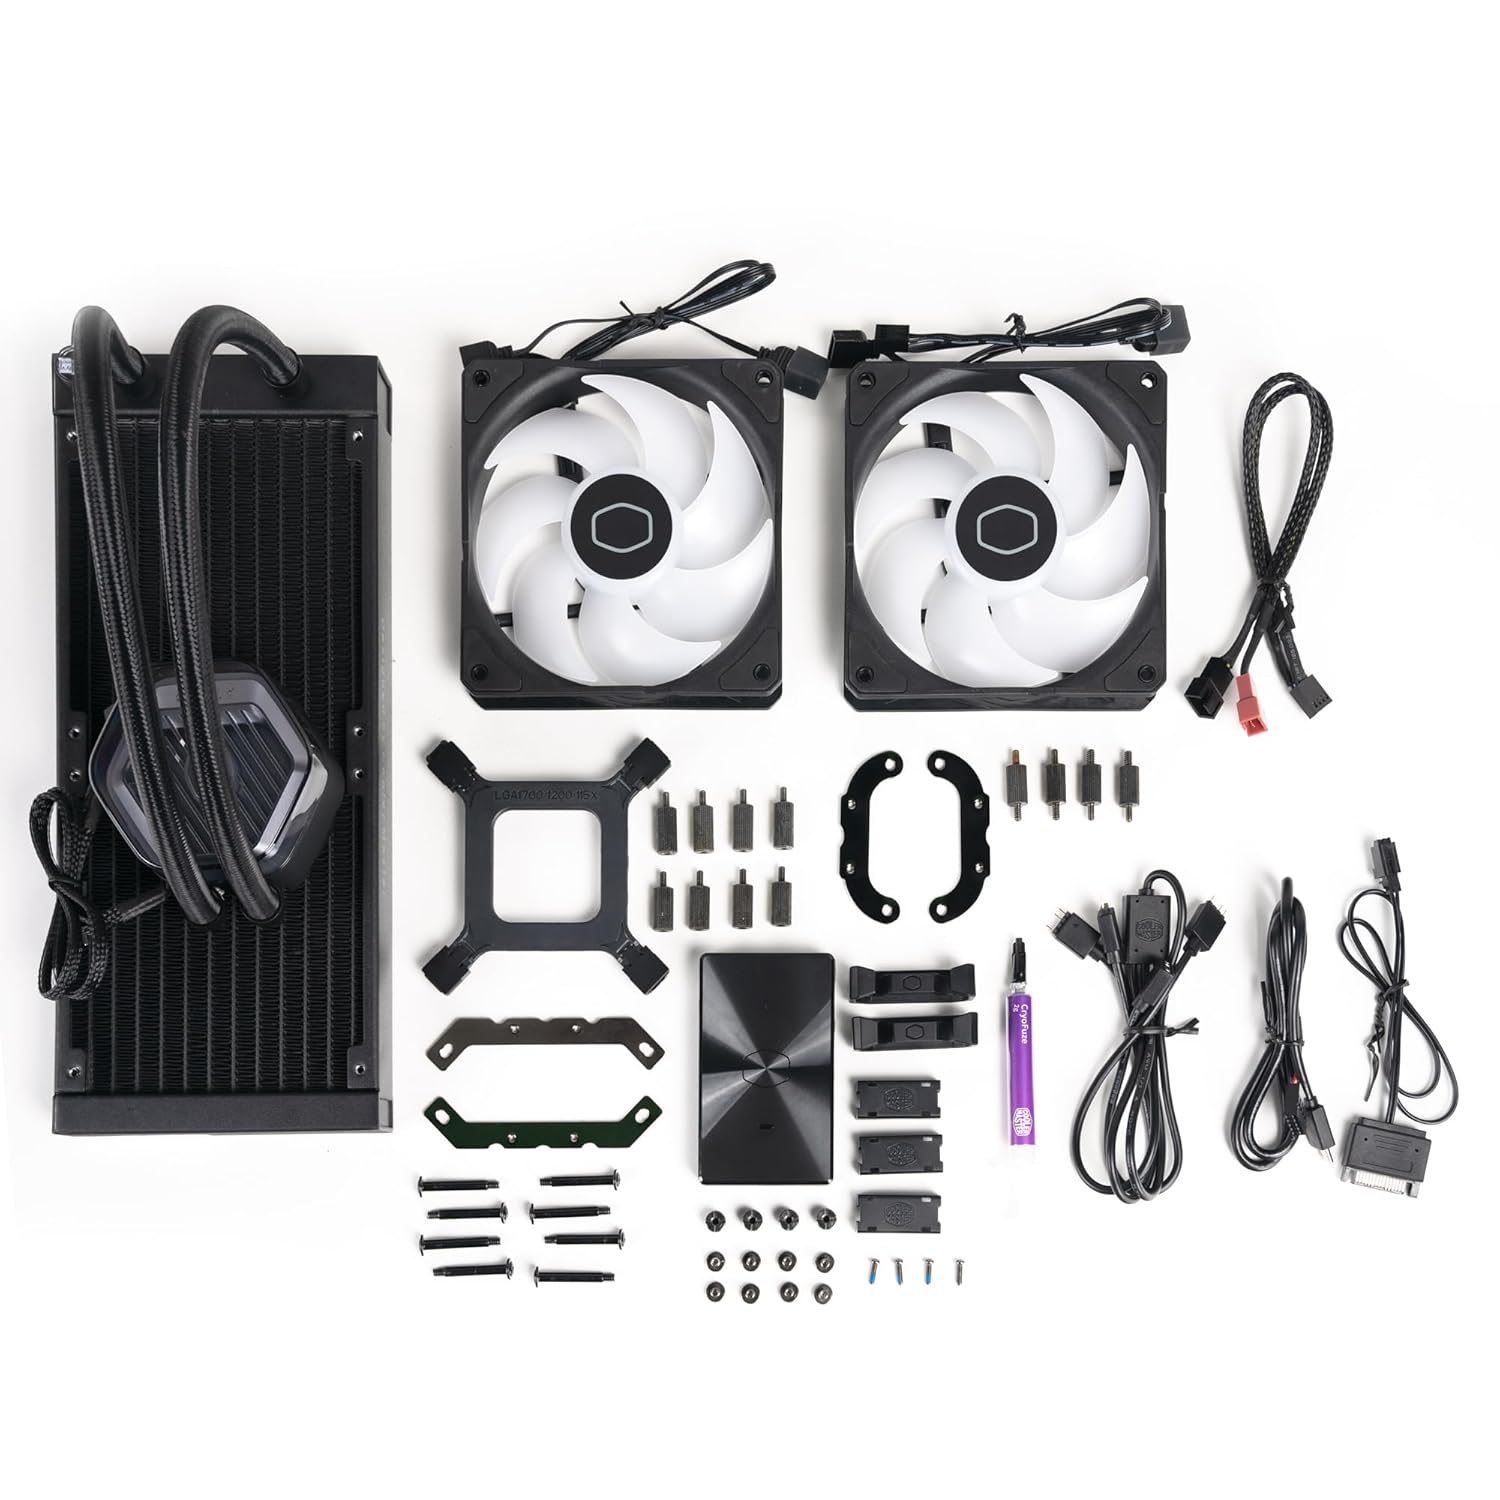
Figure 3.1: Included Components. This image displays all the components typically found in the MasterLiquid Atmos 240 retail package, laid out for inspection.
4. Setup and Installation
Proper installation is crucial for the performance and safety of your system. Please follow these general steps. Refer to the detailed installation guide provided with your product for specific instructions for your CPU socket type.
4.1 Pre-Installation Checklist
- Ensure your motherboard and CPU are compatible with the MasterLiquid Atmos 240 (Intel LGA 1700/1200/115x, AMD AM5/AM4).
- Gather necessary tools: Phillips head screwdriver, clean cloth, isopropyl alcohol (for CPU cleaning).
- Familiarize yourself with your PC case's radiator mounting options (top, front, or rear).
4.2 Installation Steps (General)
- Prepare the Radiator: If not pre-installed, attach the SickleFlow Edge fans to the radiator using the provided screws. Ensure the fan airflow direction is appropriate for your case's cooling setup (intake or exhaust).
- Mount the Radiator: Secure the radiator assembly to the desired mounting location in your PC case. Ensure adequate clearance for tubing and other components.
- Prepare the CPU: Clean any old thermal paste from your CPU and CPU cooler mounting area on the motherboard.
- Install Mounting Hardware: Attach the correct backplate (for Intel) and standoffs to your motherboard according to your CPU socket type.
- Apply Thermal Paste: Apply a small amount of thermal paste (included) to the center of your CPU's integrated heat spreader (IHS).
- Mount the Pump/Cold Plate: Carefully align the pump/cold plate unit with the CPU and mounting holes. Secure it evenly with the provided thumb screws or nuts until snug. Do not overtighten.
- Connect Cables:
- Connect the pump's 3-pin power cable to a dedicated AIO_PUMP or CPU_FAN header on your motherboard.
- Connect the fan PWM cables to the CPU_FAN or SYS_FAN headers on your motherboard, or to the included ARGB controller.
- Connect the ARGB cables from the pump and fans to the included ARGB controller, and then connect the controller to a 5V ARGB header on your motherboard (if syncing with motherboard RGB) or to a SATA power connector for standalone control.
- Cable Management: Use the included tube clips and zip ties to manage cables neatly for improved airflow and aesthetics.

Figure 4.1: Pump Installation. This image shows the MasterLiquid Atmos 240 pump unit securely mounted on a CPU, with its vibrant ARGB lighting active, demonstrating a successful installation.
5. Operating Instructions
Once installed, the MasterLiquid Atmos 240 operates automatically to cool your CPU. Here are some operational aspects:
5.1 Initial Power-On
Upon first power-on, the pump and fans will begin operating. It is normal to hear some gurgling sounds initially as air bubbles are purged from the loop. This should subside within a few minutes of operation.
5.2 Fan and Pump Control
- PWM Control: The SickleFlow Edge fans and the pump are PWM (Pulse Width Modulation) controlled. Their speeds will automatically adjust based on CPU temperature, as configured in your motherboard's BIOS/UEFI settings or through software.
- BIOS/UEFI Settings: For optimal performance and noise levels, ensure your motherboard's fan headers are set to PWM mode and configured with an appropriate fan curve.
5.3 ARGB Lighting Control
- Motherboard Sync: If connected to a 5V ARGB header on your motherboard, you can control the lighting effects using your motherboard manufacturer's RGB software (e.g., ASUS Aura Sync, MSI Mystic Light, GIGABYTE RGB Fusion, ASRock Polychrome Sync).
- Cooler Master Software: For advanced customization and control, download and install Cooler Master's MasterPlus or MasterCTRL software from the official Cooler Master website. This software allows for detailed lighting effects, fan speed adjustments, and system monitoring.
- Included Controller: If not connected to a motherboard ARGB header, the included ARGB controller provides basic lighting mode and color cycling functionality.

Figure 5.1: Operational View. This image shows the MasterLiquid Atmos 240 in operation within a PC case, highlighting the vibrant ARGB illumination of both the fans and the pump.
6. Maintenance
The MasterLiquid Atmos 240 is designed for low maintenance. However, periodic checks can help ensure optimal performance.
- Dust Cleaning: Regularly inspect the radiator fins and fan blades for dust accumulation. Use compressed air or a soft brush to gently remove dust. Excessive dust can impede airflow and reduce cooling efficiency.
- Tubing and Connections: Periodically check the tubing and connections for any signs of leaks or damage. While AIOs are sealed systems, it's good practice to ensure all connections remain secure.
- Fan Noise: Listen for any unusual fan noises. If a fan becomes excessively noisy, it may indicate a bearing issue or dust buildup.
- Pump Noise: The pump is designed to be quiet. If you notice persistent loud gurgling, grinding, or rattling noises from the pump after the initial air purge, it may indicate an issue. Ensure the pump is always running at an adequate speed (typically above 60% for optimal performance and longevity).
7. Troubleshooting
If you encounter issues with your MasterLiquid Atmos 240, refer to the following common troubleshooting steps:
| Problem | Possible Cause | Solution |
|---|---|---|
| High CPU Temperatures |
|
|
| Unusual Pump Noise (Gurgling, Grinding) |
|
|
| ARGB Lighting Not Working |
|
|
8. Specifications
| Feature | Specification |
|---|---|
| Model Number | MLX-D24M-A25PZ-R1 |
| Product Dimensions (L x W x H) | 10.91" x 4.71" x 1.07" (277 x 119.6 x 27.2 mm) |
| Material | Aluminum (Radiator) |
| Cooling Method | Liquid (Water) |
| Fan Type | SickleFlow 120 Edge ARGB |
| Fan Speed | Up to 2500 RPM |
| Fan Airflow | 70.7 CFM |
| Fan Air Pressure | 3.61 mmH2O |
| Noise Level | 27.2 dBA (Fan) |
| Voltage | 12 Volts |
| Wattage | 24 watts |
| CPU Socket Compatibility | Intel LGA 1700 / 1200 / 1151 / 1150 / 1155 / 1156 AMD AM5 / AM4 |

Figure 8.1: Product Dimensions. This diagram provides detailed measurements of the MasterLiquid Atmos 240 radiator and pump unit, useful for case compatibility planning.
9. Warranty and Support
Cooler Master products come with a limited warranty. For detailed warranty information, please refer to the warranty card included with your product or visit the official Cooler Master website.
For technical support, troubleshooting assistance, or to inquire about replacement parts, please visit the Cooler Master support portal or contact their customer service directly. You can find contact information and support resources on the official Cooler Master website: www.coolermaster.com/support/
Please have your product model number (MLX-D24M-A25PZ-R1) and proof of purchase ready when contacting support.
Related documentsMLX-D24M-A25PZ-R1


Ask a question about this manual
Ask about setup, troubleshooting, compatibility, parts, safety, or missing instructions. Manuals+ will review the question and use this page’s manual context to help answer it.