1. Introduction and Safety Information
Thank you for purchasing the SMART TECH 32HN10T2 32" HD LED Television. This manual provides important instructions for the safe and efficient operation of your new television. Please read it thoroughly before use and retain it for future reference.
Important Safety Instructions:
- Read these instructions.
- Keep these instructions.
- Heed all warnings.
- Follow all instructions.
- Do not use this apparatus near water.
- Clean only with a dry cloth.
- Do not block any ventilation openings. Install in accordance with the manufacturer's instructions.
- Do not install near any heat sources such as radiators, heat registers, stoves, or other apparatus (including amplifiers) that produce heat.
- Protect the power cord from being walked on or pinched, particularly at plugs, convenience receptacles, and the point where they exit from the apparatus.
- Only use attachments/accessories specified by the manufacturer.
- Unplug this apparatus during lightning storms or when unused for long periods of time.
- Refer all servicing to qualified service personnel. Servicing is required when the apparatus has been damaged in any way, such as power-supply cord or plug is damaged, liquid has been spilled or objects have fallen into the apparatus, the apparatus has been exposed to rain or moisture, does not operate normally, or has been dropped.

Figure 1.1: Front view of the SMART TECH 32HN10T2 32-inch HD LED Television. This image displays the television's screen, the "SMART TECH" logo at the bottom center, and various feature icons on the top left, including "32"", "HD ready", "DVB T2/S2/C", "CI+", "Dolby Audio", and "HDMI".
2. Package Contents
Please check that all items are present and in good condition upon unpacking your television.
- SMART TECH 32HN10T2 32" HD LED Television
- Remote Control (RC)
- TV Stand (Feet)
- AAA Batteries (2x) for Remote Control
3. Setup
3.1 Installing the TV Stand
To install the TV stand, carefully place the television face down on a soft, flat surface to prevent screen damage. Align the stand feet with the corresponding slots on the bottom of the TV and secure them with the provided screws.

Figure 3.1: The SMART TECH 32HN10T2 television positioned on its stand on a media console, demonstrating a typical setup.
3.2 Wall Mounting (Optional)
The television supports VESA wall mounts. The VESA mounting pattern for this model is 100mm x 100mm. Ensure you use a compatible wall mount bracket and follow the instructions provided with the wall mount. Professional installation is recommended for wall mounting.

Figure 3.2: Rear view of the television, highlighting the VESA mounting points (100mm x 100mm) and various input/output ports. These ports include USB 2, USB 1, DVB-T/T2, DVB-S/S2, HDMI 1, HDMI 2, HDMI 3, AV IN, and COAXIAL.

Figure 3.3: The television wall-mounted above a media console, illustrating an alternative installation method.
3.3 Connecting External Devices
The SMART TECH 32HN10T2 TV offers multiple connectivity options:
- HDMI: Connect Blu-ray players, game consoles, or other HDMI-enabled devices to HDMI 1, HDMI 2, or HDMI 3 ports.
- USB: Insert USB drives into USB 1 or USB 2 ports for media playback.
- DVB-T/T2 (Antenna): Connect a terrestrial antenna for digital broadcast reception.
- DVB-S/S2 (Satellite): Connect a satellite dish for satellite broadcast reception.
- AV IN: Use for older devices with composite video and stereo audio outputs.
- COAXIAL: For digital audio output to a sound system.
3.4 Power Connection
After connecting all necessary cables, plug the power cord into the TV's power input and then into a suitable wall outlet.
4. Operating Instructions
4.1 Remote Control Overview
The remote control allows you to access all functions of your television. Insert the two AAA batteries into the remote control, ensuring correct polarity.

Figure 4.1: This image displays the overall dimensions of the television (732mm width, 483mm height, 180mm depth) and an illustration of the remote control with its various buttons.
4.2 Initial Setup and Channel Scan
Upon first power-on, the TV will guide you through the initial setup process, including language selection, country, and channel scanning for DVB-T2/S2 signals. Follow the on-screen prompts.
4.3 Basic Functions
- Power On/Off: Press the POWER button on the remote control.
- Channel Selection: Use the CH+/- buttons or numeric buttons to change channels.
- Volume Control: Use the VOL+/- buttons to adjust the volume.
- Input Source: Press the SOURCE button to select between HDMI, USB, DVB-T/T2, DVB-S/S2, or AV inputs.
- Menu Navigation: Use the MENU button to access settings, and the arrow keys (UP/DOWN/LEFT/RIGHT) and OK button to navigate.
5. Maintenance
5.1 Cleaning the TV
- Always unplug the TV from the power outlet before cleaning.
- Use a soft, dry cloth to wipe the screen and cabinet.
- For stubborn marks, lightly dampen the cloth with water or a mild, non-abrasive screen cleaner. Never spray cleaner directly onto the screen.
- Avoid using abrasive cleaners, waxes, or solvents as they can damage the TV's finish.
5.2 Remote Control Battery Replacement
If the remote control's response becomes sluggish, replace the two AAA batteries with new ones. Ensure correct polarity when inserting the new batteries.
6. Troubleshooting
Before contacting customer support, please refer to the following common issues and solutions:
| Problem | Possible Cause / Solution |
|---|---|
| No power |
|
| No picture, but sound is present |
|
| No sound, but picture is present |
|
| Remote control not working |
|
| "No Signal" message |
|
7. Specifications
| Feature | Detail |
|---|---|
| Brand | Smart Tech |
| Model Number | 32HN10T2 |
| Screen Size | 32 Inches (80 cm diagonal) |
| Display Technology | LED |
| Resolution | 720p (1366 x 768 pixels) |
| Refresh Rate | 60 Hz |
| Connectivity Technology | HDMI, USB |
| Number of USB Ports | 2 |
| HDMI Ports | 3 |
| Tuner Type | DVB-T2/S2 (Triple Tuner) |
| Audio Features | Dolby Audio |
| Special Features | Flat Screen |
| Color | Black |
| Power Consumption (SDR) | 26.0 W |
| Energy Efficiency Class (SDR) | E |
| Standby Power Consumption | 0.5 W |
| Networked Standby Power Consumption | 2.0 W |
| VESA Mounting Pattern | 100mm x 100mm |
| Included Components | TV, Remote Control, Stand Feet |
| Battery Type (Remote) | 2 AAA (included) |
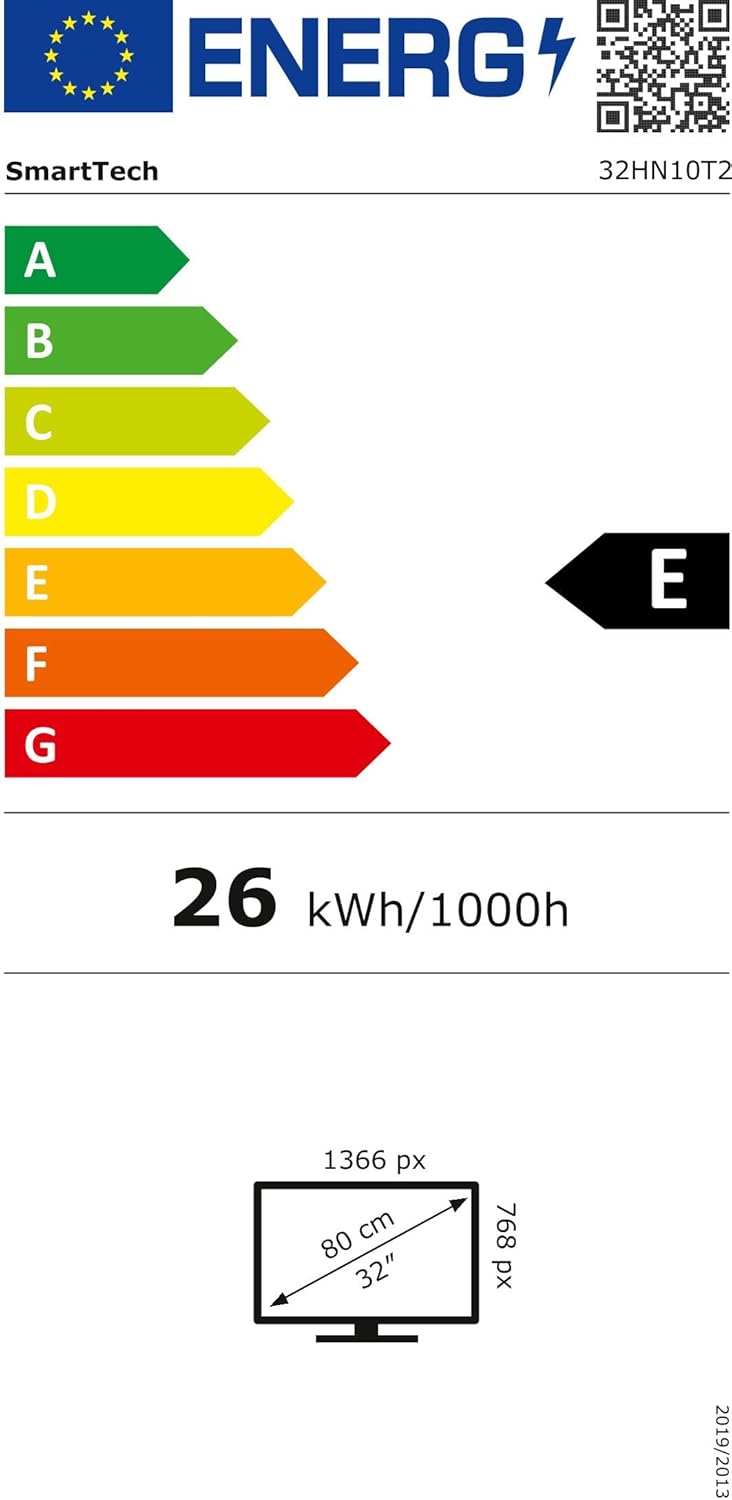
Figure 7.1: Energy efficiency label for the SMART TECH 32HN10T2, indicating an 'E' class rating and 26 kWh per 1000 hours of operation.
For detailed product information and energy efficiency data, please refer to the EPREL database: https://eprel.ec.europa.eu/qr/964700
8. Warranty and Support
SMART TECH products are designed and manufactured to the highest quality standards. For warranty information, please refer to the warranty card included with your product or contact your retailer.
Customer Support:
- Manufacturer: Express LUCK Europe Electric Kft.
- Website: www.smarttech-tv.com
- Email: csilla.simita-tompa@expressluck.hu
- Phone: +3624889353
- Address: Sales, Leshegy út 2., 2310 Szigetszentmiklós, Pest, HU
Please note that spare parts availability and software updates are not explicitly guaranteed beyond initial purchase, as per available product information.


