
Introduction
The Tormek T-1 Kitchen Knife Sharpener is designed to provide precise and efficient sharpening for kitchen knives in a home environment. This manual provides essential information for the safe and effective use, maintenance, and care of your Tormek T-1 sharpener. Please read all instructions carefully before operating the device.

Image: Front view of the Tormek T-1 Kitchen Knife Sharpener in Zinc Gray. This image displays the overall design of the sharpener, including the grinding wheel and the knife guide mechanism.
Safety Instructions
To prevent injury or damage to the sharpener, always follow these safety precautions:
- Read the Manual: Familiarize yourself with all instructions before use.
- Electrical Safety: Ensure the sharpener is connected to a grounded outlet. Do not operate with wet hands or in wet conditions. Unplug when not in use or before cleaning.
- Sharp Edges: Knives will become extremely sharp. Handle them with extreme care to avoid cuts. Keep fingers away from the grinding and honing wheels during operation.
- Supervision: This appliance is not intended for use by persons with reduced physical, sensory or mental capabilities, or lack of experience and knowledge, unless they have been given supervision or instruction concerning use of the appliance by a person responsible for their safety. Children should be supervised to ensure that they do not play with the appliance.
- Intended Use: Use the sharpener only for its intended purpose of sharpening kitchen knives. Do not attempt to sharpen other tools or materials.
- Ventilation: Ensure adequate ventilation during use.
- Maintenance: Do not attempt to service the sharpener beyond the maintenance instructions provided in this manual. Contact qualified service personnel for repairs.
Product Components
The Tormek T-1 Kitchen Knife Sharpener consists of several key components designed for optimal performance:
- Diamond Grinding Wheel: A fine-grained diamond wheel for efficient material removal and shaping the edge.
- Composite Honing Wheel: Used for deburring and polishing the knife edge to a razor sharpness. This wheel includes an integrated polishing agent.
- Patented Angle Guide: Allows for precise and repeatable setting of the sharpening angle (10° to 20°).
- Knife Holder: Secures the knife during sharpening.
- Power Switch: On/Off control for the sharpener.
- Housing: Powder-coated zinc housing with a sturdy oak handle for durability and portability.

Image: A close-up view of the fine-grained diamond grinding wheel, which is central to the Tormek T-1's sharpening capability.
Setup
Before first use, ensure the sharpener is placed on a stable, flat surface.
- Unpack: Carefully remove the Tormek T-1 from its packaging.
- Placement: Position the sharpener on a clean, dry, and stable countertop or workbench. Ensure there is sufficient space around the unit for safe operation.
- Power Connection: Plug the power cord into a standard grounded electrical outlet.
- Familiarization: Before sharpening, familiarize yourself with the angle guide and knife holder mechanisms.
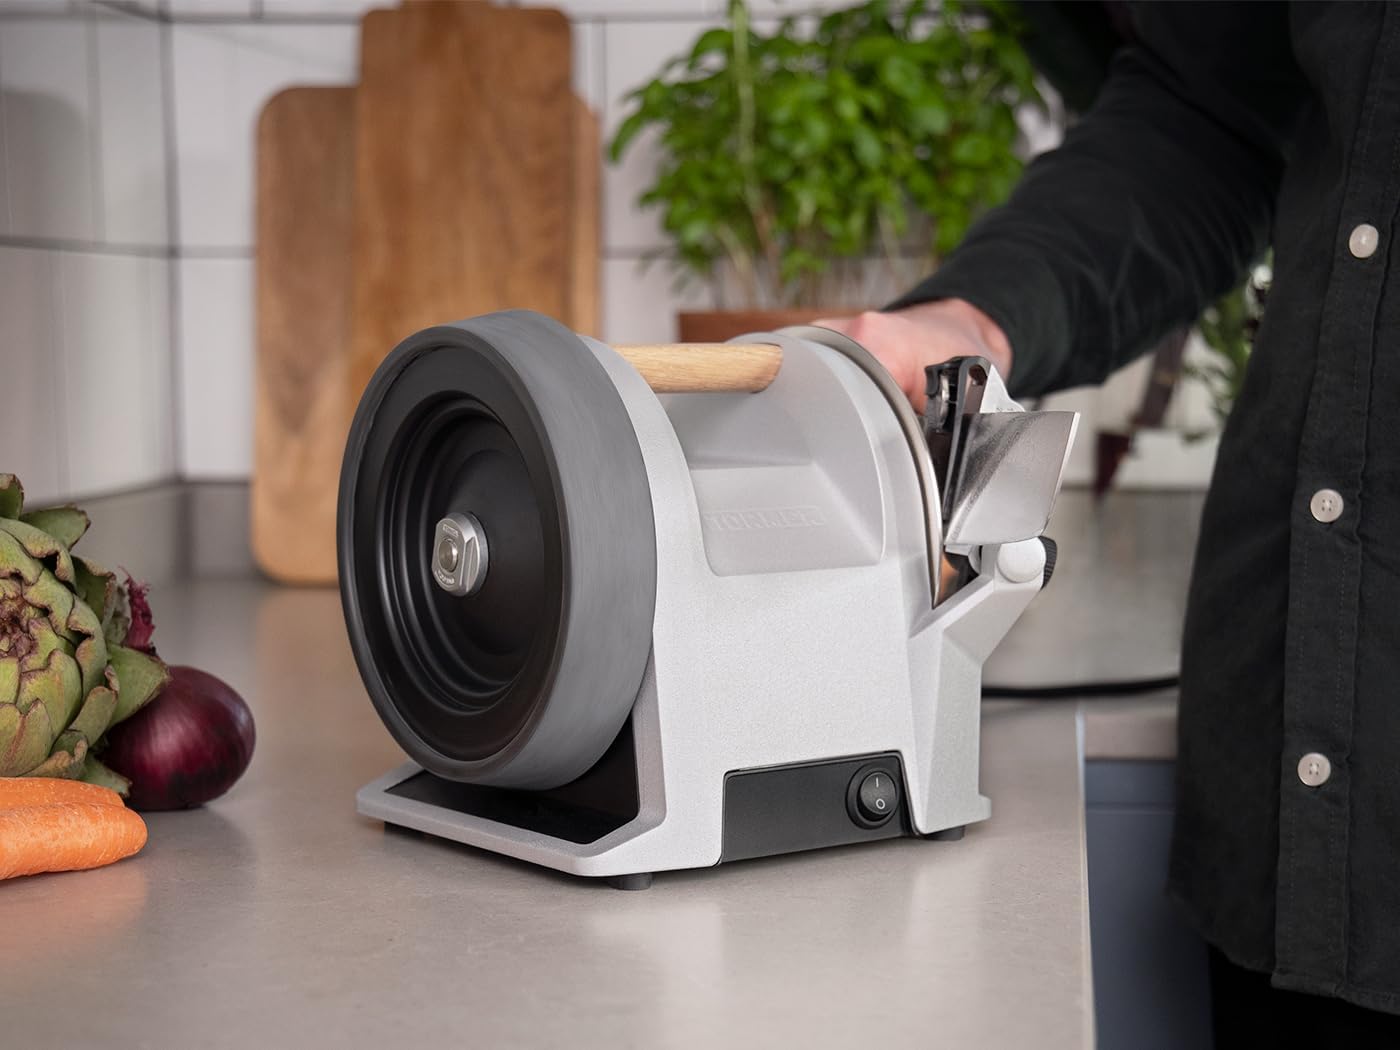
Image: The Tormek T-1 sharpener positioned on a kitchen counter, ready for use. This illustrates the typical setup environment.
Operating Instructions
Follow these steps to sharpen your kitchen knives effectively:
1. Setting the Sharpening Angle
- Identify the desired sharpening angle for your knife. Common angles for kitchen knives range from 10° to 20° per side.
- Adjust the patented angle guide on the Tormek T-1 to the desired angle. The guide features clear markings for 10°, 15°, and 20°.
- Ensure the angle guide is securely locked in place before proceeding.

Image: A hand adjusting the angle guide on the Tormek T-1, demonstrating how to select the desired sharpening angle.
2. Sharpening the Knife
- Turn on the Tormek T-1 using the power switch. The diamond grinding wheel will begin to rotate.
- Carefully insert the knife blade into the knife holder, ensuring it rests against the angle guide.
- Apply light, consistent pressure and draw the knife smoothly across the diamond grinding wheel, from heel to tip. Maintain the set angle throughout the stroke.
- Repeat this process on both sides of the blade until a burr forms along the entire edge. The burr indicates that the two bevels have met.
- Minimize material removal by using only the necessary pressure and strokes.

Image: A person demonstrating the sharpening process, holding a kitchen knife against the grinding wheel of the Tormek T-1.
3. Honing and Polishing
After sharpening, the knife requires honing to remove the burr and polish the edge.
- Move the knife to the composite honing wheel.
- Using very light pressure, draw the knife across the honing wheel, alternating sides. The integrated polishing agent in the honing wheel will refine the edge.
- Continue honing until the burr is completely removed and the edge feels smooth and sharp.
- Test the sharpness carefully.

Image: A close-up view of a hand performing the honing process on the Tormek T-1, refining the knife's edge.
Maintenance
Regular maintenance ensures the longevity and optimal performance of your Tormek T-1.
- Cleaning: After each use, wipe down the exterior of the sharpener with a damp cloth. Ensure no metal particles accumulate around the wheels or in the housing.
- Wheel Care: The diamond grinding wheel requires minimal maintenance. The composite honing wheel may occasionally need to be cleaned to remove accumulated residue. Refer to the manufacturer's guidelines for specific cleaning agents if necessary.
- Storage: Store the sharpener in a dry, clean environment away from excessive dust or moisture.
- Inspection: Periodically inspect the power cord for any signs of damage. If damaged, discontinue use and contact customer support.
Troubleshooting
If you encounter issues with your Tormek T-1, refer to the following common problems and solutions:
| Problem | Possible Cause | Solution |
|---|---|---|
| Sharpener does not turn on. | No power, loose connection, faulty switch. | Check power outlet. Ensure cord is securely plugged in. Verify power switch is in 'On' position. If problem persists, contact support. |
| Knife not getting sharp. | Incorrect angle, insufficient pressure, worn wheel. | Re-check angle guide setting. Apply consistent, light pressure. Ensure enough passes are made on both wheels. If wheels are worn, consider replacement. |
| Excessive material removal. | Too much pressure, too many passes. | Use lighter pressure. Reduce the number of passes on the grinding wheel once a burr is formed. |
| Unusual noise during operation. | Foreign object, loose component, motor issue. | Turn off and unplug the sharpener. Inspect for any obstructions. If no obvious cause, contact support. |
Specifications
Detailed specifications for the Tormek T-1 Kitchen Knife Sharpener:
- Model: T-1
- Brand: Tormek
- Material: Zinc Alloy (Housing)
- Color: Zinc Gray
- Product Dimensions (L x W x H): 12.75" x 9.25" x 10.13"
- Item Weight: 13.7 Pounds
- Grit Type (Grinding Wheel): Fine-grained Diamond
- Included Components: Knife Sharpener unit
- Noise Level: Approximately 45 dB

Image: An illustration showing the key dimensions (length, width, height) of the Tormek T-1 Kitchen Knife Sharpener.
Warranty and Support
For information regarding warranty coverage, product registration, or technical support, please refer to the official Tormek website or contact their customer service directly. Keep your purchase receipt as proof of purchase.
Official Website: www.tormek.com


