
1. Introduction
This manual provides detailed instructions for the setup, operation, and maintenance of your XXK LM091 4-Zone 2.4G RF Remote Control. This remote is designed for effective control and regulation of various LED strip types, including RGBWW, RGBW, RGB, and CCT LED strips, when paired with compatible controllers.

Figure 1: XXK LM091 Remote Control and packaging.
2. Safety Information
- Do not expose the remote control to moisture or extreme temperatures.
- Keep out of reach of children.
- Use only the specified battery type (AAA*2PCS, not included).
- Ensure correct battery polarity during installation.
- Do not attempt to disassemble or modify the device.
3. Package Contents
- LM091 RF Remote Control (1 unit)
- Instruction Manual (1 unit)
- Remote Holder (1 unit)
- Adhesive Strips for Holder (2 units)

Figure 2: Contents included with the LM091 remote control. Batteries are not included.
4. Product Overview
The LM091 remote control features a sensitive color adjustment touch wheel and button design for intuitive control of your LED lighting. It operates using 2.4G RF radio frequency technology, offering a control distance of up to 99 feet and 360° control, allowing it to function through walls.
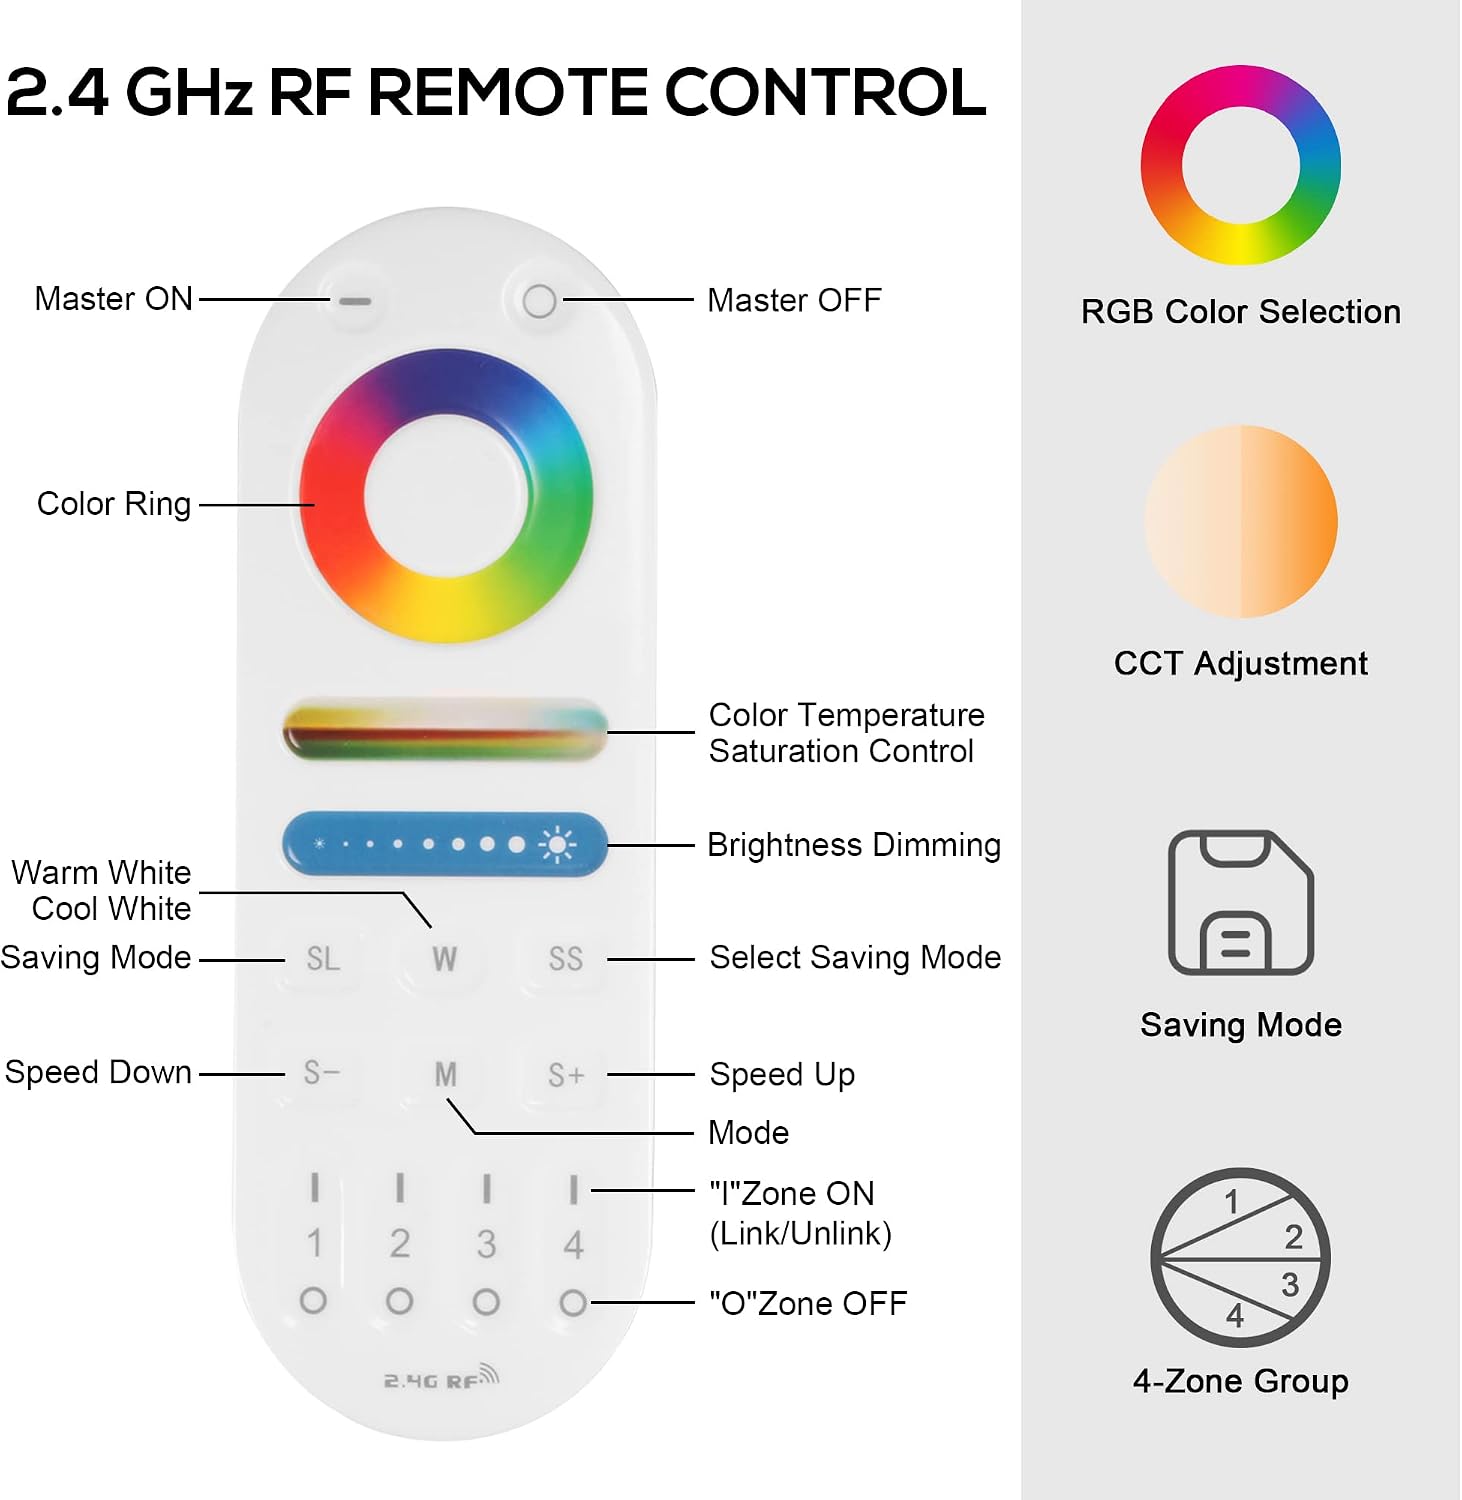
Figure 3: Layout of the LM091 remote control, highlighting its buttons and touch-sensitive areas for RGB color selection, CCT adjustment, brightness dimming, saving modes, speed control, and 4-zone group control.
Key Features:
- 2.4G Wireless RF Control: Effective control of RGBWW, RGBW, RGB, CCT LED strips.
- Wide Application: Compatible with various light strip controllers (e.g., WB5 WIFI controller, LM053 Bluetooth Mesh controller, LM052 Zigbee controller).
- 4-Zone Group Control: Divide lights into four groups for individual or simultaneous management.
- Integrated Touch Screen Design: Sensitive color adjustment touch wheel and button design for 16 million colors and 0-100% brightness adjustment.
- Easy Saving & Scenes Memory Function: Save and quickly restore preferred lighting modes and colors.
5. Setup
5.1. Battery Installation
The LM091 remote control requires two AAA batteries (not included). Open the battery compartment on the back of the remote, insert the batteries according to the polarity markings, and close the compartment.
5.2. Wiring the LED Controller
The LM091 remote control operates wirelessly with a compatible LED controller (e.g., WB5, LM053, LM052). Ensure your LED strip is correctly wired to the controller according to the controller's specific instructions. The controller typically has terminals for power input (DC 12V-24V) and output channels for the LED strip (V+, R, G, B, W, CW, WW, etc., depending on the LED strip type).

Figure 4: The LM091 remote control is part of a smart control system, connecting wirelessly to various LED controllers for different light types.
5.3. Pairing the Remote Control with the LED Controller
To establish communication between the remote and the controller, follow these steps:
- Power Cycle: Switch off the LED light/controller. Wait for 10 seconds, then switch it back on.
- Initiate Pairing: Within 3 seconds of switching the light on, short press any of the zone 'I' (ON) buttons (1, 2, 3, or 4) on the remote control three times.
- Confirmation: The connected LED light will blink three times slowly, indicating successful pairing.
To unlink the remote from a controller:
- Power Cycle: Switch off the LED light/controller. Wait for 10 seconds, then switch it back on.
- Initiate Unlinking: Within 3 seconds of switching the light on, short press the corresponding zone 'I' (ON) button five times. (The zone must be the same one used for linking).
- Confirmation: The connected LED light will blink ten times quickly, indicating successful unlinking.

Figure 5: Step-by-step guide for linking and unlinking the remote control with an LED light.
5.4. Signal Auto-Transmitting & Mode-Sync Function
The 2.4G RF remote control supports signal auto-transmitting and mode synchronization. This means that the remote can control lights up to 99 feet away, even through walls, and the control distance can be extended limitlessly by using multiple controllers that re-transmit the signal.

Figure 6: The remote's 360° control and signal re-transmission capability for extended range.
6. Operating Instructions
6.1. Basic Functions
- Master ON/OFF: Use the 'Master ON' and 'Master OFF' buttons to turn all paired lights on or off.
- RGB Color Selection: Use the 'Color Ring' touch wheel to select from 16 million colors.
- CCT Adjustment: Adjust the color temperature using the 'Color Temperature Saturation Control' slider.
- Brightness Dimming: Use the 'Brightness Dimming' slider to adjust light intensity from 0% to 100%.
- Warm White/Cool White: Dedicated buttons for quick selection of warm white or cool white light.
- Speed Control (S-/S+): Adjust the speed of dynamic lighting modes.
- Mode (M): Cycle through various pre-programmed dynamic lighting modes.
6.2. 4-Zone Group Control
The remote allows you to control up to four independent zones of lighting. Use the '1', '2', '3', '4' buttons to select a specific zone. Press the 'I' (ON) button for a selected zone to turn it on, and the 'O' (OFF) button to turn it off. You can control individual zones or multiple zones simultaneously.

Figure 7: One remote control can manage up to four distinct lighting zones.
6.3. Saving and Recalling Scenes
The remote features 'Saving Mode' buttons (SL, W, SS) to store and recall your favorite lighting configurations. Refer to the remote's specific instructions for saving and recalling procedures.

Figure 8: The remote allows for easy saving and quick restoration of preferred lighting scenes.
6.4. App Control (via Compatible Controllers)
While the LM091 is an RF remote, it is compatible with controllers that support Wi-Fi and Bluetooth, such as the WB5 WIFI controller, LM053 Bluetooth Mesh controller, and LM052 Zigbee controller. These controllers can often be managed via smartphone applications like Tuya Smart or Smart Life, offering additional features such as scheduling, music rhythm modes, and advanced scene customization.
Video 1: Demonstrates how to connect the LM091 remote to various LED light types (RGB+CCT, RGBW, RGB, CCT, Single Color) via a compatible controller.
Video 2: Shows the RF remote control in action with RGB+CCT LED smart lights, demonstrating color and mode changes.
Video 3: A concise demonstration of the remote control pairing process with an LED controller.
7. Maintenance
- Battery Replacement: Replace batteries when the remote's response becomes sluggish or it stops functioning. Always use new AAA batteries.
- Cleaning: Wipe the remote with a soft, dry cloth. Do not use abrasive cleaners or solvents.
- Storage: Store the remote in a cool, dry place away from direct sunlight when not in use for extended periods.
8. Troubleshooting
| Issue | Possible Cause | Solution |
|---|---|---|
| Remote not responding | Low or dead batteries; Remote not paired; Out of range. | Replace batteries; Re-pair the remote (see Section 5.3); Move closer to the controller. |
| Lights flickering or behaving erratically | Interference; Loose wiring to controller; Faulty controller/LED strip. | Check for nearby 2.4Ghz devices; Inspect wiring connections; Test with a different controller/strip if possible. |
| Cannot change color/brightness | Incorrect mode selected; Remote not fully paired. | Ensure the correct mode (RGB, CCT) is active; Re-pair the remote. |
9. Specifications
| Feature | Detail |
|---|---|
| Model Number | LM091 |
| Part Number | PZUS0-131-4 |
| Control Method | 2.4G RF Wireless |
| Control Distance | Up to 99 ft (30m) |
| Number of Zones | 4 Channels |
| Power Source | 2 x AAA Batteries (not included) |
| Dimensions | 4.8 x 1.5 x 0.87 inches |
| Item Weight | 2.29 ounces |
| Compatible LED Types | RGBWW, RGBW, RGB, CCT |
| Compatible Controllers | WB5 WIFI controller, LM053 Bluetooth Mesh controller, LM052 Zigbee controller |

Figure 9: Physical dimensions and material details of the LM091 remote control.
10. Warranty and Support
For warranty information and technical support, please refer to the product packaging or contact XXK customer service directly. Keep your purchase receipt as proof of purchase.