
1. Setup
1.1 Unpacking and Initial Inspection
Carefully unpack all components from the box. Verify that all items listed below are present and undamaged. If any items are missing or damaged, contact customer support.
- 2 Echo GMRS Handheld Radios
- 2 Security-Style Earpieces
- 2 USB Chargers
- 2 USB Wall Plug Power Adapters
- 1 Programming Cable
- 2 Belt Clips (pre-attached or separate)

Image 1.1: Contents of the BridgeCom Echo GMRS Handheld Radio Bundle box, showing two radios, earpieces, chargers, and cables.
1.2 Battery Installation and Charging
The BridgeCom Echo GMRS Handheld Radio uses a Lithium Ion battery. Ensure the battery is properly installed before first use. For optimal performance, fully charge the battery before initial operation.
- Locate the battery compartment on the back of the radio.
- Insert the Lithium Ion battery, ensuring the contacts align correctly.
- Secure the battery cover.
- Connect the USB charger to the radio and then to the USB wall plug power adapter.
- Plug the adapter into a standard electrical outlet. The charging indicator on the radio or charger will illuminate.
- Allow the radio to charge until the indicator shows a full charge (typically 3-4 hours).

Image 1.2: BridgeCom Echo radio shown with its charging base, USB cable, and wall adapter, illustrating the charging setup.
1.3 Attaching Accessories
The bundle includes security-style earpieces and belt clips for convenient use.
- Earpiece: Locate the two audio jacks on the side of the radio. Insert the earpiece's two-pin connector firmly into these jacks.
- Belt Clip: If not pre-attached, align the belt clip with the designated slots on the back of the radio and secure it with the provided screws.
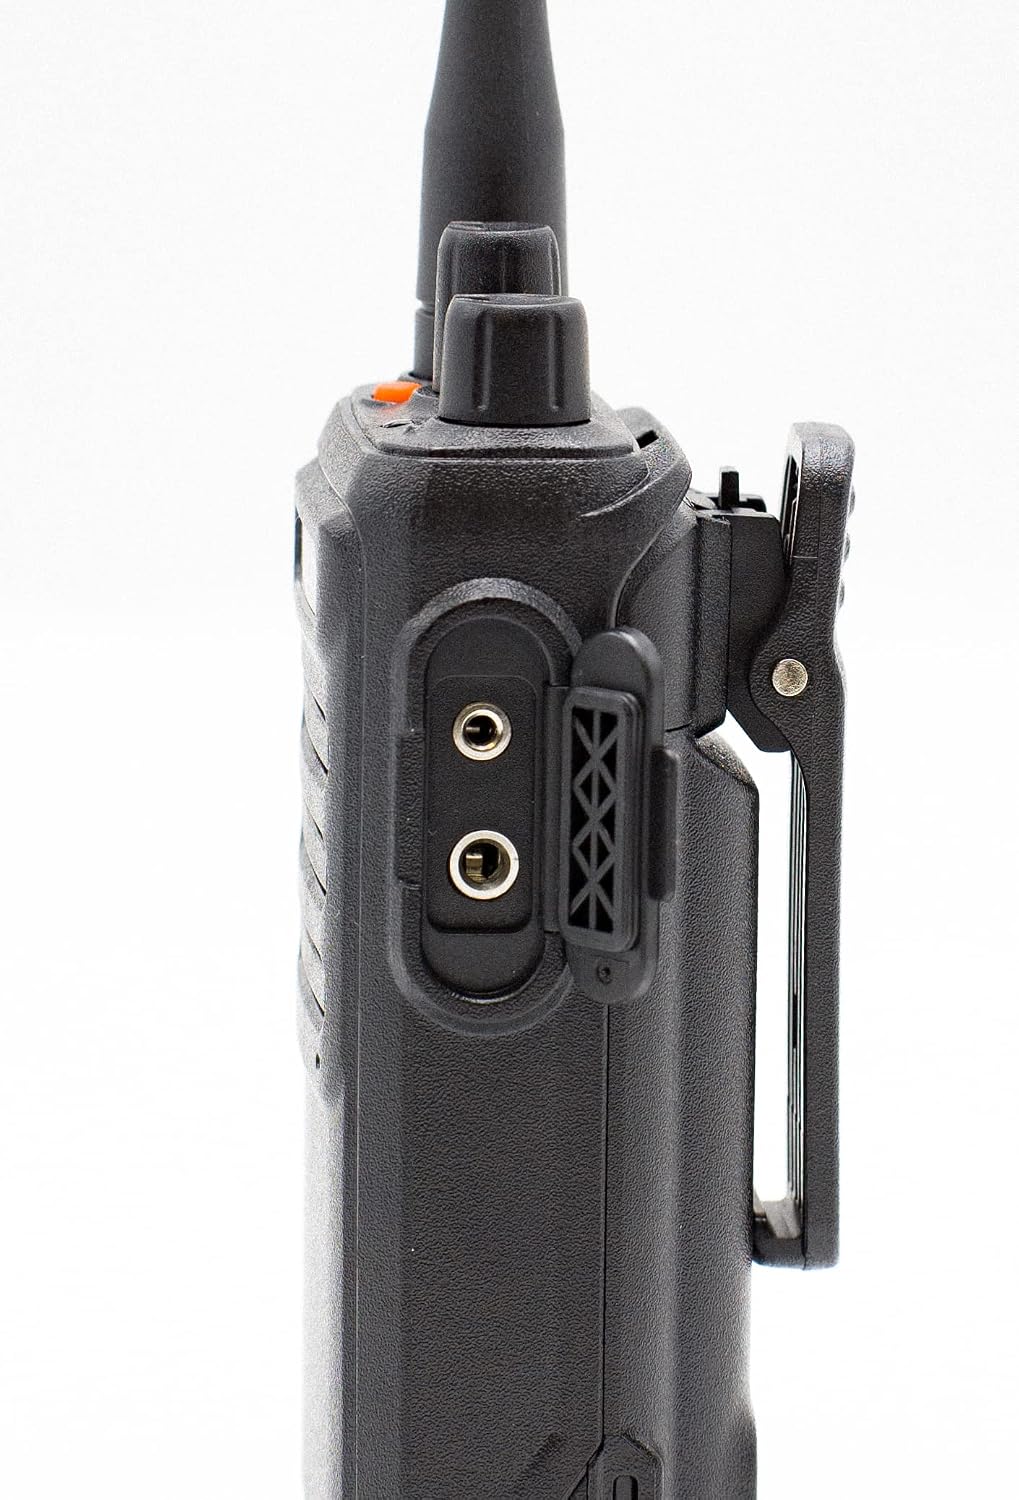
Image 1.3: Side view of the BridgeCom Echo radio, highlighting the two audio jack ports for earpiece connection.
1.4 PC Programming
The BridgeCom Echo radio is PC programmable. A programming cable is included in the bundle. Software and detailed instructions for PC programming can typically be found on the BridgeCom Systems website. This allows for advanced customization of channels, tones, and other settings.
2. Operating Your Radio
2.1 Basic Controls
Familiarize yourself with the main controls of your BridgeCom Echo radio:
- Power/Volume Knob (Top Left): Rotate clockwise to turn the radio on and increase volume. Rotate counter-clockwise to decrease volume and turn off.
- Channel Selector Knob (Top Right): Rotate to select one of the available channels.
- Push-to-Talk (PTT) Button (Side, Large Orange): Press and hold to transmit. Release to listen.
- Monitor Button (Side, Below PTT): Press to temporarily disable squelch and listen for weak signals.

Image 2.1: Close-up view of the BridgeCom Echo radio, detailing the power/volume knob, channel selector knob, and the orange Push-to-Talk (PTT) button.
2.2 Making a Call
- Turn on the radio by rotating the Power/Volume knob clockwise. Adjust the volume to a comfortable level.
- Select the desired channel using the Channel Selector knob. Ensure all parties you wish to communicate with are on the same channel.
- To transmit, press and hold the PTT button. Speak clearly into the microphone, which is typically located near the PTT button.
- Release the PTT button to stop transmitting and listen for a response.
2.3 Using Repeater Channels
The BridgeCom Echo supports 8 repeater channels, allowing access to a wider communication range through GMRS repeater towers. To utilize a repeater, select one of the designated repeater channels using the Channel Selector knob. Ensure the repeater is within range and properly configured (often done via PC programming).
2.4 Earpiece Usage
When the security-style earpiece is connected, audio will be routed through the earpiece instead of the radio's internal speaker. The earpiece typically includes an inline microphone and PTT button for discreet communication. Use the earpiece's PTT button to transmit when connected.
3. Maintenance
3.1 Cleaning
To maintain your radio's performance and appearance:
- Wipe the radio's exterior with a soft, damp cloth.
- Do not use harsh chemicals, solvents, or abrasive cleaners.
- Ensure all ports and connections are free of dust and debris.
3.2 Battery Care
Proper battery care extends the life of your Lithium Ion battery:
- Avoid fully discharging the battery frequently.
- Charge the battery in a cool, dry environment.
- If storing the radio for an extended period, charge the battery to approximately 50% before storage.
3.3 Storage
Store the radio in a cool, dry place away from direct sunlight and extreme temperatures. Remove the battery if storing for more than a month to prevent potential damage.
4. Troubleshooting
If you encounter issues with your BridgeCom Echo radio, refer to the following common problems and solutions:
| Problem | Possible Cause | Solution |
|---|---|---|
| Radio does not power on. | Battery is dead or not installed correctly. | Charge the battery. Ensure the battery is properly seated in the compartment. |
| Cannot transmit or receive. | Incorrect channel selected. Out of range. Squelch too high. | Verify all radios are on the same channel. Move closer to the other radio or repeater. Press the Monitor button to check for weak signals. |
| Poor audio quality. | Volume too low/high. Microphone/speaker obstructed. Interference. | Adjust volume. Clear any obstructions. Move away from sources of electrical interference. |
| Earpiece not working. | Earpiece not fully plugged in. Faulty earpiece. | Ensure the earpiece connector is firmly inserted into the audio jacks. Test with another earpiece if available. |
5. Specifications
Key technical specifications for the BridgeCom Echo GMRS Handheld Radio:
| Feature | Specification |
|---|---|
| Item Weight | 2.97 pounds |
| Package Dimensions | 10.39 x 8.27 x 5.87 inches |
| Item Model Number | 41112612503717 |
| Batteries | 1 Lithium Ion battery required (included) |
| Brand | BridgeCom Systems |
| Number of Channels | 8 |
| Frequency Range | 462-467 MHz |
| Talking Range Maximum | 5 Mile |
| Voltage | 3.7 Volts |
| Water Resistance Level | Water Resistant |
6. Warranty & Support
6.1 Warranty Information
BridgeCom Systems products are typically covered by a manufacturer's warranty against defects in materials and workmanship. Please refer to the warranty card included with your product or visit the official BridgeCom Systems website for specific warranty terms and conditions.
6.2 Customer Support
For technical assistance, troubleshooting beyond this manual, or warranty claims, please contact BridgeCom Systems customer support. Contact information can usually be found on the manufacturer's website or in the product packaging.
Online Resources: For additional support, firmware updates, and programming software, visit the official BridgeCom Systems website: www.bridgecomsystems.com
