
1. Introduction
The Digi EX50 is an advanced enterprise-grade cellular router designed to provide fast, secure, and resilient wireless connectivity. Featuring Wi-Fi 6 technology and 5G/4G dual connectivity, it serves as a versatile solution for primary or backup networking in various business environments, including headquarters, branch offices, and remote work setups. This manual provides essential information for the proper installation, configuration, and maintenance of your Digi EX50 router.
2. Product Overview
2.1 Key Features
- Wi-Fi 6 (IEEE 802.11 a/b/g/n/ac/ax): Provides higher speeds, increased capacity, and improved performance.
- 5G/4G Dual Connectivity: Ensures reliable primary or backup cellular internet access.
- Dual-SIM Slots: Offers carrier flexibility and wireless failover capabilities.
- Dual Band Operation: Supports 2.40 GHz ISM Band and 5 GHz UNII for flexible wireless connections.
- High Wireless Speed: Up to 320 MB/s wireless speed.
- Quad-core Processor: Equipped with a 1.80 GHz Cortex A53 Quad-core processor for efficient operation.
- Dual 2.5 Gigabit Ethernet Ports: Breaks the Gigabit barrier for future-ready networks.
- Digi Accelerated Linux (DAL OS): Robust operating system for secure and reliable performance.
- Digi TrustFence® Security Framework: Enhances device security.
- Digi Remote Manager® Support: Enables centralized configuration and management.
- Extended Operating Temperature Range: Suitable for indoor industrial environments.
- CBRS, C-band, and FirstNet® Support: Provides additional flexibility for specialized use cases.
- Serial Port: With Cisco straight-through pinout for secure out-of-band management.
2.2 Package Contents
Verify that your package contains the following items:
- Digi EX50 Cellular Router
- Power Adapter
- Antennas (if applicable)
- Quick Start Guide
2.3 Router Diagram
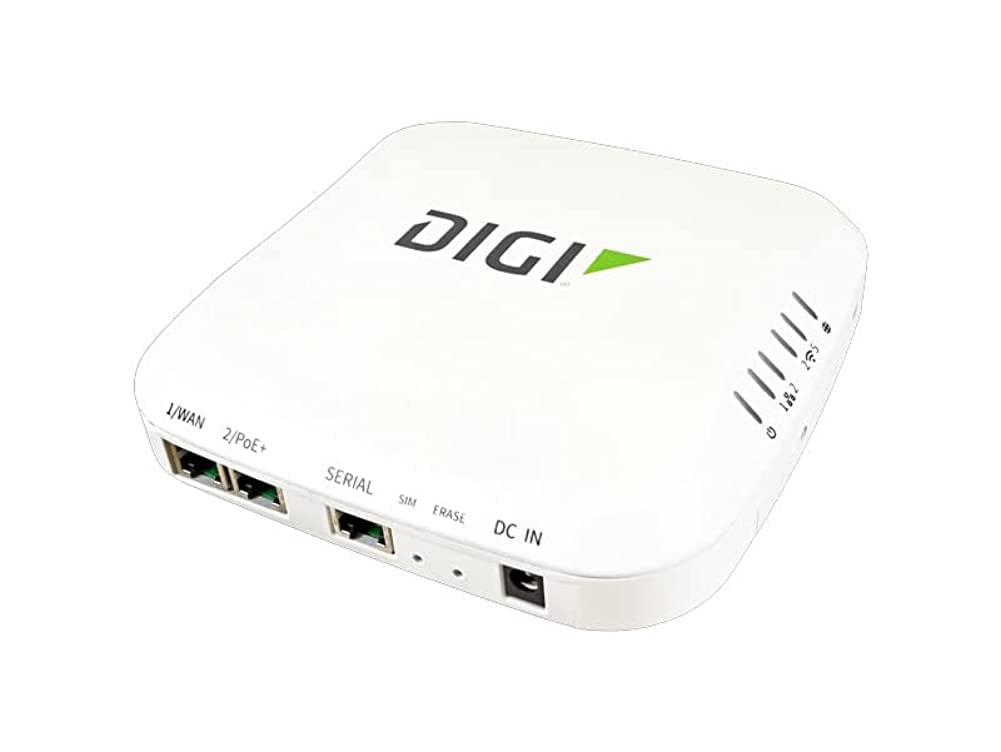
Figure 1: Front view of the Digi EX50 Wi-Fi 6 Cellular Router, showing its compact design and various ports and indicators.
3. Setup
3.1 Unboxing and Placement
- Carefully remove all components from the packaging.
- Place the router on a flat, stable surface in a central location for optimal Wi-Fi coverage. Avoid placing it near large metal objects, concrete walls, or other electronic devices that may cause interference.
- Ensure adequate ventilation around the device.
3.2 SIM Card Installation
The Digi EX50 supports dual SIM cards for redundant cellular connectivity.
- Locate the SIM card slots on the router.
- Insert your activated Nano-SIM cards into the designated slots until they click into place. Ensure the correct orientation as indicated on the device.
- Close the SIM card slot cover securely (if applicable).
3.3 Antenna Connection
If your model includes external antennas:
- Screw the provided cellular and Wi-Fi antennas onto their respective connectors on the router.
- Ensure they are finger-tight. Do not overtighten.
- Position the antennas vertically for optimal signal reception.
3.4 Power Connection
- Connect the power adapter to the router's power input port.
- Plug the power adapter into a suitable electrical outlet.
- The router will power on automatically. Wait for the system status indicators to stabilize.
3.5 Initial Configuration Access
To access the router's web-based management interface:
- Connect a computer directly to one of the router's Ethernet LAN ports using an Ethernet cable.
- Alternatively, connect to the router's default Wi-Fi network (SSID and password typically found on a label on the device).
- Open a web browser and enter the default IP address (e.g.,
192.168.1.1or refer to the Quick Start Guide). - Enter the default username and password (refer to the Quick Start Guide or device label). It is highly recommended to change these default credentials immediately for security.
4. Operating Instructions
4.1 Connecting Devices
- Wi-Fi Devices: Search for the router's Wi-Fi network name (SSID) on your device and enter the Wi-Fi password.
- Wired Devices: Connect devices such as computers, switches, or other network equipment to the router's Ethernet LAN ports using Ethernet cables.
4.2 LED Indicators
The router features various LED indicators to provide status information. Refer to the full product documentation for a detailed explanation of each LED's behavior. Common indicators include:
- Power LED: Indicates the power status of the device.
- Cellular Signal Strength LEDs: Show the strength of the cellular signal.
- WAN/LAN LEDs: Indicate activity and link status for Ethernet ports.
- Wi-Fi LED: Shows Wi-Fi activity.
4.3 Web Management Interface
The web management interface allows you to configure and monitor your router. Key functions include:
- Network settings (WAN, LAN, Wi-Fi)
- Security settings (firewall, VPN)
- Cellular connection management
- Firmware updates
- System logs and diagnostics
5. Maintenance
5.1 Firmware Updates
Regularly check for and install firmware updates to ensure optimal performance, security, and access to new features. Firmware updates are typically available through the Digi Remote Manager or the router's web management interface.
5.2 Cleaning
Clean the router periodically with a soft, dry cloth. Do not use liquid cleaners or aerosols. Ensure the device is powered off before cleaning.
5.3 Environmental Considerations
Operate the router within its specified temperature and humidity ranges. Avoid exposing it to direct sunlight, excessive heat, or moisture.
6. Troubleshooting
6.1 No Internet Connection
- Check SIM Card: Ensure SIM cards are properly inserted and activated with your cellular provider.
- Signal Strength: Verify cellular signal strength via the LED indicators or web interface. Relocate the router if the signal is weak.
- Cables: Ensure all Ethernet cables are securely connected.
- Restart: Power cycle the router by unplugging it for 10 seconds and then plugging it back in.
- Configuration: Log into the web interface to check WAN/cellular settings.
6.2 Wi-Fi Not Connecting or Slow
- Wi-Fi Enabled: Confirm Wi-Fi is enabled in the router's settings.
- Password: Double-check the Wi-Fi password.
- Interference: Move the router away from other electronic devices or obstacles.
- Channel: In the web interface, try changing the Wi-Fi channel to avoid interference.
- Distance: Ensure your device is within the Wi-Fi range.
6.3 Router Unresponsive
- Power Cycle: Unplug the power adapter, wait 10 seconds, and plug it back in.
- Factory Reset: If the router remains unresponsive, a factory reset may be necessary. Locate the reset button (often recessed) and press and hold it for 10-15 seconds while the router is powered on. Note: A factory reset will erase all custom configurations.
7. Specifications
| Feature | Specification |
|---|---|
| Model Number | EX50-WXS6-GLB |
| Wi-Fi Generation | Wi-Fi 6 (802.11ax) |
| Network Band | Dual Band (2.40 GHz ISM, 5 GHz UNII) |
| Wireless Speed | 320 MB/s |
| Processor Type | Cortex A53 Quad-core |
| Processor Speed | 1.80 GHz |
| Connectivity Technology | Wi-Fi 6, Ethernet, 5G Cellular |
| Number of Ports | 1 (Network, plus dual 2.5 Gigabit Ethernet) |
| Security Protocol | WPA2 |
| Product Dimensions | 12.5 x 10.15 x 4 inches |
| Item Weight | 4.4 pounds |
| Manufacturer | Digi International |
8. Warranty and Support
For detailed warranty information, please refer to the warranty card included with your product or visit the official Digi International website. Technical support and additional resources, including comprehensive documentation and software downloads, are available through the Digi International support portal.
Digi International Website: www.digi.com
Digi Remote Manager: For centralized management and support, utilize the Digi Remote Manager platform.


