
1. Introduction
This manual provides comprehensive instructions for the setup, operation, and maintenance of your Bushnell Prime L20 Low Glow Trail Camera. Designed for wildlife monitoring and scouting, this camera captures high-quality images and videos with minimal disturbance to its environment. Please read this manual thoroughly to ensure optimal performance and longevity of your device.
2. Package Contents
Verify that all items are present in your package:
- Bushnell Prime L20 Low Glow Trail Camera
- Adjustable Mounting Strap
- User Manual (this document)
3. Camera Components
Familiarize yourself with the key components of your trail camera:

Figure 1: Front view of the Bushnell Prime L20 Low Glow Trail Camera, showing the lens, PIR sensor, and IR LEDs.
- Lens: Captures images and videos.
- Low Glow IR LEDs: Provide illumination for night vision without a visible flash.
- PIR Motion Sensor: Detects movement to trigger recording.
- Control Panel: Located inside the camera, features an LCD display and navigation buttons for settings.
- Battery Compartment: Houses 8 AA batteries (not included).
- SD Card Slot: Accepts standard SD cards for storage (up to 32GB recommended).
- External Power Port: For optional external power sources.
- Mounting Points: For attaching the camera to a tree or other surfaces using the provided strap or compatible accessories.
4. Initial Setup
4.1 Battery Installation
The Bushnell Prime L20 requires 8 AA batteries for operation. For best performance and battery life, use high-quality alkaline or lithium batteries.

Figure 2: Battery compartment with 8 AA batteries.
- Open the camera's front cover by unlatching the side clips.
- Locate the battery tray at the bottom of the camera.
- Insert 8 AA batteries, ensuring correct polarity (+/-) as indicated inside the compartment.
- Securely close the battery tray and the camera's front cover.
4.2 SD Card Installation
A standard SD card (not included) is required to store photos and videos. The camera supports cards up to 32GB.
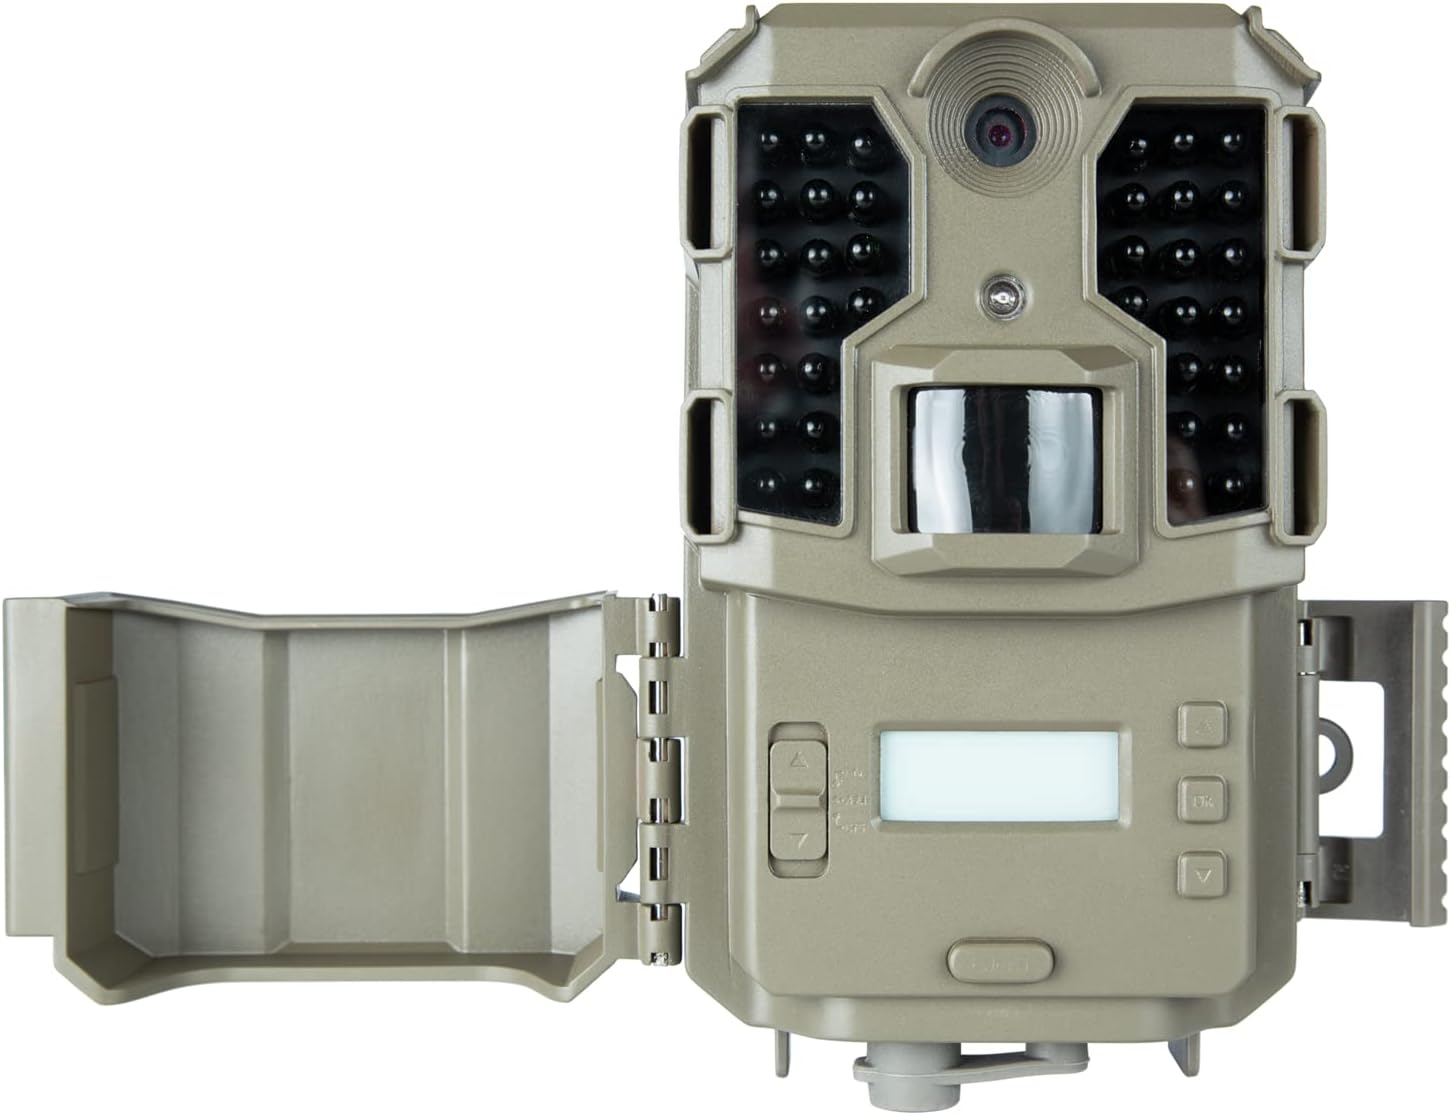
Figure 3: Internal controls and SD card slot.
- With the camera open, locate the SD card slot on the side of the control panel.
- Insert the SD card with the metal contacts facing down until it clicks into place.
- It is recommended to format the SD card using the camera's menu before first use to ensure compatibility and optimal performance.
4.3 Mounting the Camera
The camera can be mounted using the included strap or a compatible tree bracket.

Figure 4: Mounting the camera on a tree.
- Thread the mounting strap through the slots on the back of the camera.
- Securely fasten the camera to a tree or post at the desired height and angle.
- Ensure the camera is stable and pointed towards the area you wish to monitor.
5. Operating Instructions
5.1 Powering On/Off
To power on the camera, slide the power switch (located inside the camera) from 'OFF' to 'ON'. The LCD screen will illuminate. To power off, slide the switch back to 'OFF'.
5.2 Menu Navigation
Use the navigation buttons (MENU, OK, Up/Down/Left/Right arrows) on the control panel to access and adjust settings.
- Press the 'MENU' button to enter the settings menu.
- Use the Up/Down arrow buttons to scroll through menu options.
- Press 'OK' to select an option or enter a sub-menu.
- Use the Left/Right arrow buttons to change values or settings.
- Press 'MENU' again to exit the current menu or save changes.
5.3 Photo and Video Settings
Customize your camera's capture preferences:
- Image Settings: Choose between 3MP, 12MP, and 20MP resolutions for still photos.
- Video Resolution: Select 1080p at 30 FPS for detailed video recording.
- Trigger Speed: The camera features a 0.4-second trigger speed with a 1-second recovery rate.
- Date, Time, and Temp Stamps: Enable these options to overlay capture details on every photo.
6. Maintenance
6.1 Cleaning
Regularly clean the camera lens and PIR sensor window with a soft, lint-free cloth to ensure clear images and proper motion detection. Avoid abrasive cleaners.
6.2 Battery Life
The camera offers an approximate 12-month battery life with optimal usage. Replace batteries when the low battery indicator appears on the display.
6.3 Storage
When not in use, store the camera in a cool, dry place. Remove batteries if storing for extended periods to prevent leakage.
7. Troubleshooting
If you encounter issues with your camera, refer to the table below for common problems and solutions:
| Problem | Possible Solution |
|---|---|
| Camera not powering on | Check battery polarity and ensure batteries are fully charged. Verify the power switch is in the 'ON' position. |
| No photos/videos captured | Ensure SD card is inserted correctly and formatted. Check PIR sensor sensitivity settings. Verify camera is armed (switch in 'ON' position). |
| Poor image/video quality | Clean the camera lens and PIR sensor window. Adjust image/video resolution settings. Ensure adequate lighting for daytime captures. |
| Short battery life | Use high-quality alkaline or lithium batteries. Reduce the number of photos/videos captured per trigger event. |
8. Technical Specifications
| Feature | Specification |
|---|---|
| Model Number | 119930M |
| Image Resolution | 3MP, 12MP, 20MP |
| Video Resolution | 1080p @ 30 FPS |
| Trigger Speed | 0.4 seconds |
| Recovery Rate | 1 second |
| Night Vision Range | 100 feet (36 Low Glow LEDs) |
| Waterproofing | IPX6 |
| Power Source | 8 AA Batteries (not included) |
| Battery Life | Up to 12 months |
| Dimensions | 8.66 x 5.91 x 2.76 inches |
| Weight | 1.19 pounds |
9. Warranty and Support
9.1 Warranty Information
Your Bushnell Prime L20 Low Glow Trail Camera is covered by a manufacturer's warranty against defects in materials and workmanship. Please refer to the product packaging or the official Bushnell website for specific warranty terms and conditions.
9.2 Customer Support
For technical assistance, troubleshooting, or product inquiries, please visit the official Bushnell Store or contact their customer service department. You can find more information at: Bushnell Store on Amazon