1. Introduction
The Generic MP20 Home Mini LED Portable Smart Pocket Cinema Video Projector is designed for versatile multimedia entertainment. Featuring a compact design and multiple input options, it allows you to project movies, photos, and text onto various surfaces. This manual provides essential information for setting up, operating, and maintaining your projector.
Key Features:
- Innovative Design: Crafted from environmental projection ABS plastic, ensuring a safe and pollution-free experience.
- Exquisite & Realistic Pictures: Optimized picture quality frame by frame according to digital projector color standard DCI-P3, restoring original filmstrip colors for vivid and smooth visuals.
- Diffuse Reflection Eye Protection: Utilizes diffuse reflection imaging technology for soft light that is gentle on the eyes, promoting a healthy viewing experience.
- Portable Charging: Supports charging via power bank for convenient use on the go.
- Advanced Cooling System: Equipped with an advanced hydraulic axial fan for efficient heat dissipation and low noise operation, ideal for family entertainment.
- Full HD 1080p Support: Supports up to 1920*1080 pixels resolution for input, with a native resolution of 320*240 pixels.
2. Package Contents
Upon unpacking, ensure all items listed below are present. If any items are missing or damaged, please contact customer support.
- Generic MP20 Mini LED Projector
- Power Adapter (with UK adapter included)
- Remote Control (requires 2x AAA batteries, not included)
- AV Cable
- User Guide

Figure 2.1: Generic MP20 Mini LED Projector and its accessories, including the projector unit, power adapter, remote control, and AV cable.
Video 2.1: An unboxing demonstration of the Generic MP20 Mini LED Projector, showcasing the packaging, included accessories, and initial impressions of the device. (Content from 00:00 to 03:52)
3. Product Overview
3.1. Device Layout

Figure 3.1: Overview of the Generic MP20 Mini LED Projector's control buttons and various input/output interfaces.
3.2. Ports and Controls
- Front: Projection Lens, Focus Adjustment Dial.
- Top: Power Button, Navigation Buttons (Up, Down, Left, Right, OK), Menu Button, Back Button.
- Side (Right): DC IN (Power Input), HDMI Port, USB Port, 3.5mm Headphone Jack.
- Side (Left): Micro SD Card Slot, AV Input, Micro USB (5V-2A) Port.
- Rear: Ventilation Grille.
- Bottom: Tripod Mount, Anti-slip Pads.

Figure 3.2: Close-up of the projector's side panel, showing the DC IN, HDMI, USB, and headphone jack ports.
3.3. Compact Design
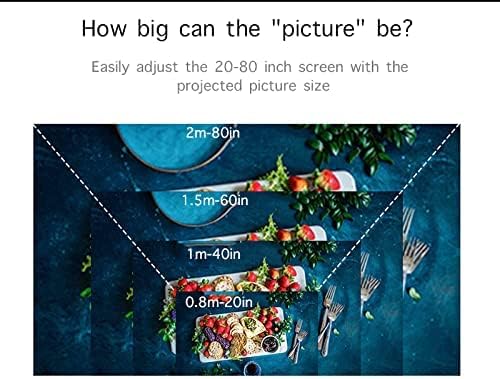
Figure 3.3: The compact size of the MP20 projector, designed for easy portability and handling.
4. Setup
4.1. Powering On the Projector
- Connect the power adapter to the DC IN port on the projector.
- Plug the power adapter into a power outlet.
- Press the Power button on the projector or the remote control to turn on the device.

Figure 4.1: The projector can be powered via the included adapter or a portable power bank for flexible use.
4.2. Adjusting Focus
Rotate the Focus Adjustment Dial located near the projection lens until the image on the screen appears clear and sharp.
4.3. Positioning the Projector
Place the projector on a stable surface or mount it on a tripod using the bottom screw mount. The optimal projection distance is between 0.8 to 2 meters, yielding a screen size of 24 to 80 inches.

Figure 4.2: The projector offers flexible screen sizes from 24 to 80 inches, depending on the projection distance.
5. Operating Instructions
5.1. Selecting Input Source
Use the navigation buttons on the projector or remote to select your desired input source from the main menu. Available inputs include HDMI, USB, Micro SD, and AV.
5.2. Menu Navigation
The main menu allows selection between Movie, Music, Photo, and Text modes. Further settings for picture, sound, and time can be accessed through the Options menu.
Video 5.1: A demonstration of the projector's operating menu, input selection, and projection quality for various media types including movies, photos, and text. (Content from 03:52 to 08:35)
5.3. Picture Quality
The projector delivers bright and colorful images. While the native resolution is 320x240 pixels, it supports input resolutions up to 1920x1080 pixels. For optimal viewing, especially with text or subtitles, ensure a dark environment and use a large font size.

Figure 5.1: Example of a vibrant image projected by the MP20, highlighting its color reproduction.
6. Specifications
| Feature | Specification |
|---|---|
| Imaging Technology | TFT LCD |
| Native Resolution | 320*240 pixels |
| Supported Resolution | 1920*1080 pixels |
| Brightness | 400-600 Lumens |
| Light Source | LED |
| LED Life Time | 30000+ Hours |
| Contrast | 800:1 |
| Operation Mode | Manual operation |
| Projector Distance | 0.8-2M |
| Screen Size | 24-80 inches |
| Aspect Ratio | 4:3/16:9 |
| Color Reproduction | 16.7K |
| Input | USB/SD/VGA/AV |
| Speaker | 8Ω1W |
| Language Support | English, Chinese, etc. |
| Unit Size | 12.7*8.15*4.85cm |
| Item Weight | 1.09 pounds |
| Product Dimensions | 5 x 3.21 x 1.91 inches |
7. Maintenance
7.1. Cleaning the Lens
Use a soft, lint-free cloth specifically designed for optical lenses to gently wipe the projection lens. Avoid using abrasive materials or harsh chemicals.
7.2. Cleaning the Projector Body
Wipe the exterior of the projector with a soft, dry cloth. Do not use liquid cleaners or solvents.
7.3. Ventilation
Ensure that the ventilation grilles are not blocked to prevent overheating. Regular airflow is crucial for the longevity of the LED light source.

Figure 7.1: The advanced cooling system ensures efficient heat dissipation, crucial for maintaining projector performance.
8. Troubleshooting
- No Image: Check power connection, ensure the correct input source is selected, and verify the connected device is powered on and sending a signal.
- Blurry Image: Adjust the focus dial on the projector. Ensure the projection surface is flat and the projector is within the recommended distance.
- No Sound: Check the volume settings on both the projector and the connected device. If using external speakers, ensure they are properly connected and powered.
- Remote Not Working: Replace the batteries in the remote control. Ensure there are no obstructions between the remote and the projector's IR receiver.
9. Warranty and Support
For warranty information and customer support, please refer to the documentation provided with your purchase or contact the retailer. Keep your proof of purchase for any warranty claims.


