
CANDY CCGM9025PX/E Gas Cooker User Manual
Model: CCGM9025PX/E | Brand: Candy
1. Important Safety Information
Please read this manual carefully before installing, operating, or performing maintenance on your appliance. Keep this manual for future reference.
- Gas Safety: Ensure proper ventilation. Do not store flammable materials near the appliance. In case of gas leak, close the main gas valve, open windows, and do not operate electrical switches.
- Electrical Safety: Ensure the appliance is properly earthed. Do not use adapters or extension cords. Disconnect from power before cleaning or maintenance.
- Children Safety: Keep children away from the appliance during operation. The surfaces can become very hot.
- Hot Surfaces: The oven and hob surfaces become hot during use. Use oven mitts when handling hot items.
- Cleaning: Always allow the appliance to cool down before cleaning.
2. Product Overview
The Candy CCGM9025PX/E is a freestanding gas cooker featuring a gas hob with 5 burners and a gas oven with grill function. It is designed for household use.
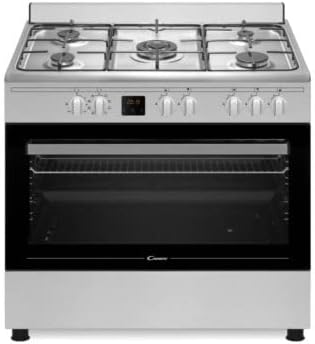
Figure 2.1: Front view of the Candy CCGM9025PX/E Gas Cooker. This image shows the full appliance, including the five gas burners on top, control knobs on the front panel, and the oven door with a clear glass window.

Figure 2.2: Energy efficiency label for the Candy CCGM9025PX/E Gas Cooker. This label indicates an energy class A, with a usable volume of 95 liters, and energy consumption values for conventional and forced air modes.
Components:
- Gas Hob: Equipped with 5 gas burners of varying sizes for different cooking needs.
- Control Panel: Knobs for controlling gas burners and oven functions.
- Gas Oven: Main cooking cavity with a grill function.
- Oven Door: Double-glazed for insulation and safety.
- Adjustable Feet: For leveling the appliance.
3. Installation
The Candy CCGM9025PX/E is a freestanding appliance designed for table installation. Professional installation by a qualified technician is highly recommended for gas and electrical connections.
3.1 Unpacking
- Remove all packaging materials from the appliance.
- Check for any damage during transit. Report any damage to your retailer immediately.
- Keep packaging materials out of reach of children.
3.2 Positioning
- Place the cooker on a flat, stable surface.
- Ensure adequate clearance from adjacent walls and furniture as per local regulations.
- Use the adjustable feet to level the appliance, ensuring stability and proper operation of the oven door.
3.3 Gas Connection
WARNING: Gas connection must be performed by a qualified and certified gas fitter in accordance with local and national regulations.
- Ensure the main gas supply is turned off.
- Connect the appliance to the gas supply using a suitable flexible or rigid pipe.
- Check all connections for leaks using a soapy water solution (do not use a flame).
3.4 Electrical Connection
WARNING: Electrical connection must be performed by a qualified electrician in accordance with local and national regulations.
- Ensure the main power supply is turned off.
- Connect the appliance to a properly earthed electrical outlet.
- Verify the voltage and frequency match the appliance's requirements (refer to specifications).
4. Operating Instructions
4.1 Using the Gas Hob
The hob features 5 gas burners. Each burner is controlled by a dedicated knob on the control panel.
- To Ignite a Burner: Push and turn the corresponding knob counter-clockwise to the maximum flame position. Hold the knob in for a few seconds to allow the thermocouple to heat up (if applicable).
- Adjusting Flame: Once ignited, release the knob and adjust the flame size by turning the knob between the maximum and minimum flame positions.
- Turning Off: Turn the knob clockwise to the "OFF" position.
- Pan Supports: Always use appropriate cookware that covers the burner flame.
4.2 Using the Gas Oven
The oven is suitable for baking, roasting, and grilling.
- Preheating: Turn the oven function knob to the desired temperature. Allow the oven to preheat for approximately 10-15 minutes before placing food inside.
- Baking/Roasting: Place food on the appropriate oven rack. Monitor cooking progress through the oven door.
- Grill Function: Turn the oven function knob to the grill setting. Use the grill pan and rack provided. Keep the oven door slightly ajar when grilling (refer to specific model instructions if different).
- Turning Off: Turn the oven function knob to the "OFF" position.
5. Maintenance and Cleaning
Regular cleaning and maintenance will ensure the longevity and optimal performance of your cooker.
5.1 General Cleaning
- Always ensure the appliance is cool and disconnected from the power supply before cleaning.
- Use a soft cloth and mild detergent for external surfaces. Avoid abrasive cleaners or scourers.
- Wipe spills immediately to prevent staining.
5.2 Hob Cleaning
- Remove pan supports and burner caps/crowns. Wash them in warm soapy water, rinse, and dry thoroughly.
- Clean the hob surface with a damp cloth and mild detergent. Ensure burner holes are not blocked.
- Reassemble only when all parts are completely dry.
5.3 Oven Cleaning
- Remove oven racks and accessories. Wash them in warm soapy water.
- Wipe the interior of the oven with a damp cloth and mild oven cleaner (ensure it's safe for gas ovens).
- For stubborn stains, follow the instructions on your chosen oven cleaner.
- Clean the oven door glass with a glass cleaner.
6. Troubleshooting
Before contacting service, please check the following common issues and solutions:
| Problem | Possible Cause | Solution |
|---|---|---|
| Burner not igniting | No gas supply; burner cap/crown misaligned; ignition electrode dirty/wet. | Check gas supply; reposition burner parts correctly; clean and dry electrode. |
| Oven not heating | No gas supply; power supply issue; oven control knob not set correctly. | Check gas supply; check power connection/fuse; ensure knob is set to a temperature. |
| Uneven cooking in oven | Food placed incorrectly; oven not preheated; door not fully closed. | Ensure proper air circulation; preheat oven fully; check door seal. |
| Gas smell | Gas leak. | Immediately turn off gas supply, open windows, do not operate electrical switches, and contact a qualified gas fitter. |
If the problem persists after checking these points, please contact qualified service personnel.
7. Specifications
| Feature | Detail |
|---|---|
| Brand | Candy |
| Model Number | CCGM9025PX/E |
| Type | Freestanding Gas Cooker |
| Installation Type | Table |
| Hob Type | Gas |
| Number of Burners | 5 |
| Oven Type | Gas |
| Oven Function | Grill |
| Energy Used | Gas |
| ASIN | B09MJ8CXV6 |
| First Available Date | May 21, 2022 |
8. Warranty and Support
For warranty information, please refer to the warranty card included with your purchase or contact your retailer. Keep your proof of purchase for any warranty claims.
For technical assistance, spare parts, or service requests, please contact Candy customer support or an authorized service center. Information regarding spare parts availability is not provided in the product specifications.
You can visit the official Candy store on Amazon for more information: Candy Store


