1. Introduction
This user manual provides detailed instructions for the installation, operation, and maintenance of your Pholiten Dual Monitor Stand, model MD97442(PH). This monitor stand is designed to securely hold two monitors, ranging from 13 to 38 inches in size and weighing up to 22 lbs each, enhancing your workspace ergonomics and organization.
2. Safety Information
Please read all instructions carefully before assembly and use. Failure to follow these instructions may result in property damage, serious injury, or death. Keep this manual for future reference.
- Weight Capacity: Do not exceed the maximum weight capacity of 22 lbs (10 kg) per monitor arm.
- Monitor Size: Ensure your monitors are within the supported size range of 13 to 38 inches.
- VESA Compatibility: This stand supports VESA mounting patterns of 75x75mm and 100x100mm. Verify your monitor's VESA pattern before installation.
- Desk Material: Do not install on desks made of particle board (PB), medium-density fiberboard (MDF), or glass, as these materials may not provide sufficient stability.
- Secure Installation: Ensure all screws and clamps are securely tightened before placing monitors on the stand.
- Cable Management: Use the provided cable clips to prevent cables from snagging or interfering with monitor movement.
- Children and Pets: Keep children and pets away from the monitor stand during assembly and adjustment.
3. Package Contents
Verify that all components are present and undamaged before proceeding with assembly. If any parts are missing or damaged, please contact customer support.

Image: All components of the Pholiten Dual Monitor Stand laid out for inspection.
- Main Pole
- Monitor Arms (2)
- Desk Clamp Assembly
- VESA Plates (2)
- Cable Management Clips
- Hardware Kit (screws, washers, spacers)
- Hex Keys (various sizes)
- User Manual
4. Specifications

Image: Detailed product dimensions including arm length, pole height, and clamp height.
| Feature | Detail |
|---|---|
| Model Number | MD97442(PH) |
| Supported Monitor Size | 13 - 38 inches |
| Weight Capacity per Arm | Up to 22 lbs (10 kg) |
| VESA Compatibility | 75x75mm, 100x100mm |
| Mounting Type | Desk Clamp or Grommet Mount |
| Material | Metal |
| Color | Black |
| Tilt Angle | ±90 Degrees |
| Swivel Angle | ±90 Degrees |
| Rotation | 360 Degrees (Portrait/Landscape) |
5. Setup and Installation
Follow these steps to assemble and install your Pholiten Dual Monitor Stand. It is recommended to have a second person assist during monitor attachment.
5.1. Install the Monitor Mount
- Attach the desk clamp to the main pole using the provided screws and hex key. Ensure it is securely fastened.
- Mount the assembled pole and clamp to your desk. Tighten the clamp screw until the stand is stable.
- Slide the monitor arms onto the main pole. Ensure the "Up" direction is correctly oriented as indicated on the arms. Tighten the arm collar screws with the hex key to secure them at your desired height.
Video: Step-by-step guide on installing the Pholiten Dual Monitor Arm to the desk.

Image: Detail of the desk clamp for secure attachment.
5.2. Monitor Installation
- Carefully attach the VESA plates to the back of your monitors using the appropriate screws and spacers from the hardware kit. Ensure the screws are tightened firmly but do not overtighten.
- With assistance, lift each monitor and slide its VESA plate onto the corresponding monitor arm bracket. Ensure the monitor is securely seated.
- Tighten the security screws on the arm brackets to prevent accidental dislodgement of the monitors.

Image: Close-up view of the VESA plate attachment to the monitor.

Image: Rear view of two monitors securely mounted on the stand, showing the arm structure.
5.3. Cable Management
Route your monitor and power cables through the provided cable management clips along the arms and pole. This helps maintain a tidy workspace and prevents cable damage.

Image: Cables neatly routed through the integrated cable management system on the monitor arms.
6. Operating Instructions (Adjustments)
The Pholiten Dual Monitor Stand offers a wide range of adjustments to customize your viewing experience. Adjustments should be made carefully to avoid sudden movements.
6.1. Height Adjustment
To adjust the height of the monitors, loosen the collar screws on the main pole, slide the arms to the desired height, and then re-tighten the screws firmly.
6.2. Tilt, Swivel, and Rotation
Each monitor can be independently adjusted:
- Tilt: Adjust the monitor screen up or down by ±90 degrees to find your optimal viewing angle.
- Swivel: Pivot the monitor screen left or right by ±90 degrees.
- Rotation: Rotate the monitor 360 degrees to switch between landscape and portrait orientations.
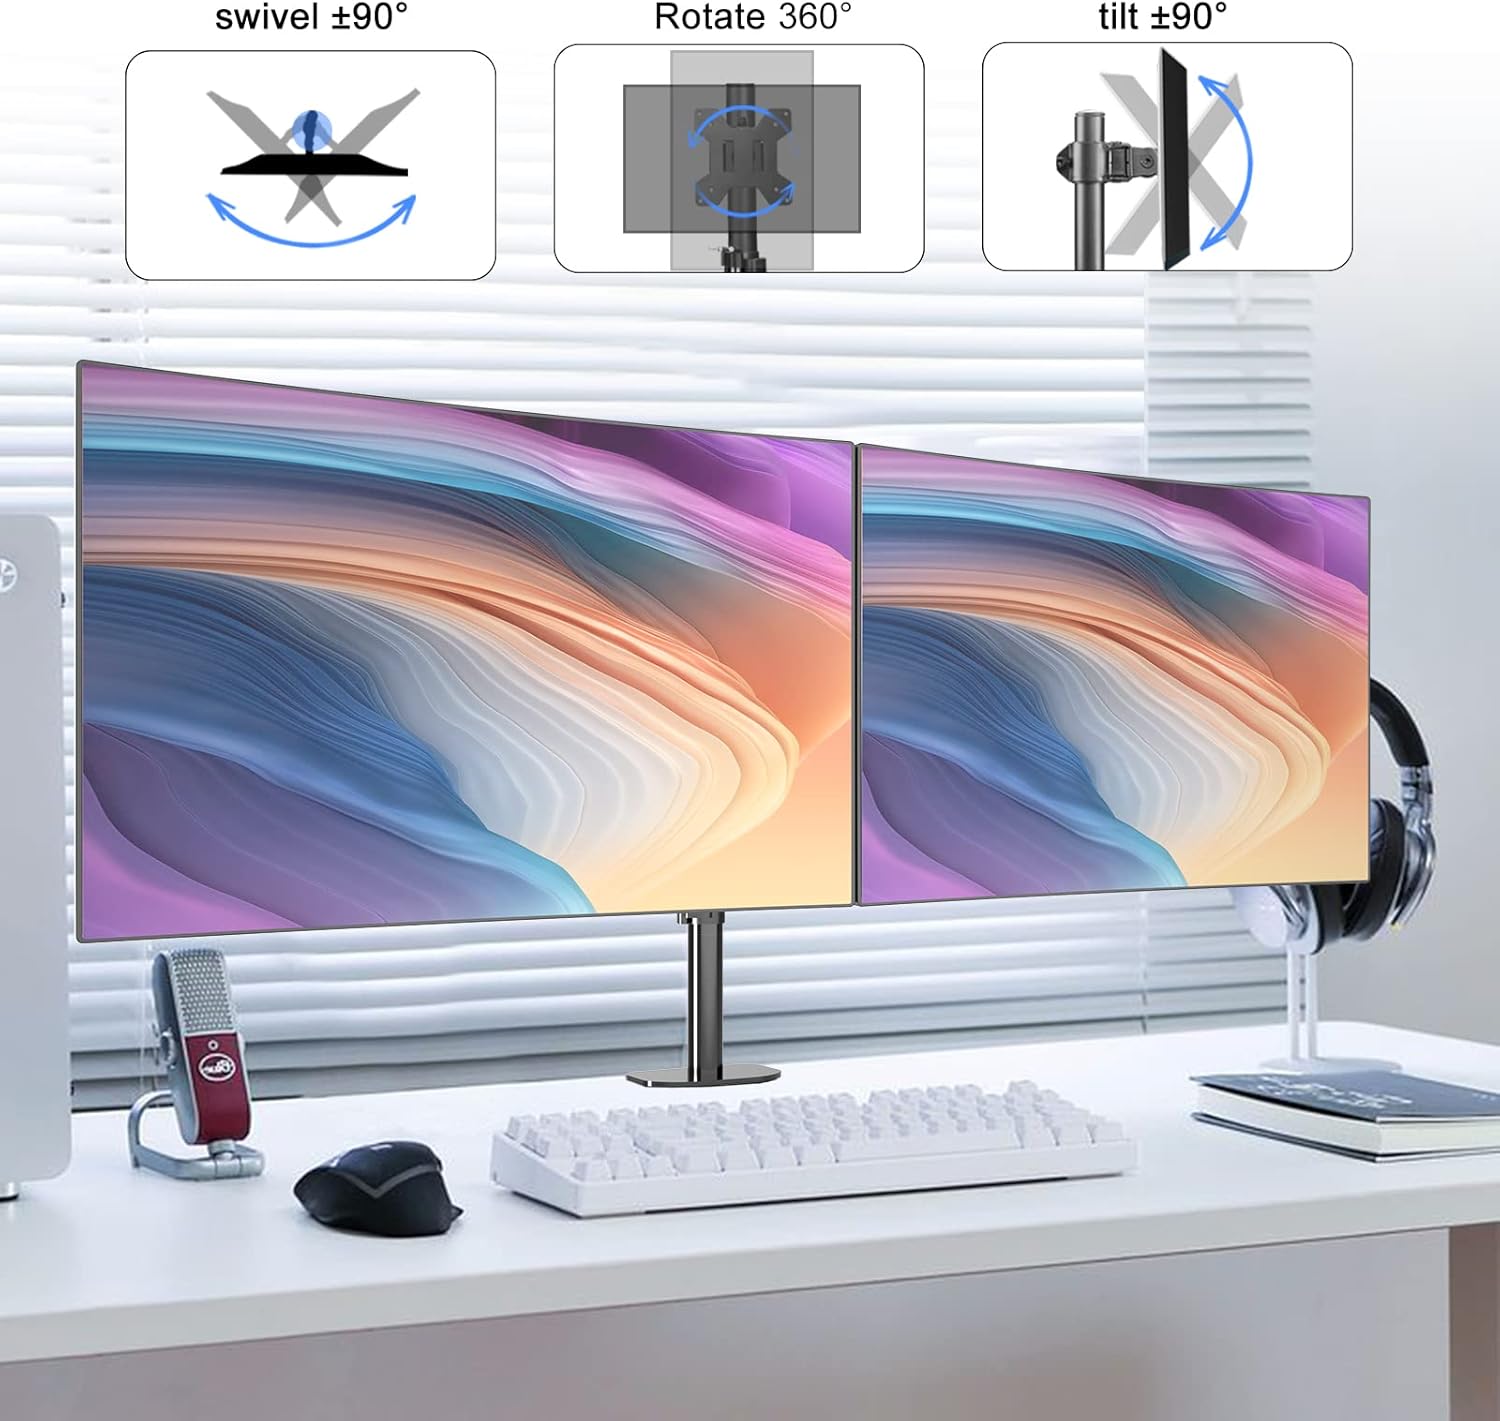
Image: Visual representation of the tilt, swivel, and 360-degree rotation capabilities of the monitor mount.
6.3. Arm Extension and Articulation
The monitor arms can extend and articulate to position your monitors precisely. The arms offer 270-degree rotation at various joints, allowing for flexible placement and viewing distances.

Image: Illustration of the 270-degree arm rotation for flexible monitor positioning.
Video: Demonstration of the Pholiten Dual Monitor Stand's full range of motion, including extension, rotation, and tilt adjustments.
7. Maintenance
Regular maintenance ensures the longevity and safe operation of your monitor stand.
- Cleaning: Wipe the stand with a soft, damp cloth. Avoid abrasive cleaners or solvents that could damage the finish.
- Tightness Check: Periodically check all screws and connections to ensure they remain tight. Re-tighten if necessary.
- Cable Inspection: Inspect cables regularly for any signs of wear or damage. Replace damaged cables immediately.
8. Troubleshooting
If you encounter issues with your monitor stand, refer to the following common problems and solutions:
| Problem | Possible Cause | Solution |
|---|---|---|
| Monitor is unstable or sags. | Screws are loose; monitor weight exceeds capacity. | Ensure all mounting screws and clamp are tightened. Verify monitor weight is within 22 lbs. |
| Difficulty adjusting monitor position. | Joints are too tight. | Loosen the corresponding joint screws slightly with the hex key until desired movement is achieved. Re-tighten to secure. |
| Stand slides on desk. | Desk clamp not tight enough; desk surface is too smooth. | Re-tighten the desk clamp firmly. Ensure the desk surface is suitable for clamping. |
| Monitors are not level. | Arms are not set at the same height or VESA plates are not aligned. | Adjust the height of each arm on the main pole. Ensure VESA plates are installed straight on the monitors. |
9. Warranty and Support
Pholiten products are manufactured with quality and durability in mind. For warranty information or technical support, please refer to the product packaging or contact Pholiten customer service through their official website or the retailer where the product was purchased.
Please retain your proof of purchase for warranty claims.


