
1. Introduction
This manual provides detailed instructions for the assembly, operation, and maintenance of the GeeekPi Mini Tower Case for Raspberry Pi 4 Model B. This kit integrates an ICE Tower Cooler for efficient heat dissipation, a UPS Plus Hat for uninterrupted power supply, and a 0.96 inch OLED Display for system monitoring. It also includes a GPIO 1 to 2 Expansion Board for extended connectivity. Please read these instructions carefully before proceeding with assembly and operation.
2. Package Contents
Verify that all components listed below are present in your package:
- 1 x ABS Mini Tower Case
- 2 x Acrylic Side Panels
- 1 x 0.96 inch OLED Display (pre-mounted on the case)
- 1 x UPS Plus Hat (18650 lithium battery NOT included)
- 1 x ICE Tower Cooler
- 1 x GPIO Edge Extension
- 1 x Assembly Manual
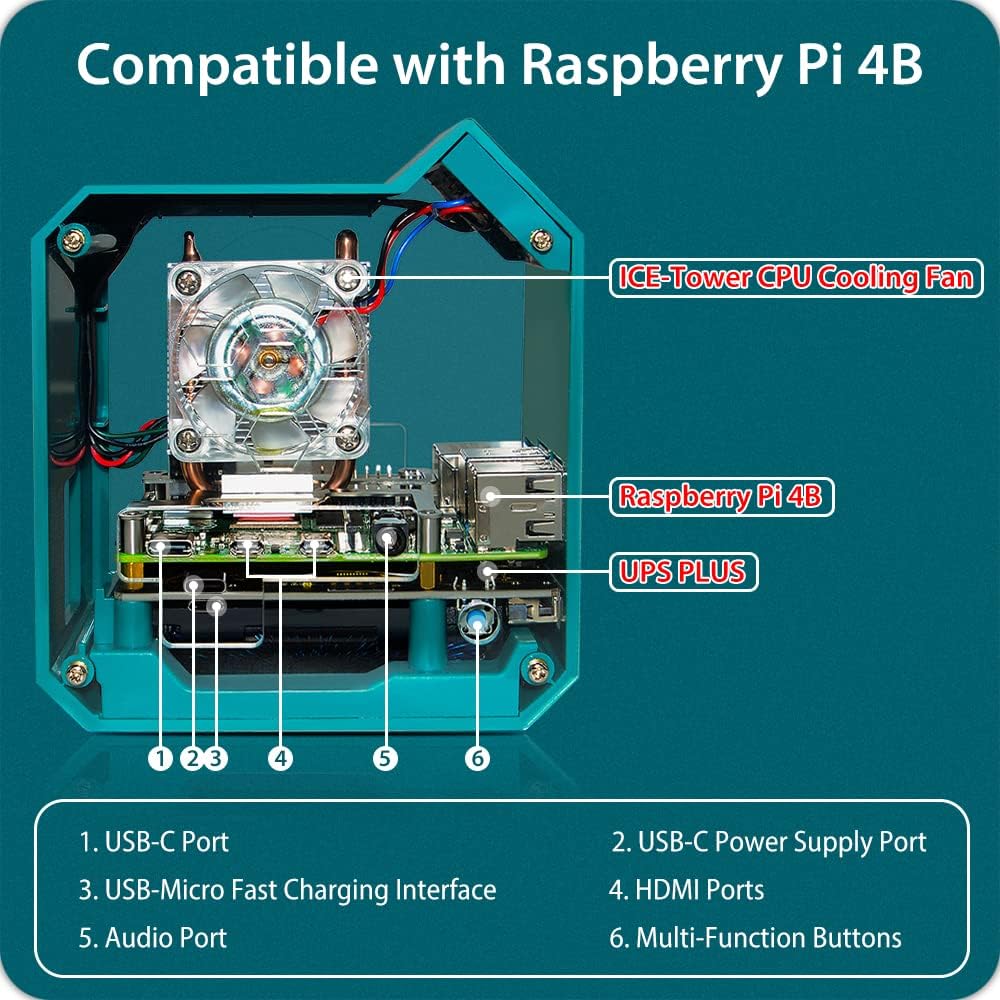
Figure 2.1: Overview of the assembled GeeekPi Mini Tower Case with key components and ports labeled. This image shows the ICE Tower CPU Cooling Fan, Raspberry Pi 4B, UPS Plus, USB-C Port, USB-C Power Supply Port, USB-Micro Fast Charging Interface, HDMI Ports, Audio Port, and Multi-Function Buttons.
3. Assembly Instructions
Follow these steps carefully to assemble your GeeekPi Mini Tower Case:
- Prepare the Raspberry Pi: Tear off the transparent protective film from both sides of the heat dissipation sticker and apply it to the CPU position of your Raspberry Pi.
- Attach ICE Tower Cooler Brackets: Fix the metal brackets of the Low Profile ICE Tower Cooler using M2.5 screws.
- Mount ICE Tower Cooler: Fix the ICE Tower Cooler to the Raspberry Pi using the provided copper pillars.
- Insert Batteries into UPS Plus: Carefully insert 18650 lithium batteries (not included) into the UPS Plus Hat. Pay close attention to the polarity direction (+ and -).

Figure 3.1: Visual guide for assembly steps 1 through 4, showing the preparation of the Raspberry Pi, attachment of cooler brackets, mounting of the cooler, and battery insertion into the UPS Plus Hat.
- Secure ABS Holder: Fix the ABS holder with M2.5 long screws to the UPS and Raspberry Pi. Ensure the pogo pins are correctly aligned with the features on the Raspberry Pi.
- Connect Fan Cable: Connect the fan cable from the ICE Tower Cooler to the OLED driver board.
- Connect OLED Cable: Insert the white plug of the OLED screen cable into the side jack of the driver board. Connect the female header to the GPIO pin of the Raspberry Pi in the direction shown in the figure. The red wire indicates the 5V pin; ensure correct orientation.
- Attach Acrylic Side Panels: Fix the two acrylic side panels with screws to complete the case assembly.

Figure 3.2: Visual guide for assembly steps 5 through 8, detailing the securing of the ABS holder, fan cable connection, OLED cable connection, and attachment of acrylic side panels.

Figure 3.3: Detailed view of the ICE Tower Cooler, highlighting its tower structure, 5mm copper tube, and multi-layer heat sinks for effective heat dissipation.

Figure 3.4: Wiring diagram illustrating the connections from the Raspberry Pi GPIO pins to the OLED display and the cooling fan, including a pinout reference.

Figure 3.5: The 40PIN GPIO Edge Expansion Board connected to the Raspberry Pi, demonstrating how the GPIO pins can be extended for additional peripherals. Note that the 40-pin parallel cable is not included.
4. Operating Instructions
4.1. UPS Plus Hat
The UPS Plus Hat provides an uninterruptible power supply for your Raspberry Pi. When connected to an external power source, it charges the installed 18650 batteries while simultaneously powering the Raspberry Pi. In the event of an external power failure, the UPS Plus Hat automatically switches to battery power, ensuring continuous operation of your system. It can also power the Raspberry Pi via Pogo Pins, conserving GPIO resources.

Figure 4.1: The UPS Plus Hat, showing its battery slots and highlighting features such as easy installation, enhanced power management, remote OTA firmware upgrade, programmable auto power-up, programmable sample period, I2C communication, standalone RTC, and support for stacked battery design.
4.2. ICE Tower Cooler
The ICE Tower Cooler is designed to maintain optimal operating temperatures for your Raspberry Pi 4. It features a tower structure with a 5mm copper tube, multi-layer heat sinks, and a 7-blade PWM RGB fan. This cooling system is highly effective, capable of reducing the Raspberry Pi's temperature significantly, even under overclocking conditions. The fan's PWM (Pulse Width Modulation) functionality allows for dynamic speed control, and its RGB lighting provides visual feedback.

Figure 4.2: The ICE Tower Cooler in operation, illustrating its super heat dissipation capabilities with a 5mm copper tube and active fan cooling.
4.3. 0.96 inch OLED Display
The 0.96 inch OLED screen, pre-mounted on the case, can display various system information for your Raspberry Pi or UPS Plus. Through programming, you can customize it to show data such as the Raspberry Pi's IP address, CPU temperature, disk utilization, CPU load, memory status, network card traffic, and other relevant system metrics.
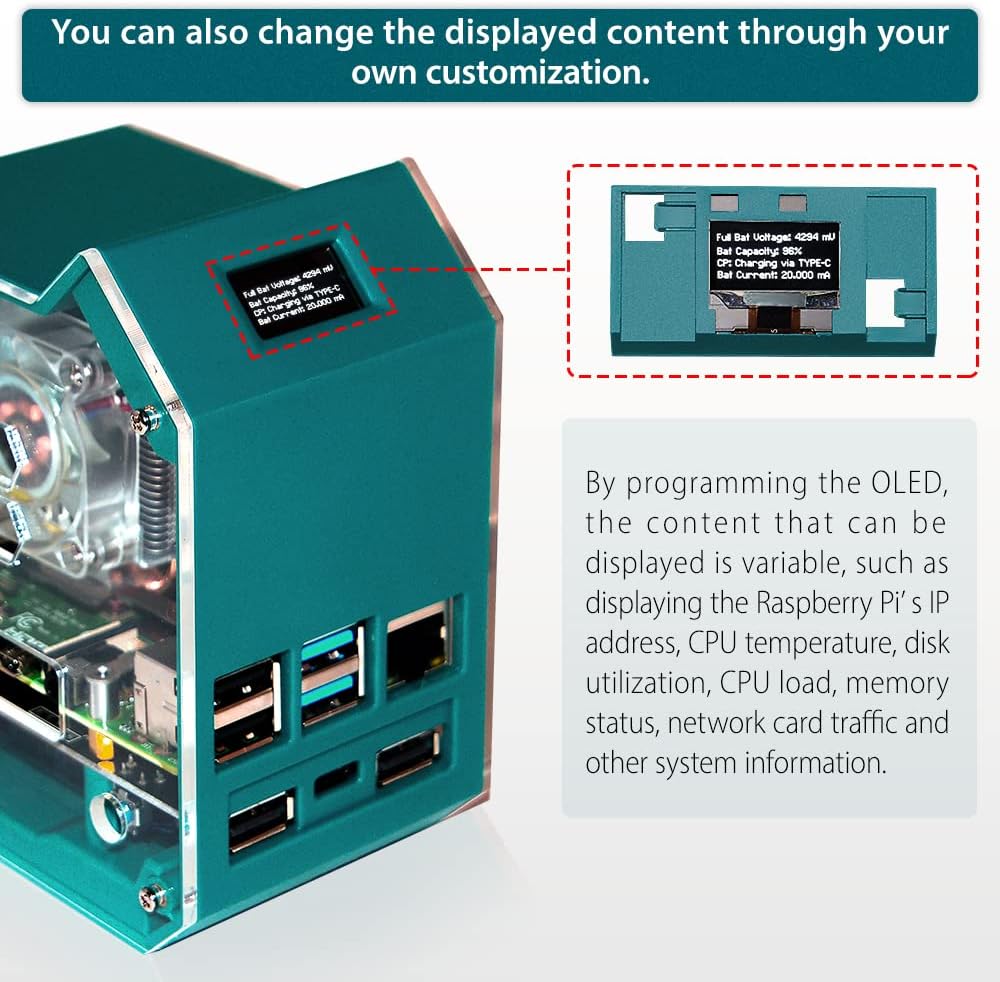
Figure 4.3: The 0.96 inch OLED display showing customizable system information, including battery voltage, capacity, charging status, and current.
5. Software Configuration
To fully utilize the features of the ICE Tower Cooler, UPS Plus Hat, and OLED Display, specific software configuration is required. This typically involves installing drivers and scripts on your Raspberry Pi operating system.
- OLED Display: Scripts are needed to fetch and display system information on the OLED screen.
- ICE Tower Cooler Fan: Configuration may be required to control the PWM RGB fan speed based on CPU temperature.
- UPS Plus Hat: Software can monitor battery status, charge levels, and manage power-related events.
For detailed software installation and configuration guides, please refer to the official GeeekPi Wiki: wiki.52pi.com/index.php?title=ZP-0129. This resource provides up-to-date instructions and necessary scripts.
6. Maintenance
Proper maintenance ensures the longevity and optimal performance of your GeeekPi Mini Tower Case components:
- Cleaning: Periodically clean the ICE Tower Cooler fan and heatsinks to prevent dust accumulation, which can impede cooling efficiency. Use compressed air or a soft brush.
- Battery Care (UPS Plus): If using 18650 batteries, ensure they are of good quality and correctly inserted. Avoid over-discharging or over-charging. If the system will be stored for an extended period, it is advisable to remove the batteries.
- Case: Wipe the ABS case and acrylic panels with a soft, dry cloth. Avoid harsh chemicals that may damage the material.
7. Troubleshooting
This section addresses common issues you might encounter:
- OLED Display Not Working:
- Check the cable connection between the OLED and the driver board, and the driver board to the Raspberry Pi GPIO.
- Ensure the necessary software drivers and scripts for the OLED are correctly installed and running on your Raspberry Pi. Refer to the GeeekPi Wiki for guidance.
- ICE Tower Cooler Fan Not Spinning:
- Verify the fan cable is securely connected to the OLED driver board.
- Confirm that the fan control software or script is properly configured and running.
- Check for any physical obstructions preventing the fan blades from spinning.
- UPS Plus Hat Not Providing Backup Power:
- Ensure 18650 batteries are correctly inserted with the right polarity and are charged.
- Check the connection of the UPS Plus Hat to the Raspberry Pi, especially the pogo pins.
- Verify that the external power supply is functioning correctly.
- System Overheating:
- Ensure the ICE Tower Cooler fan is spinning and free of dust.
- Confirm the heat dissipation sticker is properly applied to the Raspberry Pi CPU.
- Check that the fan control software is actively managing fan speed based on temperature.
8. Specifications
| Feature | Specification |
|---|---|
| Brand | GeeekPi |
| Model Name | Mini Tower Case |
| Compatible Devices | Raspberry Pi 4 Model B |
| Case Type | Tower |
| Material | Acrylonitrile Butadiene Styrene (ABS) |
| Cooling Method | Air (ICE Tower Cooler) |
| Fan Size | 6 centimeters |
| Number of Fans | 1 |
| Light Color | RGB |
| OLED Display | 0.96 inch |
| UPS Hat | UPS Plus (18650 battery support) |
| GPIO Expansion | GPIO 1 to 2 Edge Extension |
9. Official Product Video
Video 9.1: Official product video demonstrating the assembly and features of the GeeekPi Mini Tower UPS Kit for Raspberry Pi 4B. This video provides a visual guide to the components and their integration.
10. Warranty and Support
For warranty information, technical support, or further assistance, please contact GeeekPi customer service through their official website or the platform where the product was purchased. Keep your proof of purchase for warranty claims.