
RLAARLO 2.4GHz Remote Controller
RLAARLO 2.4GHz RC Transmitter User Manual
Model: 2.4GHz Remote Controller
1. Introduction
Thank you for purchasing the RLAARLO 2.4GHz RC Transmitter. This remote controller is designed for use with RLAARLO 1:14 RC Crawler, Truck, and Car models, providing reliable and precise control. Please read this manual thoroughly before operating the transmitter to ensure proper use, optimal performance, and safety.
2. Safety Information
- Always ensure the transmitter batteries are fully charged or replaced before each use.
- Never operate your RC vehicle in public streets, near people, or in areas where it could cause damage or injury.
- Keep the transmitter away from water, moisture, and extreme temperatures.
- Do not attempt to disassemble or modify the transmitter. This may void the warranty and cause malfunction.
- Store the transmitter in a dry, cool place when not in use.
- This product is recommended for users aged 6 years and up. Adult supervision is advised for younger users.
3. Package Contents
Please check the package contents to ensure all items are present:
- 1 x RLAARLO 2.4GHz Remote Control Transmitter
Note: Batteries for the transmitter (4x AA) are not included and must be purchased separately.
4. Product Overview
Familiarize yourself with the components of your RLAARLO 2.4GHz RC Transmitter:
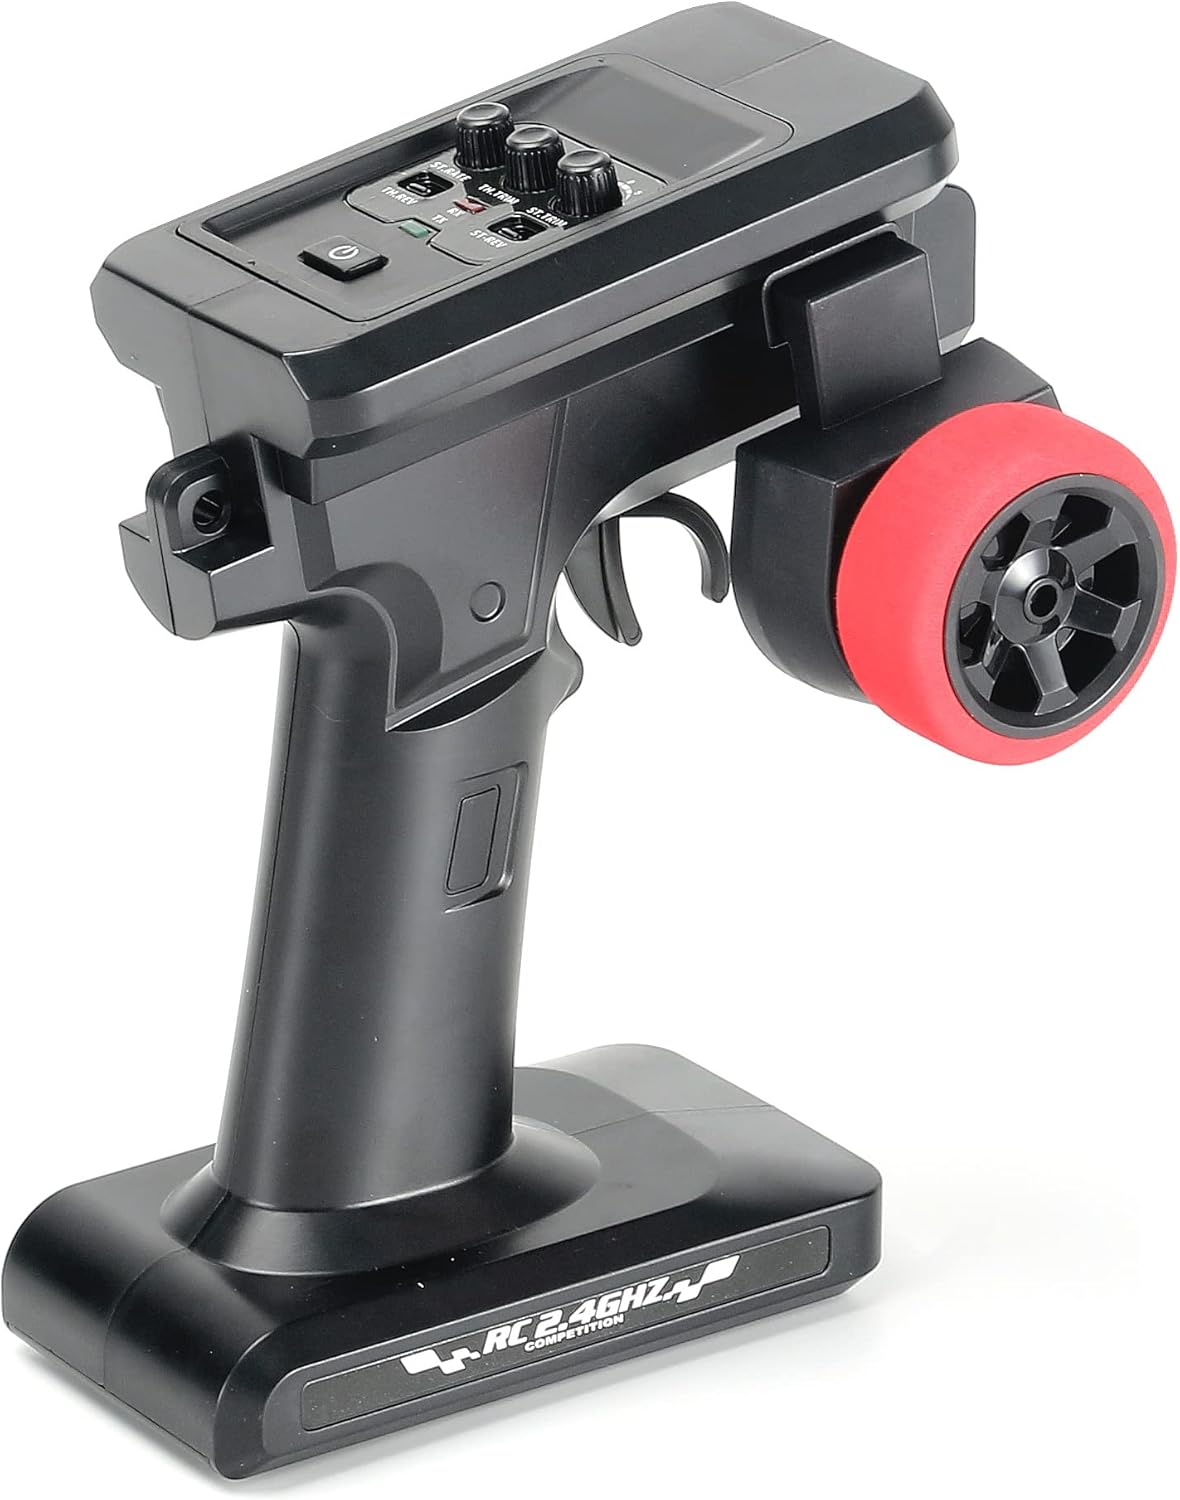
Figure 4.1: RLAARLO 2.4GHz RC Transmitter. This image shows the full transmitter unit, highlighting the ergonomic grip, the red foam-covered steering wheel on the side, and the control panel on top with various adjustment knobs and buttons.
Key Components:
- Steering Wheel: Located on the side, controls the left and right steering of the vehicle. Features a red foam grip for comfort.
- Throttle Trigger: Located under the handle, controls forward and reverse movement. Pull for forward, push for reverse/brake.
- Power Button: On the top panel, used to turn the transmitter ON/OFF.
- ST.TRIM Knob: (Steering Trim) Adjusts the neutral position of the steering. Use if the vehicle pulls to one side when the steering wheel is centered.
- TH.TRIM Knob: (Throttle Trim) Adjusts the neutral position of the throttle. Use if the vehicle creeps forward or backward when the throttle trigger is at neutral.
- ST.REV Switch: (Steering Reverse) Reverses the steering direction. Flip if the vehicle steers left when you turn the wheel right.
- TH.REV Switch: (Throttle Reverse) Reverses the throttle direction. Flip if the vehicle moves backward when you pull the trigger forward.
- D/R Knob: (Dual Rate) Adjusts the maximum steering angle. Turn to limit or increase the steering throw.
- CH3 Knob: (Channel 3) Provides control for an auxiliary third channel, if supported by your RC vehicle's receiver (e.g., lights, winch).
- Battery Compartment: Located at the bottom of the handle (not visible in image, but standard location), holds 4x AA batteries.
5. Setup
5.1 Battery Installation
- Locate the battery compartment cover on the bottom of the transmitter handle.
- Slide or unclip the cover to open the compartment.
- Insert 4 new AA batteries, ensuring correct polarity (+/-) as indicated inside the compartment.
- Replace the battery compartment cover securely.
5.2 Binding the Transmitter and Receiver
The transmitter and receiver are typically pre-bound from the factory. If you need to re-bind or bind to a new receiver, follow these general steps. Refer to your RC vehicle's manual for specific receiver binding instructions, as procedures can vary.
- Ensure both the transmitter and the vehicle's receiver are powered OFF.
- Place the transmitter and receiver close to each other (within 1 meter).
- Turn ON the transmitter first.
- Power ON the receiver (usually by connecting the vehicle's battery).
- Locate the "BIND" button or port on your receiver. Press and hold the bind button, or insert a bind plug into the bind port.
- The receiver's LED should flash, indicating it's in binding mode.
- Release the bind button/remove the bind plug once the LED becomes solid, indicating a successful bind.
- Turn OFF both the transmitter and receiver, then turn them ON again to confirm the bind.
6. Operating Instructions
6.1 Basic Controls
- Steering: Turn the steering wheel clockwise to steer right, counter-clockwise to steer left.
- Throttle: Pull the trigger towards the handle for forward movement. Push the trigger away from the handle for reverse movement or braking.
6.2 Adjusting Trims and Reverses
- ST.TRIM (Steering Trim): If your vehicle drifts left or right when the steering wheel is centered, adjust this knob in small increments until the vehicle tracks straight.
- TH.TRIM (Throttle Trim): If your vehicle creeps forward or backward when the throttle trigger is at neutral, adjust this knob until the vehicle remains stationary.
- ST.REV (Steering Reverse): If the steering direction is opposite to your input (e.g., turning wheel left makes vehicle go right), flip this switch.
- TH.REV (Throttle Reverse): If the throttle direction is opposite to your input (e.g., pulling trigger makes vehicle go backward), flip this switch.
- D/R (Dual Rate): Use this knob to adjust the sensitivity or maximum throw of the steering. A lower setting reduces the steering angle, useful for high-speed driving or beginners. A higher setting provides maximum steering angle for tighter turns.
- CH3 (Channel 3): This knob controls the third channel. Its function depends on your RC vehicle's setup (e.g., controlling lights, a winch, or other accessories). Refer to your vehicle's manual for specific CH3 functionality.
7. Maintenance
- Cleaning: Use a soft, dry cloth to clean the transmitter. Avoid using solvents or harsh chemicals.
- Storage: When not in use for extended periods, remove the batteries from the transmitter to prevent leakage and damage. Store the transmitter in a cool, dry place, away from direct sunlight.
- Battery Care: Always use fresh, good quality AA batteries. Do not mix old and new batteries, or different types of batteries.
8. Troubleshooting
| Problem | Possible Cause | Solution |
|---|---|---|
| Transmitter does not power on. |
|
|
| Vehicle does not respond to transmitter. |
|
|
| Vehicle steers incorrectly or drifts. |
|
|
| Vehicle moves without throttle input. |
|
|
9. Specifications
| Brand | RLAARLO |
| Model | 2.4GHz RC Transmitter (ASIN: B09M6JX3KV) |
| Package Dimensions | 11.1 x 8.98 x 4.17 inches |
| Item Weight | 9.6 ounces |
| Recommended Age | 6 years and up |
| Manufacturer | RLAARLO |
10. Warranty and Support
Information regarding product warranty and customer support is not provided in this manual. For warranty details or technical assistance, please refer to the product packaging, the seller's website, or contact RLAARLO customer service directly through the platform where the product was purchased.
Ask a question about this manual
Ask about setup, troubleshooting, compatibility, parts, safety, or missing instructions. Manuals+ will review the question and use this page’s manual context to help answer it.