
1. Important Safety Information
Please read all safety instructions carefully before using the device.
- Always ensure the silicone sleeve is tightly on the ear pick before use to prevent scratching the ear canal.
- Do not attempt to break the ear pick with your hands.
- Children should only use the Visual Ear Endoscope under adult supervision.
- Not recommended for children under 6 years old or for use on pets that are moving.
- Keep the product out of reach of children.
- For first-time users, approach the ear canal gently and slowly.
- Always follow the user manual for your first use.
- Do not use metal ear picks directly to clean earwax without a silicone cover.
- Charge the product using a regular 5V1A charging plug.
- Do not use the product while charging.
- Do not place the product near a fire source.
- Do not charge the product continuously for more than 1.5 hours.
2. Product Overview
The LEIPUT Ear Wax Removal Tool is an advanced ear cleaning kit featuring a 1080P HD camera and 6 LED lights, designed to provide a clear view of the ear canal for effective and safe earwax removal. It includes various silicone ear spoons for different ear canal shapes and is compatible with both iOS and Android devices.

Image: The LEIPUT Ear Wax Removal Tool, showing the main device, a smartphone displaying the ear canal view, various ear spoons, and charging cables.
3. Package Contents
Your LEIPUT Ear Wax Removal Kit includes the following items:
- Earwax Removal Kit with Light (1 unit)
- Silicone Earplug Cover (5 units)
- Earplug Cover Storage Bottle (1 unit)
- Traditional Ear Scoop Kit (7 units)
- Charging Cable (1 unit)
- Instruction Manual (1 unit)

Image: A visual representation of the earwax removal kit contents, including the main device, various ear picks, and silicone covers.
4. Setup Guide
4.1. Charging the Device
Before first use, fully charge the device. Connect the provided Type-C charging cable to the device's charging port and a 5V1A USB power adapter (not included). The charging indicator will show the charging status.
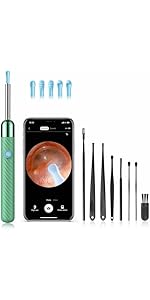
Image: Close-up of the Type-C charging port on the LEIPUT ear cleaner device.
4.2. App Download and Installation
To use the camera feature, you need to download the companion application on your smartphone or tablet.
- Scan the QR code provided in the physical instruction manual or search for the designated app name (usually mentioned in the manual) in your device's app store (App Store for iOS, Google Play Store for Android).
- Download and install the application.
- Grant necessary permissions to the app, especially access to your device's Wi-Fi and photo/video album if you wish to save media.
4.3. Connecting to Your Device
- Press and hold the power button on the ear cleaner device to turn it on. The indicator light will illuminate.
- On your smartphone or tablet, go to your Wi-Fi settings.
- Locate and connect to the Wi-Fi network broadcast by the ear cleaner device. The network name typically starts with a specific prefix (e.g., 'LEIPUT-XXXX'). No password is usually required.
- Open the installed companion application. The camera feed from the ear cleaner should now be visible on your screen.

Image: The ear cleaner device shown alongside smartphones and tablets, illustrating its wide compatibility with iOS and Android devices and the live camera feed.
5. Operating Instructions
5.1. Attaching Ear Spoons
The kit includes various silicone ear spoons with different curvatures (high arc, middle arc, low arc) to suit individual needs. Always attach a silicone ear spoon cover to the tip of the device before insertion into the ear canal.
- Select the desired silicone ear spoon.
- Carefully slide the silicone ear spoon over the metal tip of the ear cleaner until it is securely and tightly fitted. Ensure it does not easily detach.

Image: An illustration demonstrating the 'All-In-One Design Ear Cleaner' with different ear spoon curvatures (high, middle, low arc) and how they attach to the device.
5.2. Using the Ear Camera and Ear Spoon
With the device connected and the app open, you can now view your ear canal.
- Gently and slowly insert the ear cleaner tip into your ear canal while observing the live feed on your smartphone.
- Use the camera to locate earwax buildup. The 1080P HD camera and 6 LED lights provide a clear, illuminated view.
- Carefully maneuver the silicone ear spoon to scoop or dislodge earwax. Always move slowly and avoid pushing wax deeper into the ear canal.
- The app may offer options to take photos or record videos of your ear canal. These will be stored in the app's album and can be saved to your phone's gallery if permissions are granted.
- If the image appears inverted, check the app settings for a 'Right ear' or 'Left ear' option to correct the orientation.

Image: A detailed view of the 1080P HD camera lens components, highlighting the clarity and resolution for viewing the ear canal.

Image: A comparison showing the LEIPUT device with 6-axis gyroscope for safe ear cleaning versus unsafe methods like fingers, cotton swabs, or pliers.
6. Maintenance and Care
6.1. Cleaning the Device
The otoscope, ear spoon, and lens are IP67 waterproof, allowing for easy cleaning.
- After each use, remove the silicone ear spoon.
- Clean the silicone ear spoon and the lens tip with water or wipe with alcohol cotton.
- Ensure the device is completely dry before storing.
- Do not immerse the entire otoscope in water.

Image: The IP67 waterproof camera lens of the ear cleaner being rinsed under water, demonstrating its water resistance for cleaning.
6.2. Charging and Battery Life
The device has a built-in 350mAh rechargeable battery.
- A full charge provides approximately 90 minutes of continuous use.
- Standby time can be up to 30 days.
- Charge using a 5V1A charging plug. Do not charge for more than 1.5 hours continuously.
7. Troubleshooting
| Problem | Possible Cause | Solution |
|---|---|---|
| Cannot connect to the device's Wi-Fi. | Device is off, Wi-Fi not enabled, or incorrect network selected. | Ensure the device is powered on. Go to your phone's Wi-Fi settings and manually select the device's Wi-Fi network. Restart both the device and your phone if necessary. |
| No image or black screen in the app. | Device not connected, app permissions missing, or device battery low. | Verify Wi-Fi connection. Check app permissions for camera access. Charge the device fully. Restart the app. |
| Image appears inverted or mirrored. | Incorrect orientation setting in the app. | Look for an orientation setting within the app, often labeled 'Left ear'/'Right ear' or a rotation icon, to correct the view. |
| Silicone ear spoon keeps falling off. | Sleeve not properly attached or damaged. | Ensure the silicone sleeve is pushed on tightly. Replace with a new sleeve if it is worn or damaged. |
| Device not charging. | Faulty cable, adapter, or charging port. | Try a different 5V1A USB adapter and charging cable. Ensure the cable is fully inserted into the Type-C port. |
8. Specifications
| Feature | Detail |
|---|---|
| Model Number | X6 |
| Camera Resolution | 1080P HD |
| LED Lights | 6 |
| Battery Capacity | 350mAh Lithium Polymer (included) |
| Usage Time | Approx. 90 minutes (fully charged) |
| Charging Port | Type-C |
| Waterproof Rating | IP67 (lens and ear spoon) |
| Product Dimensions | 15.75 x 15.75 x 11.81 inches |
| Item Weight | 3.88 ounces |
| Compatibility | iOS and Android devices |
9. Warranty and Support
LEIPUT products are manufactured to high-quality standards. For any questions, technical support, or warranty claims, please refer to the contact information provided with your purchase or visit the official LEIPUT website. Please retain your proof of purchase for warranty purposes.